Introduction
Sending year end statements is an important task when reviving gifts from donors. Donors can use this information for tax purposes and would need it prior to filing their taxes. Donors can access their own statements through the User Center, however CharityEngine suggests sending a reminder to donors and informing them on how to receive their statement if they do not know how to do so. Organizations can also leverage CharityEngine to create and execute mail and email templates for donor delivery and notification. 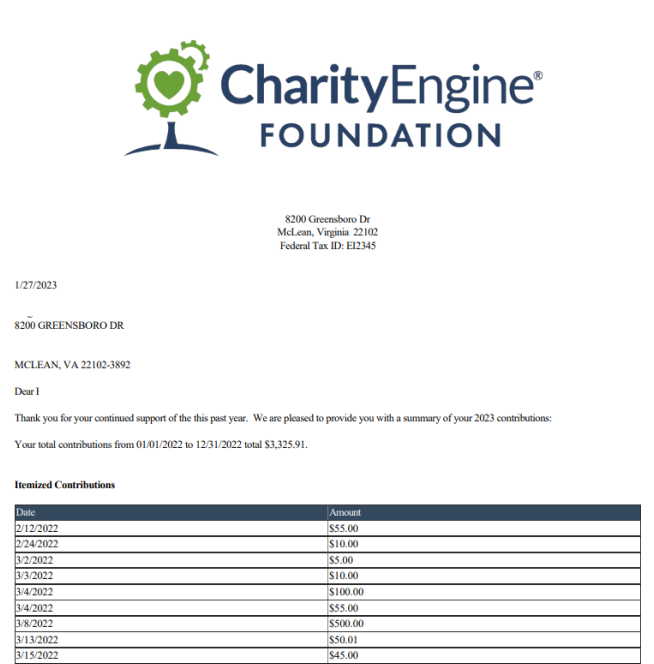
Table of Contents
Prerequisites
Note: Only people and organizations contacts will have access to the user center, households are excluded from access. If the organization wishes to send year end statements to households, CharityEngine recommends sending manually (via letter or email). For assistance in sending these statements manually, read this article.
Why, When, and What to Include
Sending end-of-year tax acknowledgments for nonprofit donations is an important part of maintaining transparency, building trust with donors, and ensuring compliance with tax regulations. Here, we will cover the basics of why, when, and what to include when sending these acknowledgments:
Why to send an end of year tax acknowledgement?
- Legal Requirement: Nonprofits are generally required to provide written acknowledgment of donations of $250 or more to donors for them to claim tax deductions.
- Donor Appreciation: Acknowledgments show appreciation for donors' support, encouraging them to continue their contributions.
- Record Keeping: It helps both the nonprofit and donors maintain accurate records for tax purposes.
So when do you send tax acknowledgments?
- Year-End: Tax acknowledgments are typically sent at the end of the calendar year, shortly after a donor makes their final calendar year contribution.
- Timeliness: Acknowledgments should be sent promptly to allow donors to use them for their annual tax filings. This is usually within a few weeks of receiving the final, end of year donations.
What is needed or recommended in a tax acknowledgement?
- Include Required Information include the nonprofit's name and contact information.
- Tax ID: Include the nonprofit's Employer Identification Number (EIN) to help donors with their tax filings.
- Donor's name and contact information.
- Date of the donation - or time-frame if a total dollar sum.
- If providing transactional detail, the amount of the donation.
- A statement that no goods or services were received in exchange for the donation (if applicable).
- Noncash Donations: If the donation includes noncash items (e.g., clothing, household items), include a description of the items donated but without assigning a specific value.
- Express Gratitude: Include a thank-you message to show appreciation for the donor's support.
- Signature: The acknowledgment should be signed by an authorized representative of the nonprofit.
- Delivery Method:
- Physical letters can be sent through the mail.
- Email acknowledgments are common; however, you should ensure the donor's consent for electronic communication.
- Online portals or platforms can also be used for acknowledgment delivery such as CharityEngine’s User Center.
- Retain Copies: Keep copies of all acknowledgments for your organization's records, in case they are needed for audits or donor inquiries.
- Thank You Letters: While tax acknowledgments serve a legal and tax purpose, consider sending separate thank-you letters or emails expressing your appreciation to donors. These can be more personal and heartfelt.
- Stay Updated: Be aware of any changes in tax regulations and adjust your acknowledgment procedures accordingly.
- Customize to Your Needs: Tailor your acknowledgment process to the specific needs and preferences of your nonprofit and its donors.
Remember that specific rules and regulations regarding tax acknowledgments can vary by country and region, so it's essential to consult with a tax professional or legal counsel to ensure compliance with local laws and best practices.
How Can CharityEngine Help Your Non-Profit with End of Year Tax Acknowledgements?- When creating, producing and sending end of year tax acknowledgements, CharityEngine can be leveraged to identify your audience, create templates, and produce/deliver these statements while also recording the delivery practice and message directly within the donor's contact record.
Instructions - Creating an End of Year Tax Acknowledgement Template
CharityEngine offers users multiple channels and paths to deliver end of year tax acknowledgements. Organizations can select the method that is best suited for their constituent population and/or standard operating procedures.
Options include:
1. Send Statement Feature within the Donations App: Allowing users to bulk select constituents for creating and sending statements via email or print
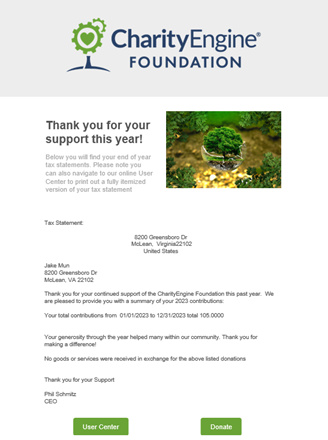
2. Online User Center Feature within the Online App: Allows users to leverage email to route donors to the User Center to self-service and download End of Year Tax Statements
3. Email/Mail Blast Feature within the Campaigns App: Allows users the flexibility to craft custom creatives and leverages queries to present custom tokens
If using the Send Statement or Online User Center features, users can leverage out of the box statement templates or craft custom statement templates. This will be the first step needed for these two features. Below you will find instructions on how to create each of these templates.
Send Statement Tool Templates
CharityEngine has already created a statement template that can be used in the Send Statements tool in the Transaction Application. This template contains tokens and tables to make it easier for you to send these statements out to your donors via the Send Statements tool and will show itemized transactions in the statement, just as they would in the User Center.
The out of the box statement template is called Tax Statement with all Details. This can be used as is, however, if the organization wishes to customize/edit, leverage the steps below to create a new custom statement template and customize using the out of the box statement template.
To duplicate the out of the box template, navigate to the Configuration Application and under the Design and Messages section, click on Templates.
Search for the statement called "Tax Statement with all Details".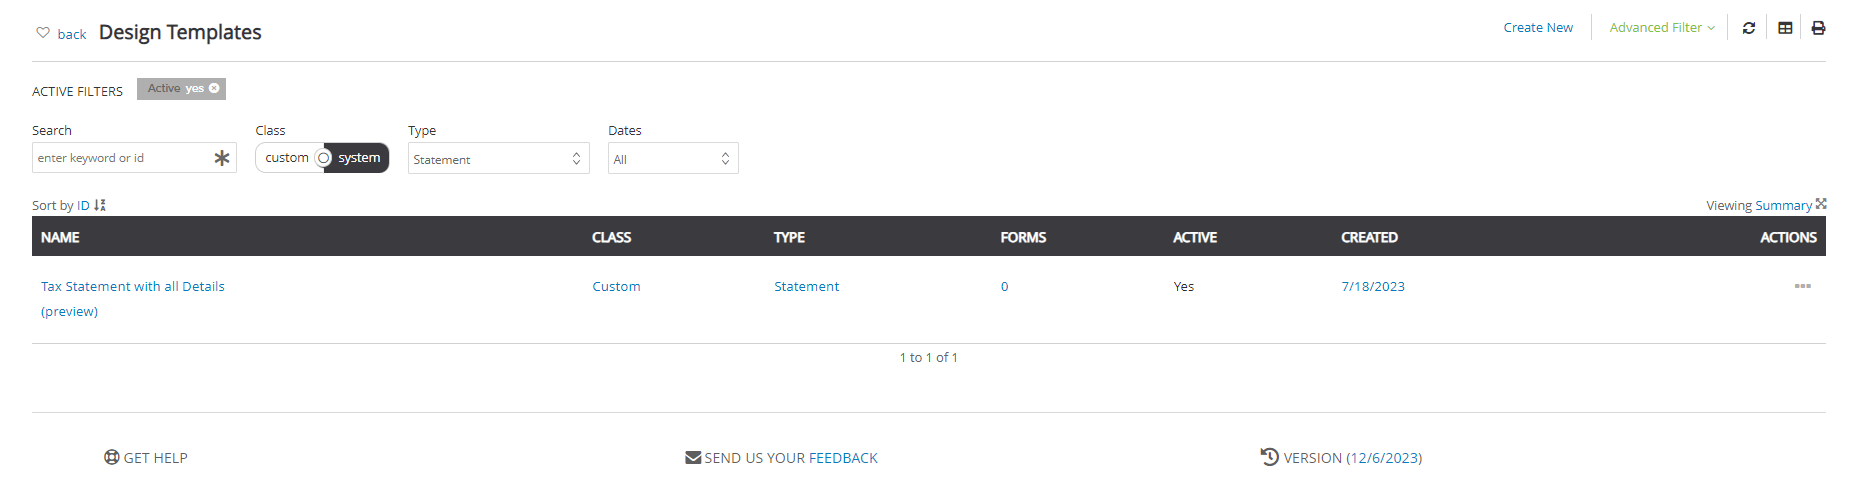
Under Action, click on Duplicate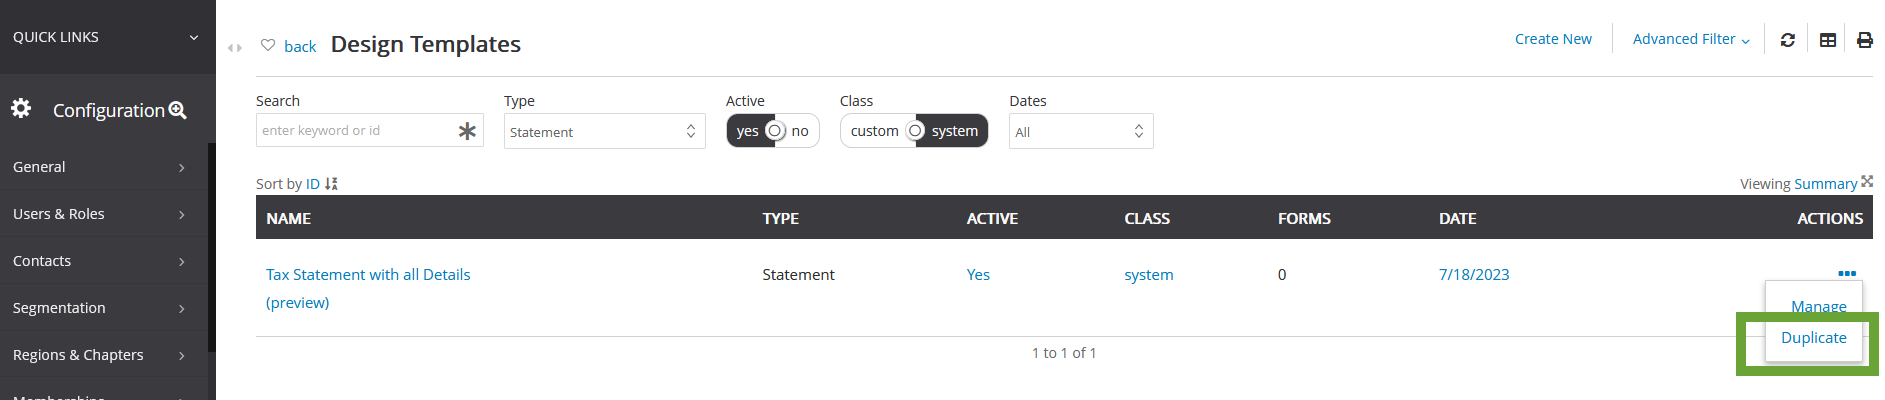
On the Message Content tab, you will see all of the content that CharityEngine has already created, but you can add any additional content to the template to personalize and make on brand with your organization.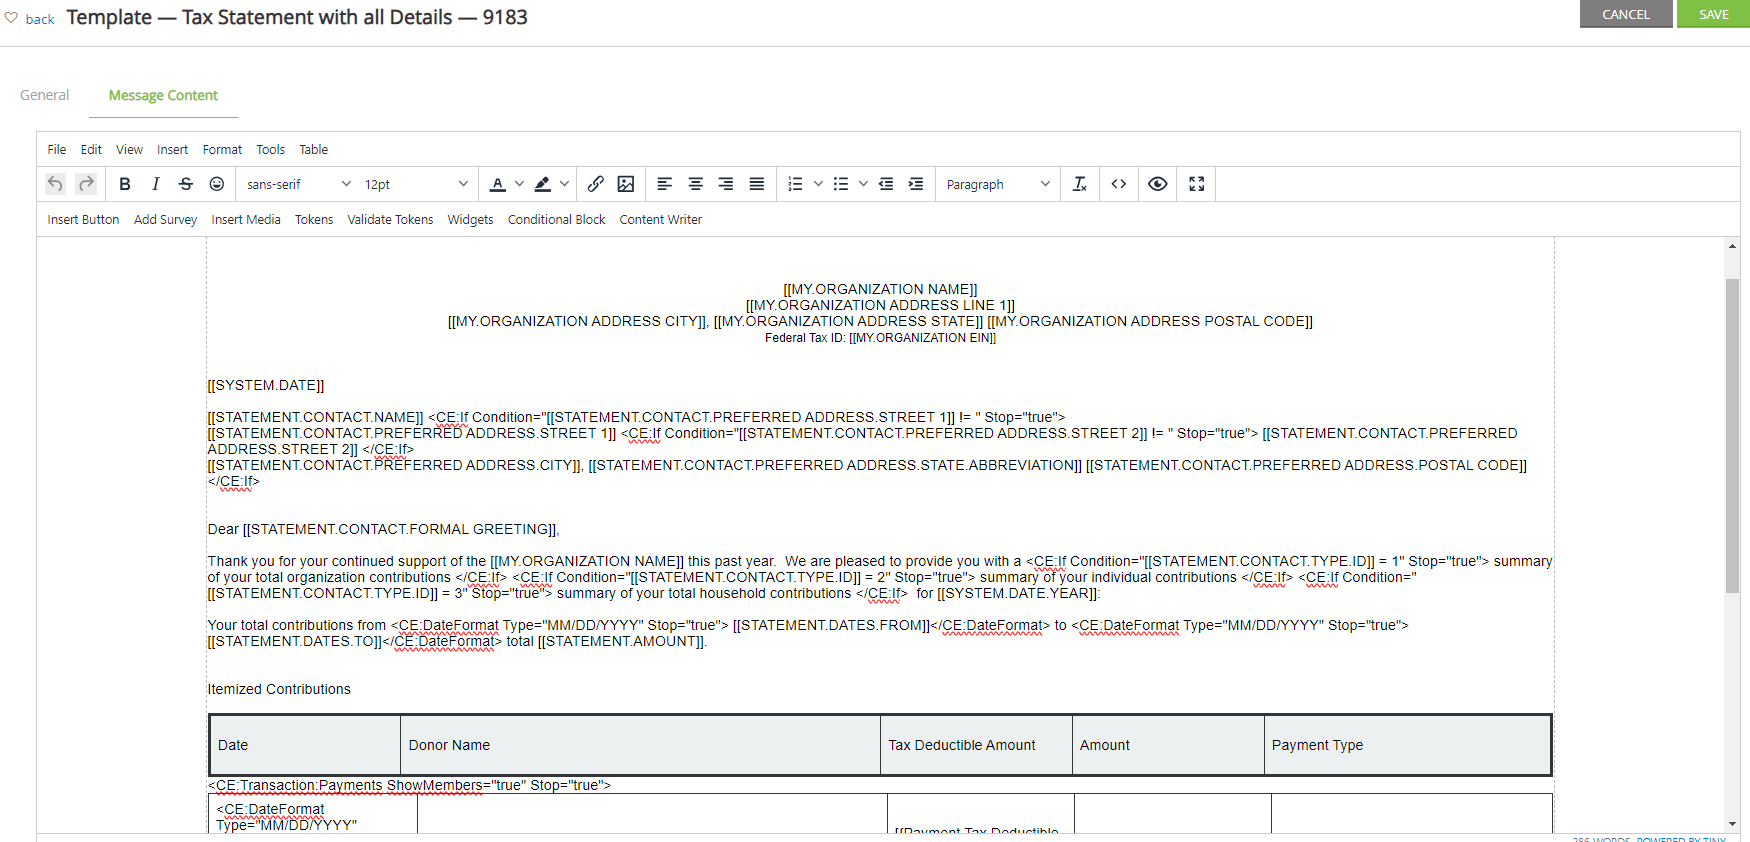
Note: This statement template already contains tokens that will populate donations made from any member of a household if you are sending the statements to households. If you send statements to both households and individuals, you may want to make an additional template for direct giving. To make this modification, change the payment widget already in the template to show members to false. Below you can see where this widget lives in the template. Currently it states ShowMember="true", you will want to change true to false in order to only show direct giving. This is not required to do, however if you are sending to households and you only want to show direct giving that does not include the members contributions, you will need to make these adjustments.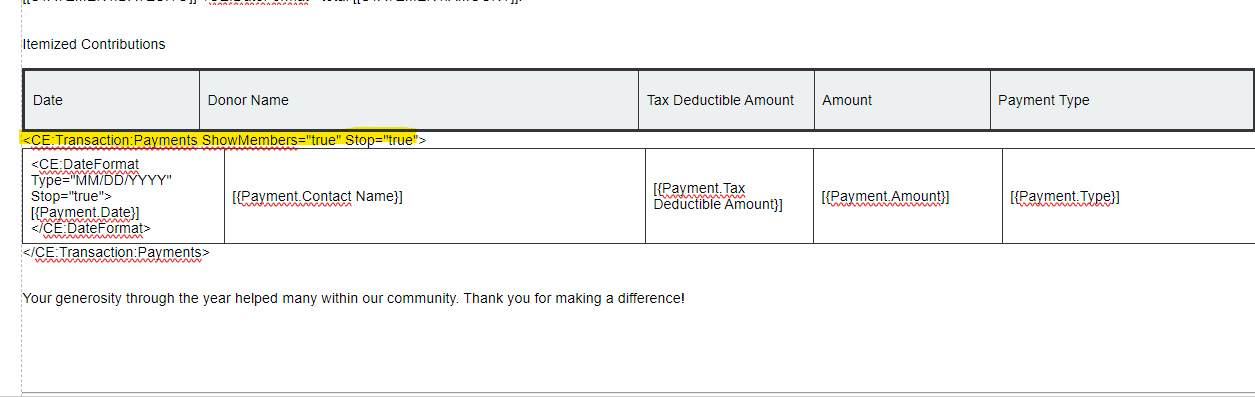
If using the Statement Template, please proceed next to "Instructions - Sending Statements through Statements Tool" as the audience will be created/selected through the Statement listing screen.
User Center Tool Template
If you are utilizing the User Center for your donors to print out their tax statements, you can create a template in the Design & Messages section of the Configuration Application.
Step 1: Navigate to the Configuration Application > Design & Messages > Templates > Create New
Step 2:
-
- Name your template (required)
- Select Type = Statement from the drop down
- Set Active to yes
- Optional, create Description
- Click SAVE
-
- Search Statement to locate all End of Year Statement systemic tokens to enter into your template
- Pro Tip: Click on the Validate Tokens to ensure any tokens used are confirmed
Step 4: Use the CE: Transactions: Payments Widget. Click on Widgets in the tool bar and then select the widget and then click on insert to insert the widget into your template. This is what will populate the line item detail of the transactions and dates for the donor.
Below you will find an example of what a statement template could look like
 8200 Greensboro Dr McLean, Virginia 22102 Federal Tax ID: 61-1727716 4/16/2024
[[statement.contact.name]] [[statement.contact.preferred address.street 1]] [[statement.contact.preferred address.city]], [[statement.contact.preferred address.state.abbreviation]] [[statement.contact.preferred address.postal code]] Dear [[statement.contact.formal greeting]], Thank you for your continued support of the [[statement.contact.organization.name]] this past year. We are pleased to provide you with a summary of your 2024 contributions: Your total contributions from
Your generosity through the year helped many within our community. Thank you for making a difference! |
Email Blast Templates
If you are sending your statements via CharityEngine Campaign Application, you can still create a template for your email prior to sending to your donor list. This will help you work out the kinks and create a template that can be used in the future.
Step 1: Navigate to Campaigns > Create & Publish > Creatives > Create New
Step 2: Create your Email that contains all of the needed tax information previously discussed. You can use global tokens here, but you will also most likely need to use custom tokens that will populate data form your queries. To do this hover over the field in the query and then insert the token exactly how it appears. Below you can see that the token for the contact Id field being used in the query is "Contact Person Household.Contact Id" to use this as a token you would insert [[contact person household.contact id]] into your email.
Step 3: Once you have your email configured the way you want it, click Save.
Step 4: After you click Save, click on the dropdown arrow next to Save and click on Save as Template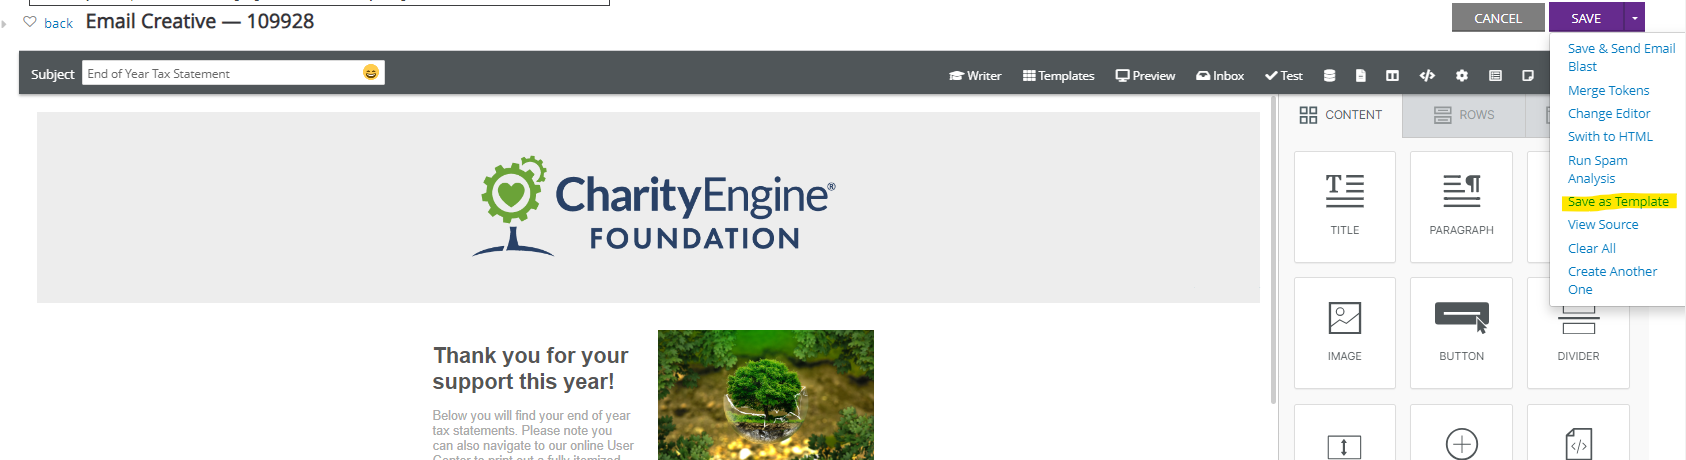
Once saved as a template, you will be able to click on Templates in the Tool Bar of the email and populate the template for future use.
Instructions - Gathering the Audience
As a next step, it will be important to gather the audience the organization plans to communicate with. Important considerations when determining the data needs will include:
- Will the organization present the total amount giving in the calendar year? Or will the organization present transaction line item detail?
- Does the organization leverage Households with Head of Household/Spousal/Other Member attributions?
- If yes, will the organization plan to send an acknowledgement once to the Household - or will the organization send to the household and each individual member of the household?
- What data will be needed to support your tax acknowledgement template? Consider:
- Formal Salutation
- First Name/Last Name
- Mailing details (including country code)
- Preferred email address
- Total giving summary for the last calendar year
- Transaction details including date, amount, payment method
Take a moment to outline the data elements which will be needed to support the organization's template. Consider all system and/or custom tokens that have been included in the tax acknowledgement template.
Below, organization's will find a few recommended steps when using queries to pull the audience and details. While these are used for demonstration purposes, be sure to add the needed data elements important to the non-profit's end of year tax acknowledgement.
Note: Audience creation will only be needed if the organization has decided to send customized content via Email Blast or Mail Blast. Organizations using the Send Statement feature should proceed to the section Instructions - Sending Statements through Statements Tool
Use Case: People & Organizations - Total Giving Last Calendar Year
The following use case can be used for people and organizations (excluding households - or people within a household if applicable). The giving dollar represent a total sum for the last calendar year.
Step 1: Access the Automation & Workflow App > General > Queries > Create New
Step 2: Select Filter: Contacts and Select: Contacts > CONTINUE
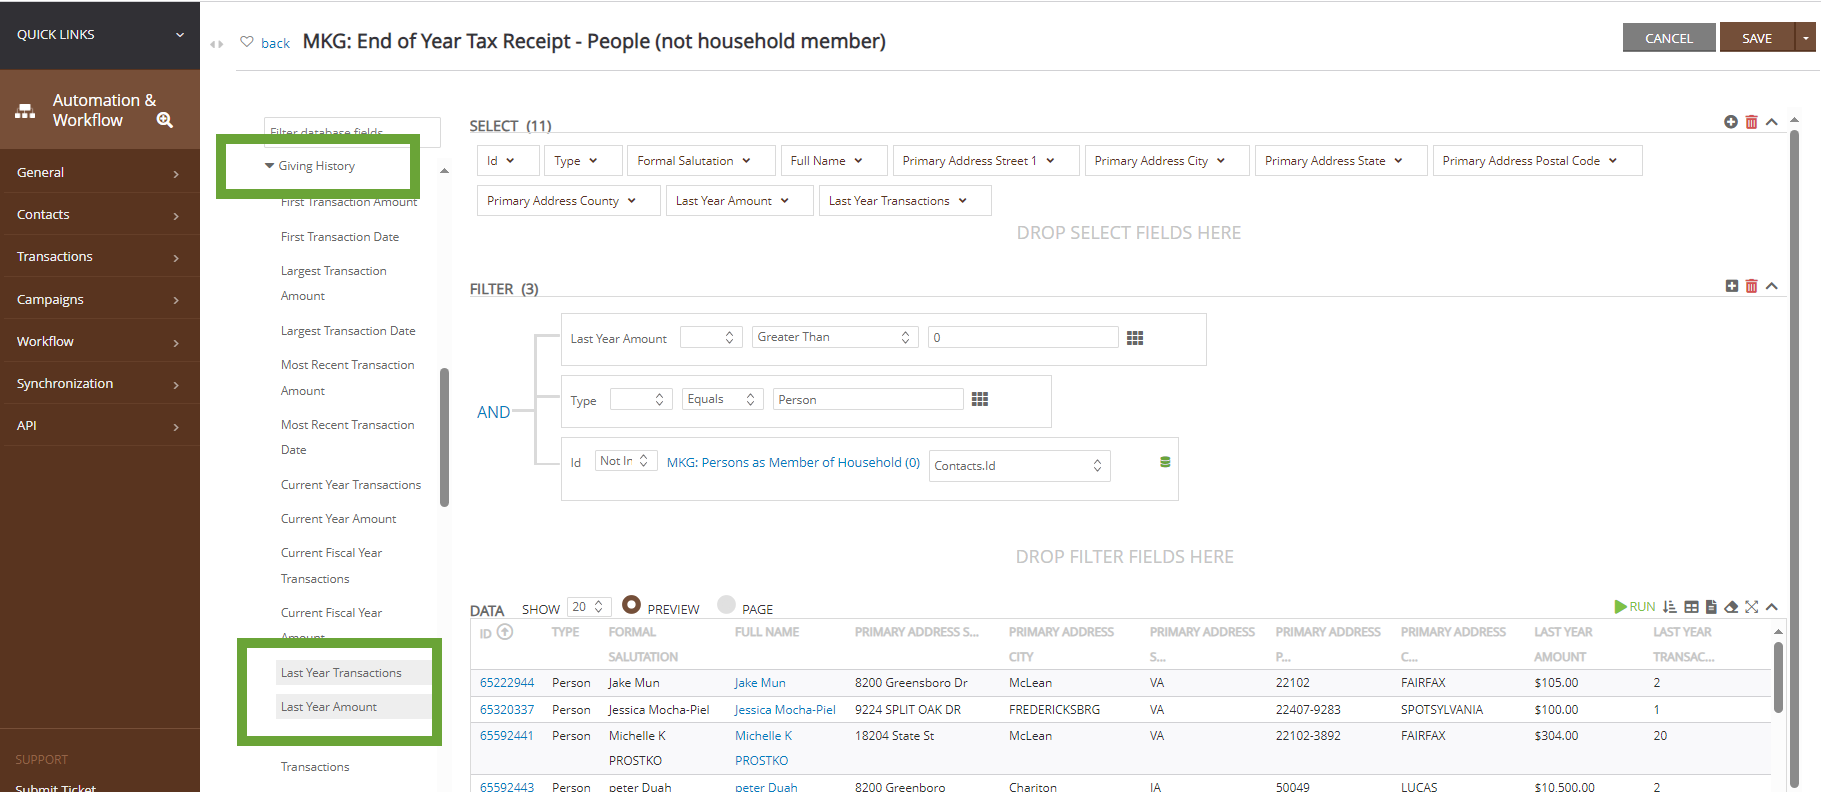
Step 3: In the SELECT area, add output fields needed for the end of year tax acknowledgement
-
- Pro Tip: Navigate on the left hand side to locate the Giving History sub-table to expose summarized giving details related to the contact id
- In this use case, the organization has included the contact id, the type of contact, formal salutation, full name, primary address line 1, primary address city, primary address state, primary address postal code, last year amount and last year transaction (count)
-
- In this example, the organization is filtering:
- Last Year Amount > $0.00 (excluding donors who did not give last year)
- Type = Person (excluding households and organizations)
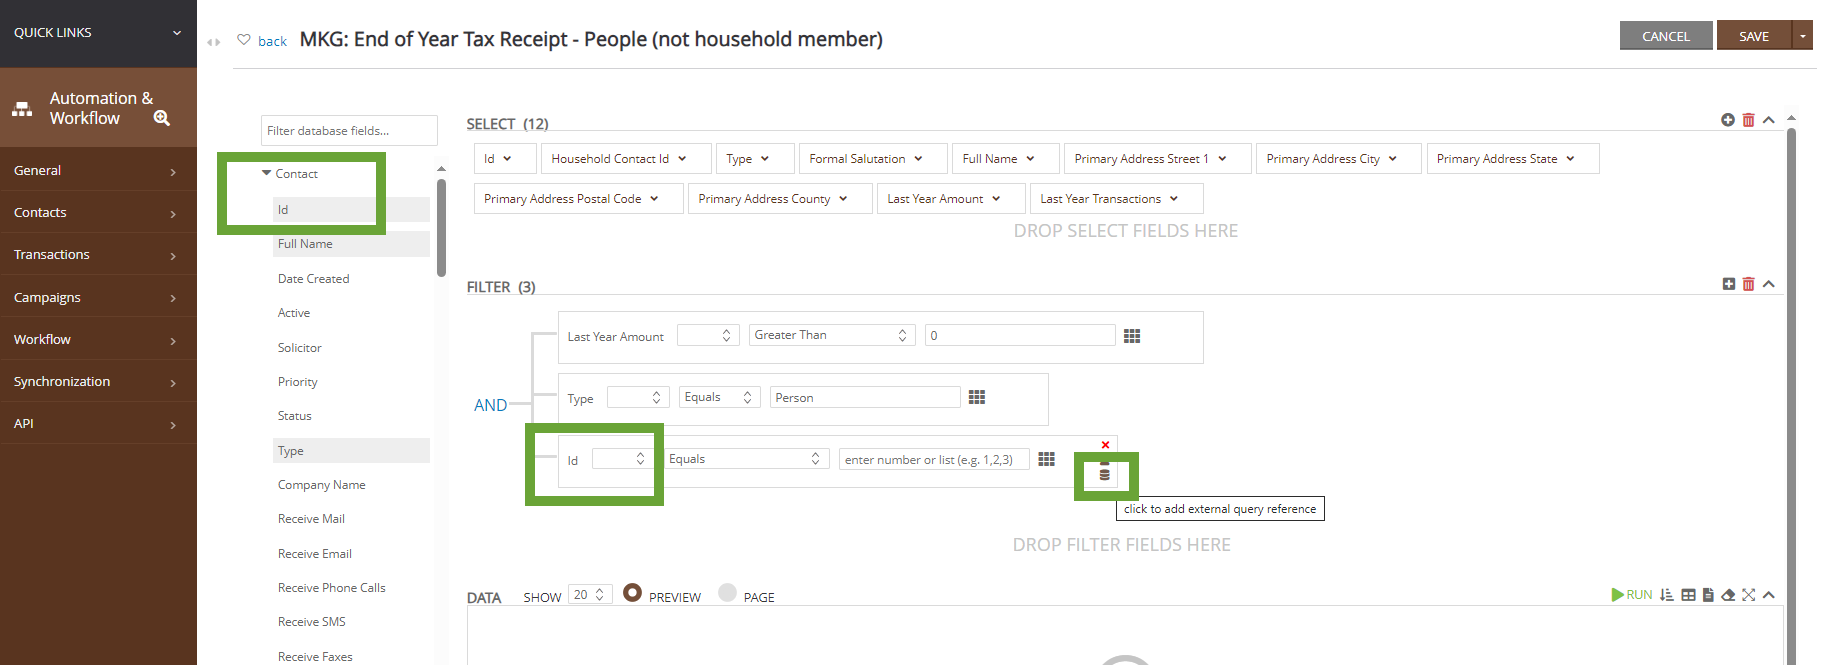
- ID Not Equal To Person Who Is A Member of Household
- Note: if the organization does not use households, this can be excluded
- If the organization does use households, see below for details on how/why to leverage this as a subquery - please establish the subquery as the first step)
- In this example, the organization is filtering:
-
- Note: As a best practice, always review and sample the data set to ensure executed counts, audience inclusion/exclusion. Consider donor IDs that should be included and those that should be excluded to ensure proper QA.
Use Case: Subquery to Exclude People Who Are Part of a Household
If your organization uses households as a contact type with associated members, you may decide that members of households should be excluded from other "People" type contacts. This assists in reducing expense by sending only one end of year tax acknowledgement to the household. See above for reference of people vs. household gift summaries.
Step 1: Access the Automation & Workflow App > General > Queries > Create New
Step 2: Select Filter: Contacts and Select: Contacts > CONTINUE
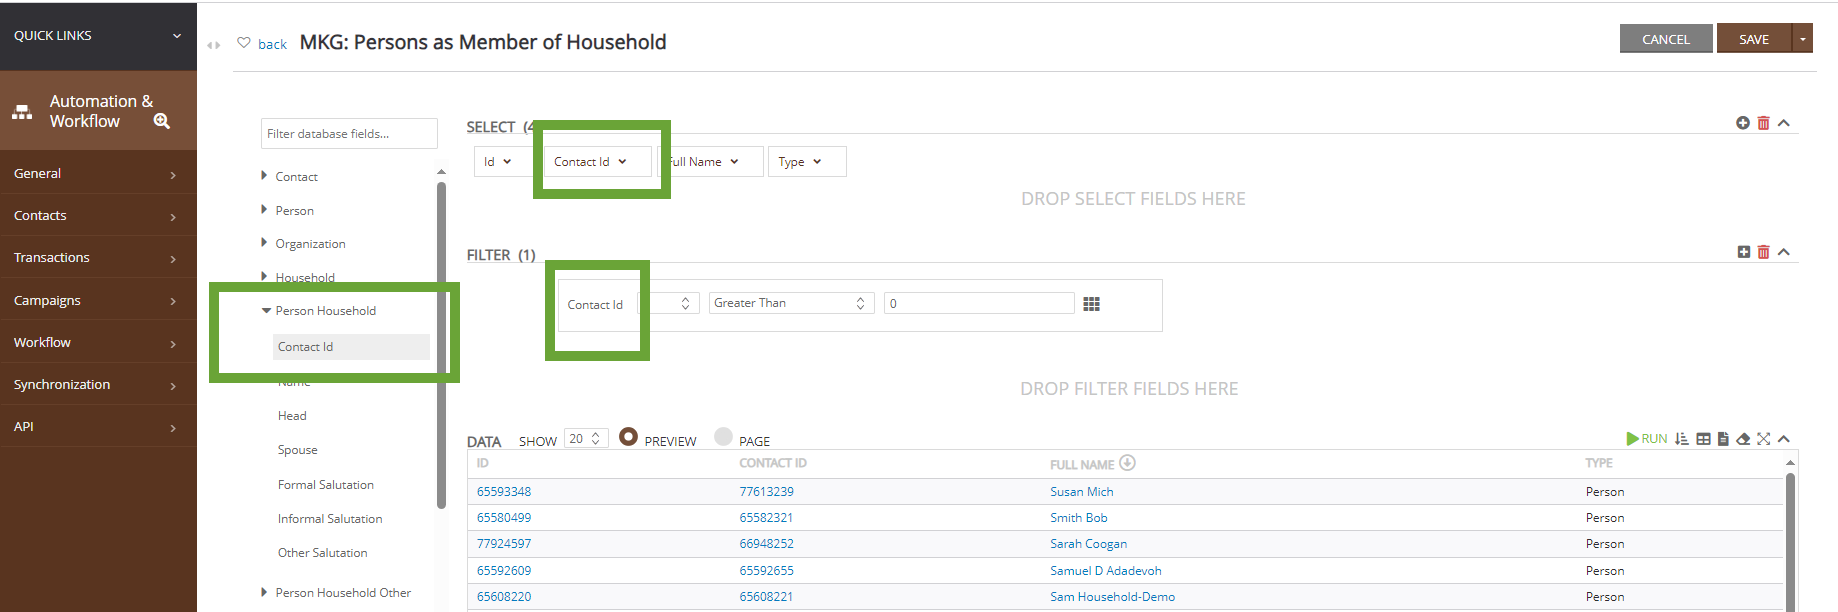
Step 3: In the SELECT area, add output fields needed for the end of year tax acknowledgement
-
- Pro Tip: Navigate on the left hand side to locate the Person Household sub-table to expose the Contact Id field
- In this use case, the organization has included the (Contact) Id, (Personal Household) Contact Id, (Contact) Full Name, (Contact) Type
- Note, as this is a subquery, keep SELECT fields limited to maximize speed of downstream queries. Objective of the subquery is to identify the contact id to be excluded as a subquery.
-
- In this example, the organization is filtering:
- (Person Household) Contact Id > 0 (including contacts who have an associated household contact id)
- In this example, the organization is filtering:
-
- Note: As a best practice, always review and sample the data set to ensure executed counts, audience inclusion/exclusion. Consider donor IDs that should be included and those that should be excluded to ensure proper QA.
Use Case: Households (Direct Contribution & Indirect Contributions by Household Members) - Total Giving Last Calendar Year
The following use case can be used for households and members of the household. The giving dollar represent a total sum for the last calendar year.
Step 1: Access the Automation & Workflow App > General > Queries > Create New
Step 2: Select Filter: Contacts and Select: Household > CONTINUE
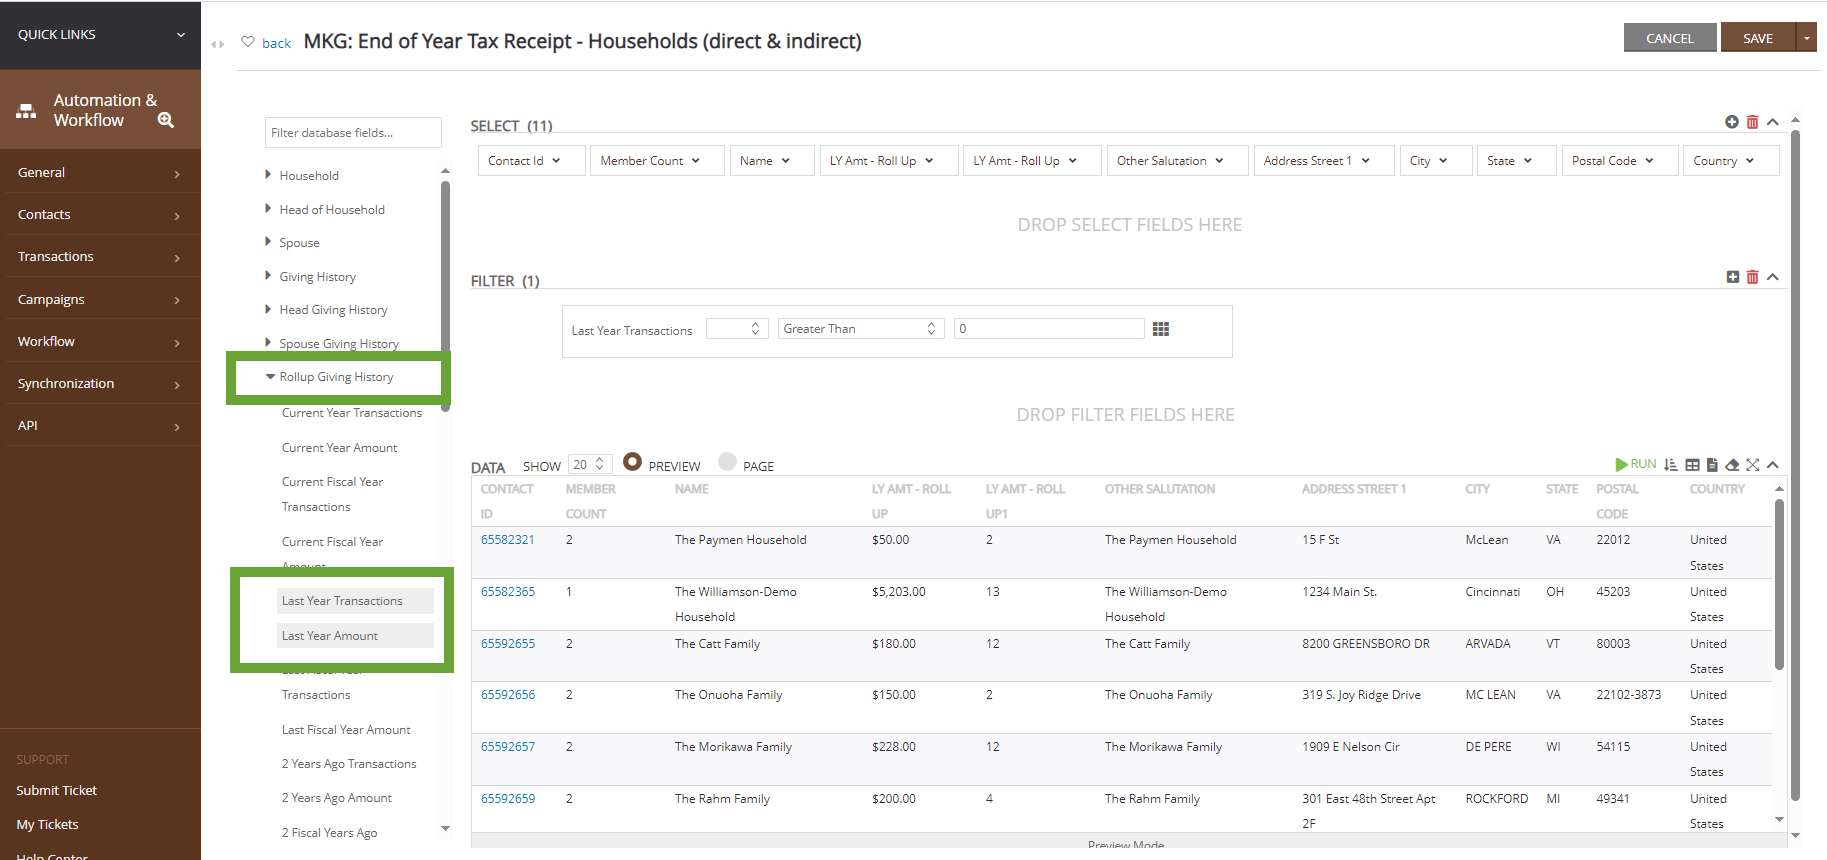
Step 3: In the SELECT area, add output fields needed for the end of year tax acknowledgement
-
- Pro Tip: Navigate on the left hand side to locate the Rollup Giving History sub-table to expose summarized giving details for the household and all members to the household contact id
- In this use case, the organization has included the contact id, household member count, household name, Last Year Amount (Rollup Giving History), Last Year Transactions (Rollup Giving History), primary address line 1, primary address city, primary address state, primary address postal code, country
-
- In this example, the organization is filtering:
- Last Year Amount (Rollup Giving History) > $0.00 (excluding households direct + members giving who did not give last year)
- In this example, the organization is filtering:
-
- Note: As a best practice, always review and sample the data set to ensure executed counts, audience inclusion/exclusion. Consider donor IDs that should be included and those that should be excluded to ensure proper QA.
Step 1: The first step in sending year end statements is creating a list of contacts, which can be done in query builder. This this list will need to contain all contacts who have donated within the past year.
-
- SELECT: Full Name and Primary Email Address
- FILTER: Date > use the beaker icon to select Last Year from the drop down
- SELECT: Full Name and Primary Email Address

Instructions - Executing the Tax Acknowledgement
Now that you have created your templates and gathered your audience, you can move on to actually sending the statements out to your donors
Instructions - Sending Statements through Statements Tool
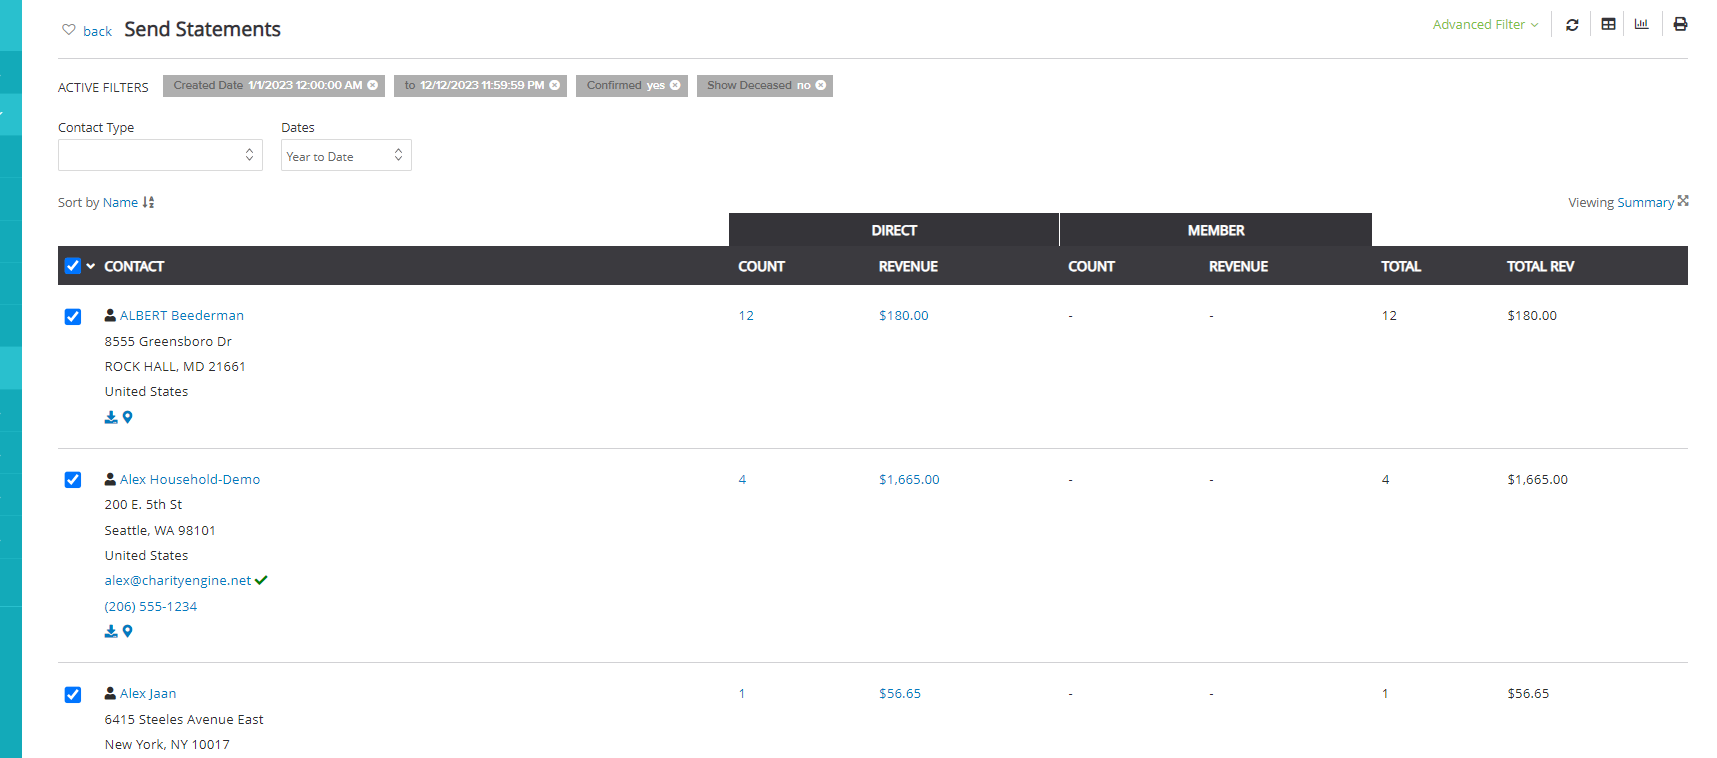
If you want to utilize the Send Statements feature, statements can be delivered via email or direct mail and contain itemized transaction details. Navigate to Donations App > Transactions > Show More > Send Statements and follow the below instructions:
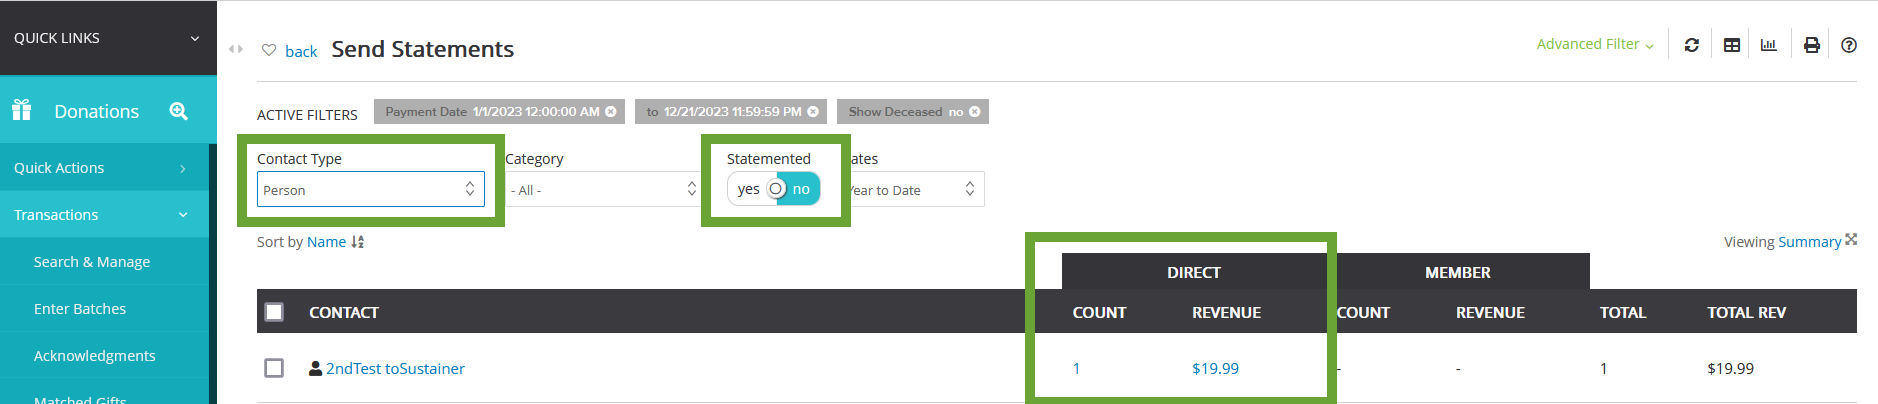
Step 1: Use the filters to find your audience
- Contact Type filter - This will allow you to filter by the content type.
- This is important if your organization utilizes households and wants to send statements directly to the household. You can filter by Household, Person, or Organization
- Dates filter - This will pull transactions by contact in the date range selected. Depending on when you are sending the statement, you will most likely use the Year to date or Last Year filters.
- Advanced Filters - You can further segment your contacts by using the advanced filters such as Payment Method or Receive Mail/ Email
- For example, if your organization wishes to exclude 'soft credit', use the Advanced Filter > Payment Method > and select all payment methods applicable for the statement
Step 2: Once you have set your filters and found your audience use the check boxes to select the contacts you want to send the statements to.
- Please note that if you are selecting all, it will only select the contacts showing on the page. You can show up to 500 records at one time.
- Sending to large amounts of contacts at one time will slow down the sending/creation of printable direct mail piece.
Step 3: After you selected your contacts, click on the drop-down next to the check box in the tool bar and click Send Tax Statements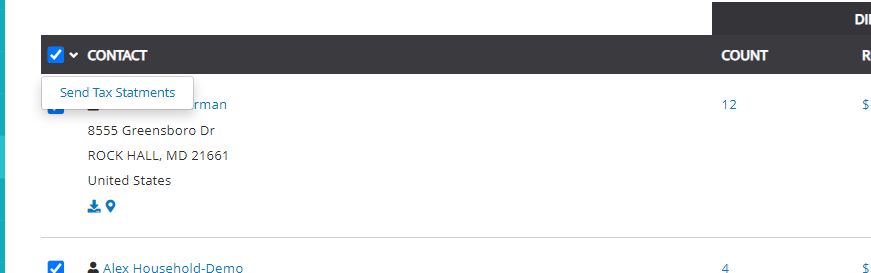
- Select your Template from the Message Template drop down. You can use the out of the box template or choose one that you have created.
- Select you deliver method - either Print or Email
- If email is selected, enter in the Subject, Sender Name, and Reply to email
- Select preferred option for Mark Statements
- All: Marks as 'statemented' for Person and Household (important if organizations wish to send only 1 statement to the household and their associated members)
- Direct Payments: Marks as 'statemented' for direct contributions only (i.e. Household direct contributions only allowing organizations to later send a separate statement to members of the household)
- Member Payments: Marks as 'statemented' for member contributions only (i.e. Household members individual payments only, allowing organizations to send a separate statement to the Household)
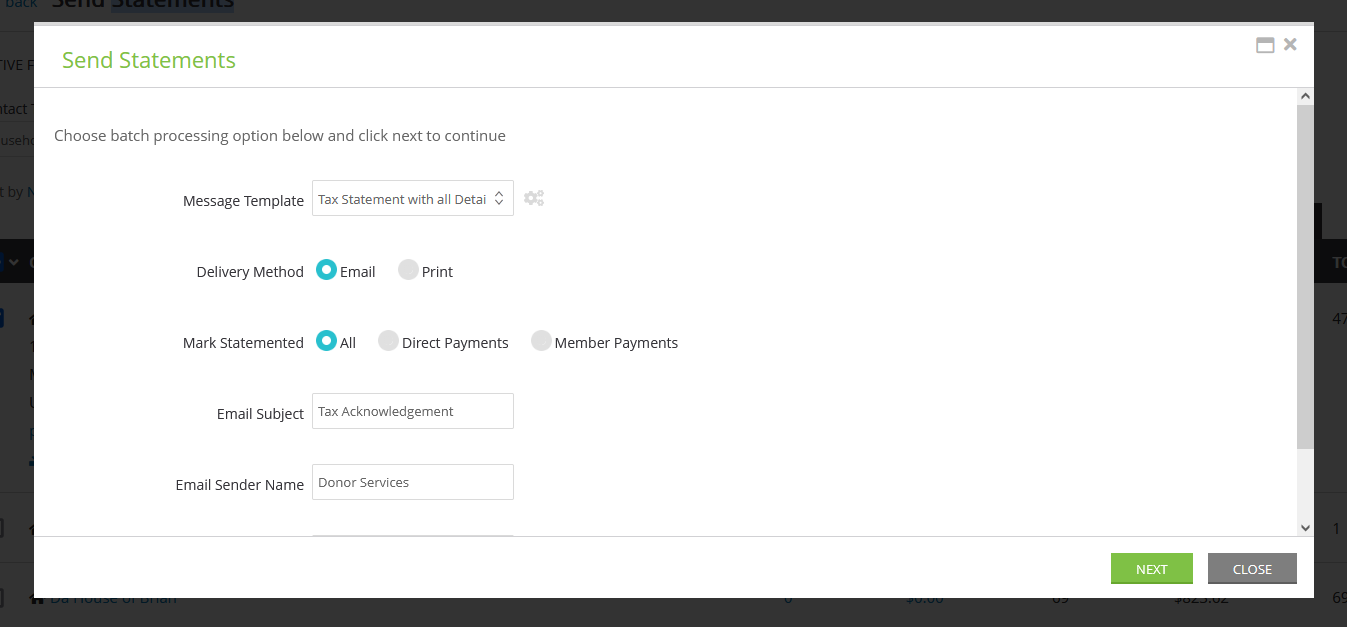
- Click Next to Preview your statement
- Depending upon size of file, allow for loading time. This may take a few seconds to populate. The NEXT button will appear when ready.
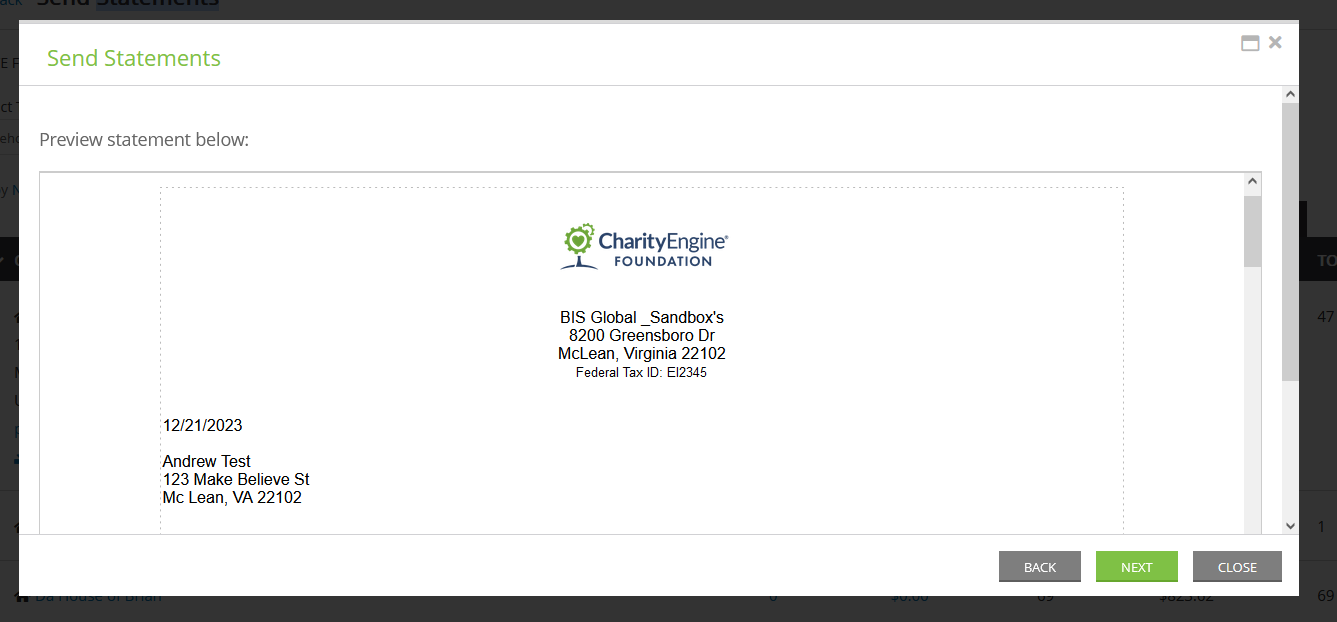
- Depending upon size of file, allow for loading time. This may take a few seconds to populate. The NEXT button will appear when ready.
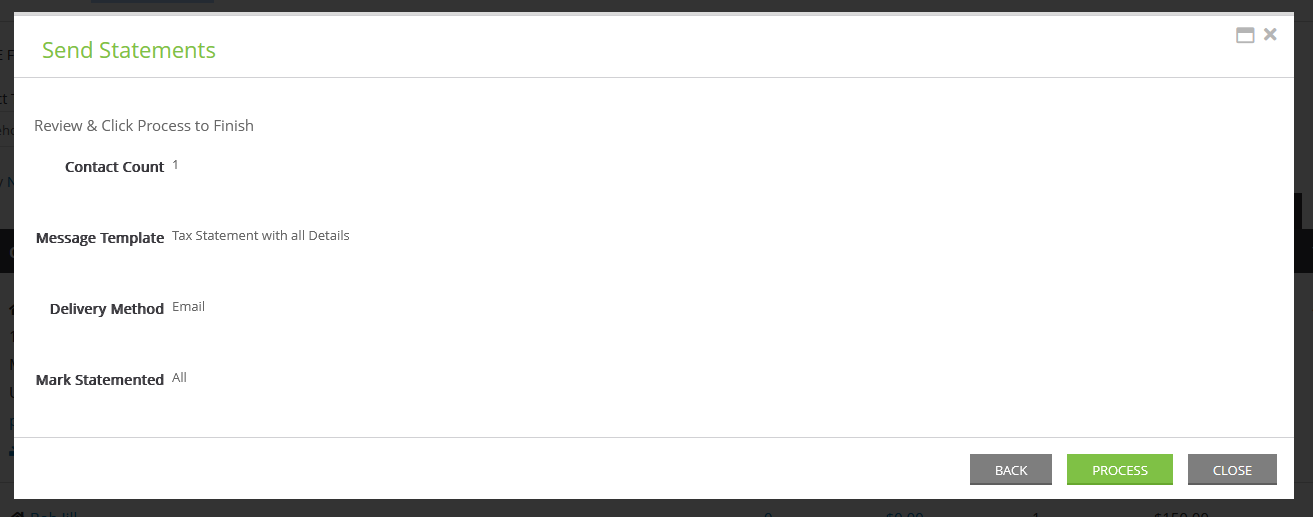
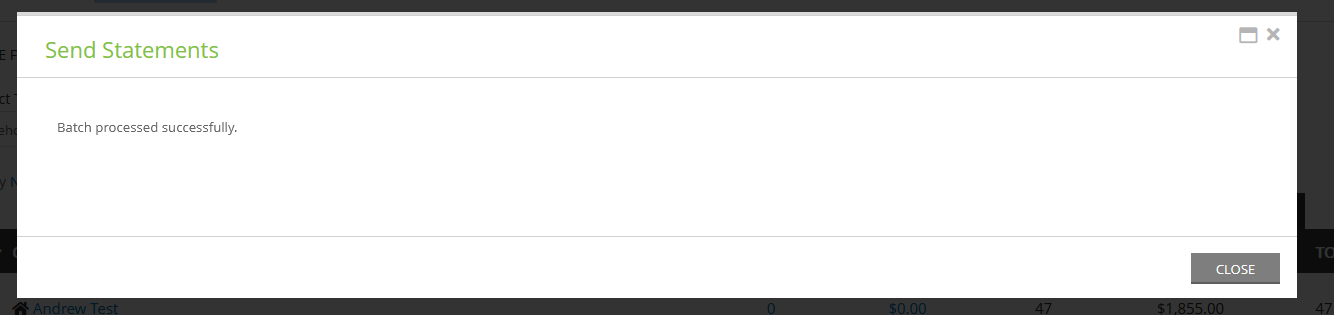
- Click Next to Review and confirm the statements you want to send, then click Process
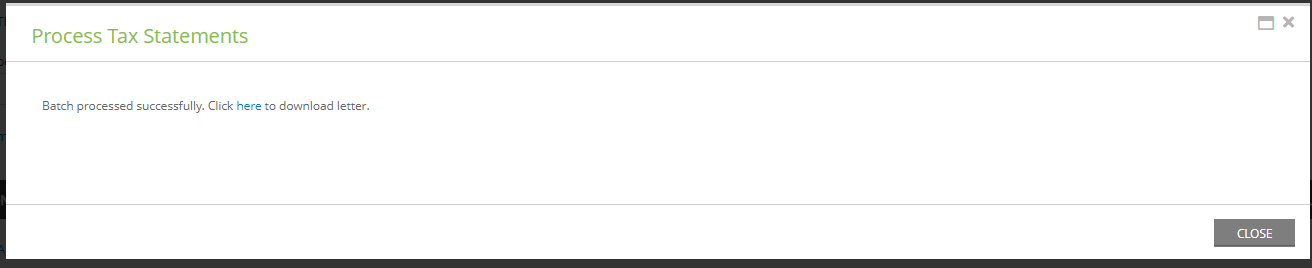
- if you selected print as the delivery method, you will be able to download the letters after you click process
Import Note for Organizations Utilizing Households:
If your organization utilizes households and you wish to send one statement to the household and its associated members, please initiate your send statement select by filtering by Contact Type: Household
Performing this action first will allow the user to process statements for households and their associated members. Within the flow outlined above, select Mark Statemented: All to mark both the household and all members as already statemented. Then the user can proceed with a second batch to process Contact Type: People who are not part of a household.
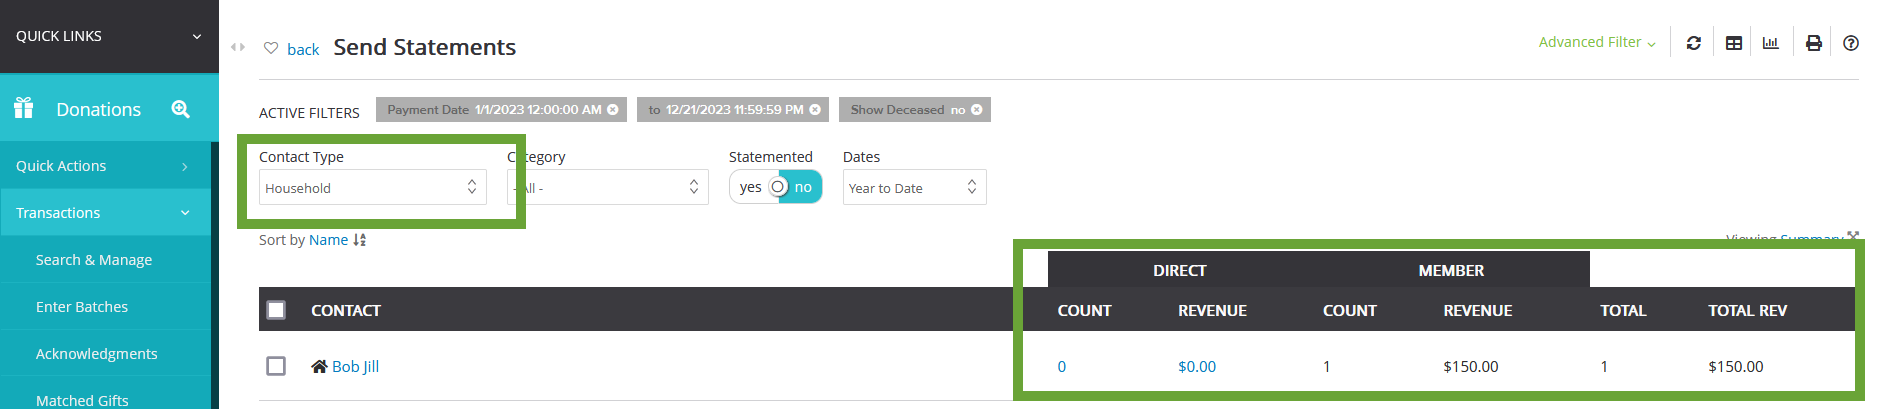
When the users initiates the second batch to identify People (not associated with a household), set the filter to Contact Type: Person and Statemented: No to proceed with the batch statement process for people not associated with a household.
Instructions - Exposing the Tax Acknowledgement Download Option within the User Center
Ensure your Online User Center has been configured to expose Year End Tax Acknowledgement template.
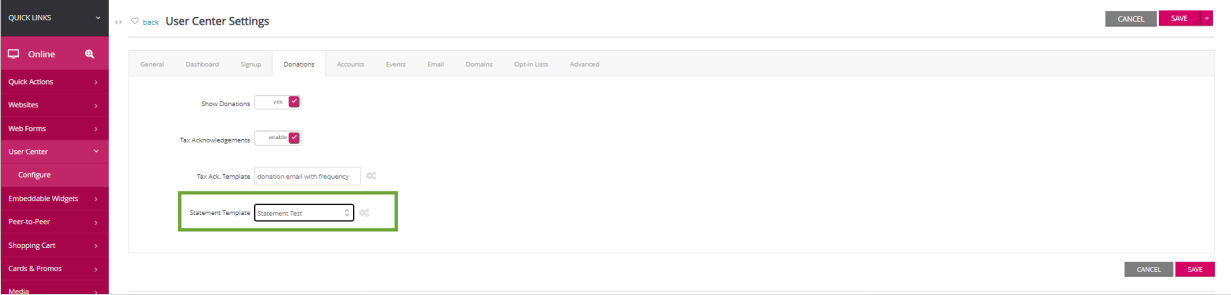
Step 1: Navigate to Online > User Center > Configure > Donations
-
- Ensure Enable Tax Ack. Download = yes
- Select your Statement Template from the drop down box (as created above)
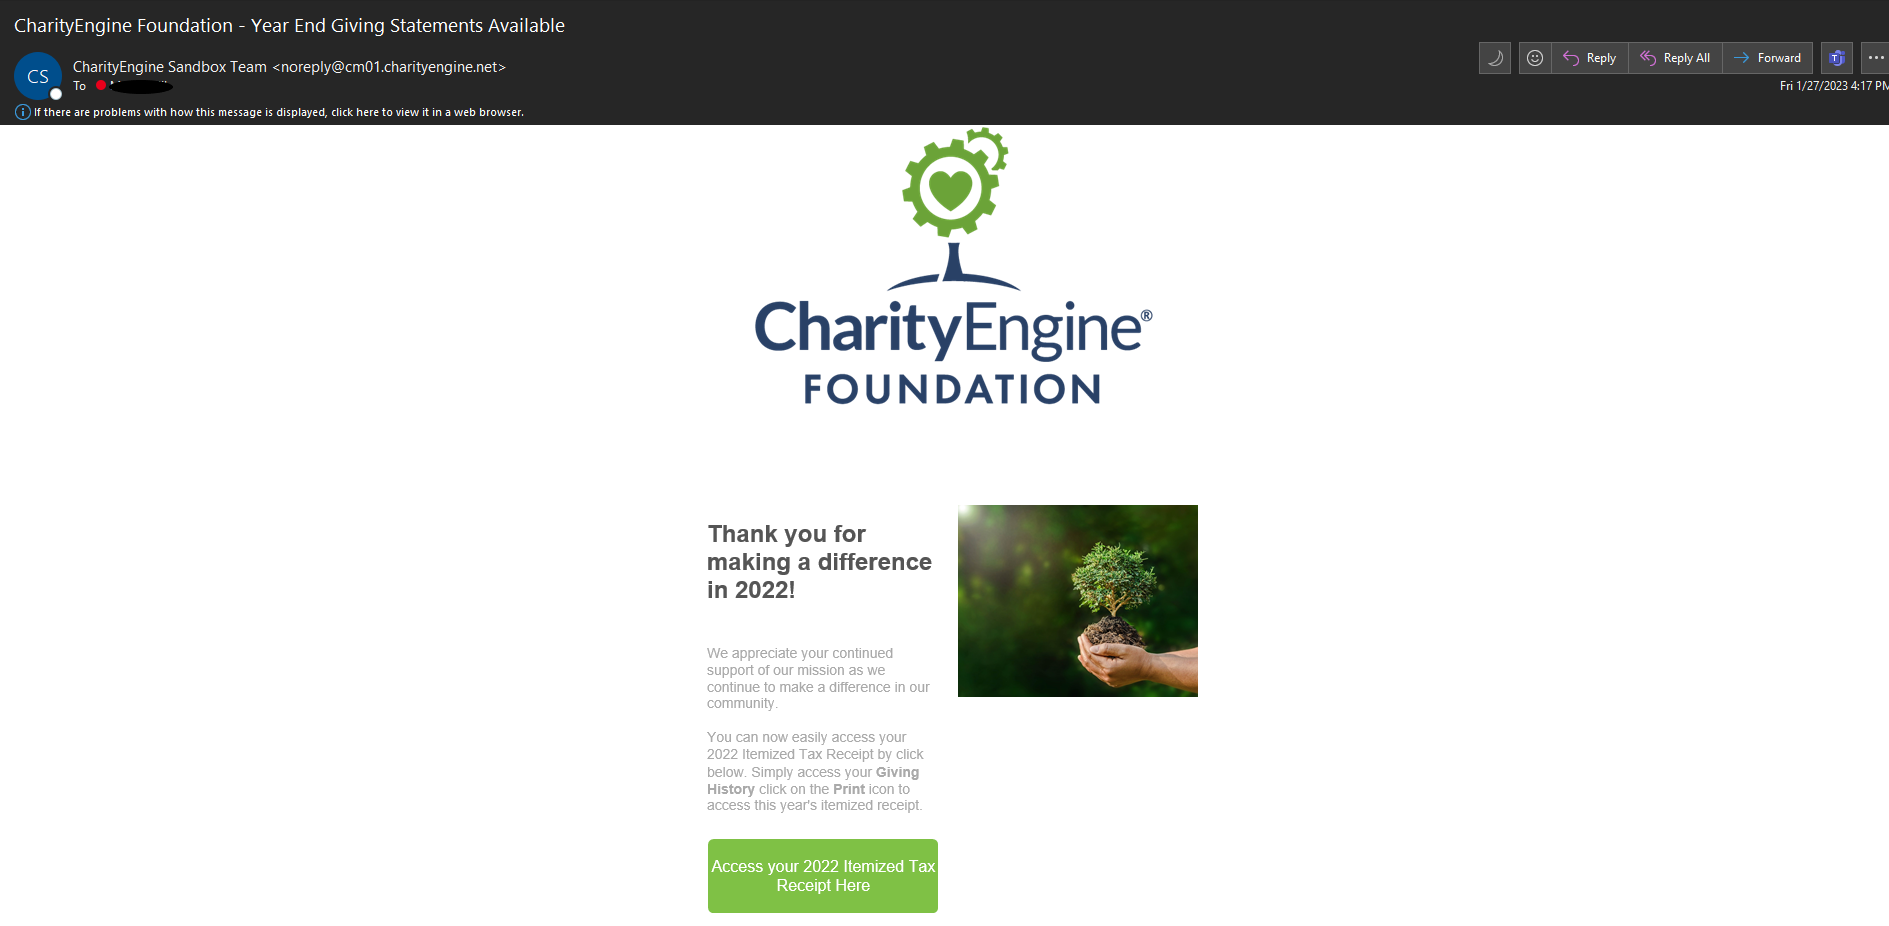
Instructions - Initiating an Email Blast for Donor Notification
If you are using user center to send statements you will need to notify your donors on how to navigate and download the statements. You can also just send out the statements via email instead of navigating your donors to the user center.
using the email template you created earlier you can follow the below steps to send out your email.
Step 1: Navigate to the Campaigns App > Quick Action > Email Blast
Step 2: When selecting your Audience, select Source: List and from the Select List: select the name of the query you created above and click NEXT.
Step 3: Next create your message or locate your previously designed content. Click NEXT once ready.
- Pro Tip: Be sure to include a link to the User Center where donors can print their tax statements (use the Button under Content and add your user center URL captured from above for easy click through)
Step 4: Under Settings, schedule your send (Send Now or Send Later) and leverage Additional Settings for additional attribution or sending details. Click NEXT.
Step 5: Confirm & Send by clicking PROCESS.
Instructions - Initiating and Printing a Mail Blast for Donor Notification
Using the mail template you created earlier you can follow the below steps to send out your direct mail.
Step 1: Navigate to the Campaigns App > Quick Action > Mail Initiative
Step 2: When selecting your Audience, select Source: List and from the Select List: select the name of the query you created above and click NEXT.
Step 3: Next create your message or locate your previously designed content. Click NEXT once ready.
- Pro Tip: Be sure to include a link to the User Center where donors can print their tax statements (use the Button under Content and add your user center URL captured from above for easy click through)
Step 4: Under Settings, schedule your send (Send Now or Send Later) and leverage Additional Settings for additional attribution or sending details. Click NEXT.
Step 5: Confirm & Send by clicking PROCESS.
FAQs & Additional Reading
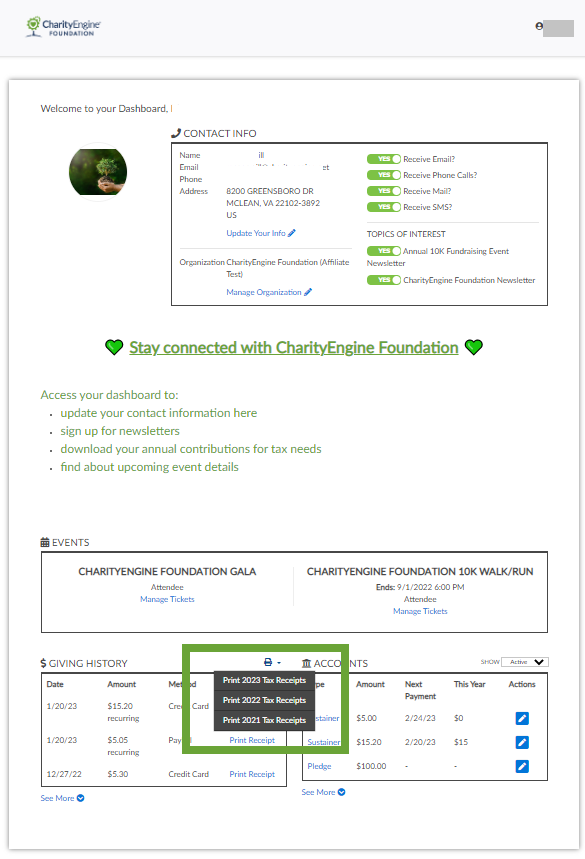
Q. How do I guide my donors on accessing and using the User Center?
A. For assistance in providing instructions to the user center, please read this article
Q. What is the difference between sending an email or direct mail via the campaigns application and sending via the Send statements tool?
A. The send statements tool will allow you to send itemized transaction statements, but does not have the visual customization that the Creative has in the Campaigns application. You can still customize the template, however it will send as more of a letter than a creative email. The creative option does allow for more visual customization, however the statements will be a summary instead of itemized list of transaction.
Q. Can I change the system Template for the "Statement" feature for my organization's need?
A. Yes - we would recommend replicating the system template for your customized needs. From the template, simply adjust the language, tokens, and/or table components as needed.
Q. If have households and members within those households. How do I use the Send Statement feature to only send 1 statement to the household?
A. If you have households with members, begin first with statementing using the Contact Type: Household. And then secondarily, complete a second send statement for Contact Type: Person and Advanced Filter: Show Statemented: No. This will limit send statements to people who are not part of a household.
