Introduction
Your donation forms can become prime targets for malicious bad actors testing stolen credit card information - jeopardizing unsuspecting and innocent card holders. With CharityEngine, we have you covered with our standard fraud protection, but if you'd like true peace of mind, consider purchasing our Advanced Fraud Protection. Furthermore, ensuring your web forms have the proper security settings will support preventative fraud measures. These efforts can reduce lost fundraising dollars as well as reduce spam data that produce bad records and can reduce database slow downs.
Table of Contents
- Introduction
- Prerequisites
- Instructions - General Steps to Protect Web Forms
- Always enable CAPTCHA for Non-Transactional (Non-Payment) Forms
- Always enable and require CVV Transactional (Payment) Forms
- NEVER disable advanced fraud without enabling IP lock down and defining trusted IPs for private networks.
- Instructions: Setting Trusted IPs
- ALWAYS Disable Web Forms After Use
- Enable Fraud Settings Like Device Limitations
- Manually Block/Blacklist an IP
- Manually Block/Blacklist an Email Address
- FAQs & Additional Information
Prerequisites
If you are interested in learning more about CharityEngine's Advanced Fraud Protection feature, please contact your account manage.
Always enable and require CVV Transactional (Payment) Forms
CVV (card value verification) is a standard verification on most online financial transactions. Exposing CVV and requiring on transactional (payment) forms can be used as an additional security measure for credit card transactions.
When the user navigates to the Layout tab on a web form, the users will see form sections and fields. Locate the Payment form section and click on the Pencil Icon to edit the section.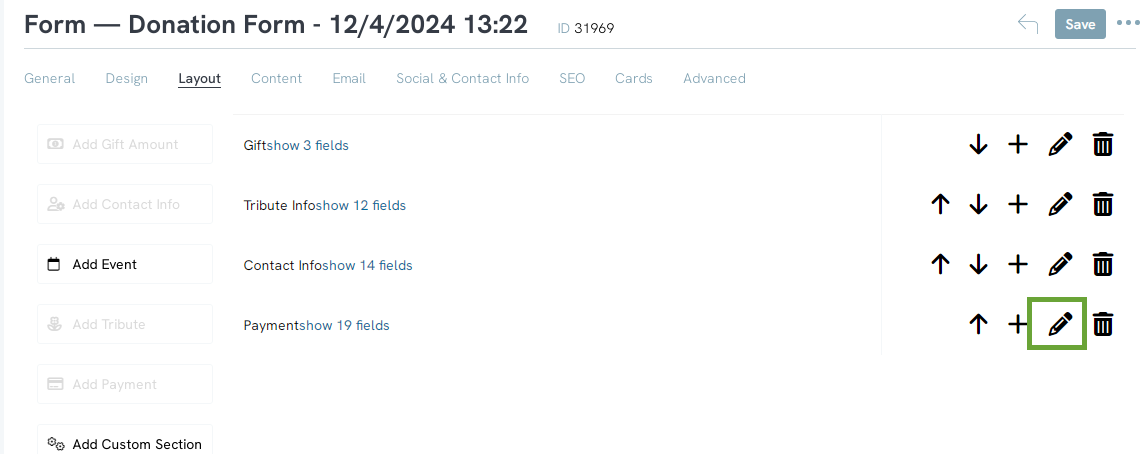
A pop up will appear with the configuration settings. The user will be able to name the section and toggle the form fields that will appear on your form. If the field is toggled yes, it will appear on the form, if it is toggled no, it will not appear.
Note: For best practice and for prevention of fraudulent activities, CharityEngine strongly encourages the user to toggle the Include Name on Card and Include CVV to yes. Click SAVE to secure the changes. 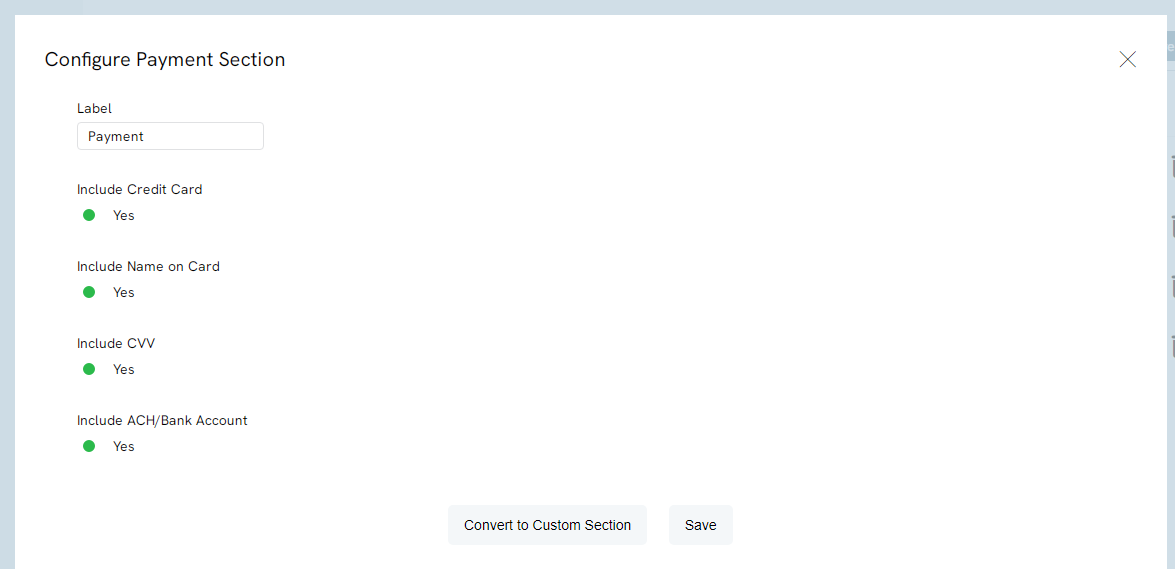
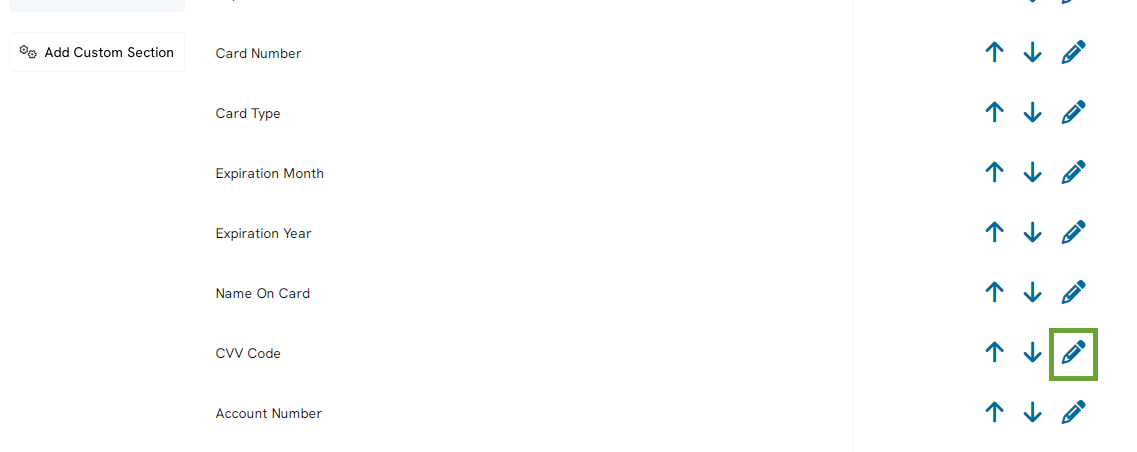
Once the CVV field is activated, set the field as a requirement for entry. Navigate to the Payments section, click on Show # fields, locate the CVV Code field and click on the Pencil icon to edit.
Next, from the Basic tab > Validation tab > Click Required and add a validation message if a donor does not complete.
Click SAVE to secure your changes.
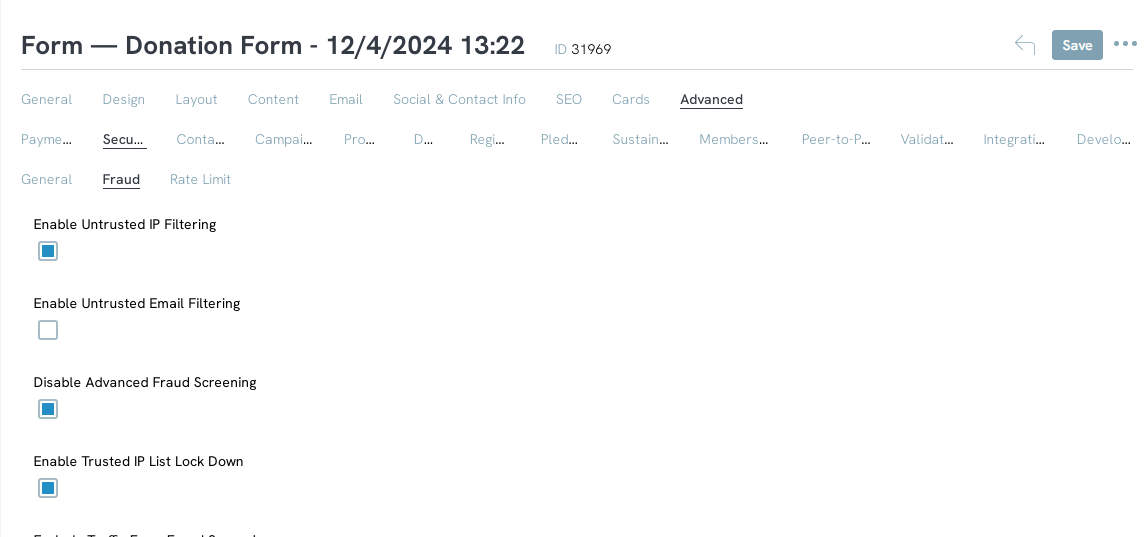
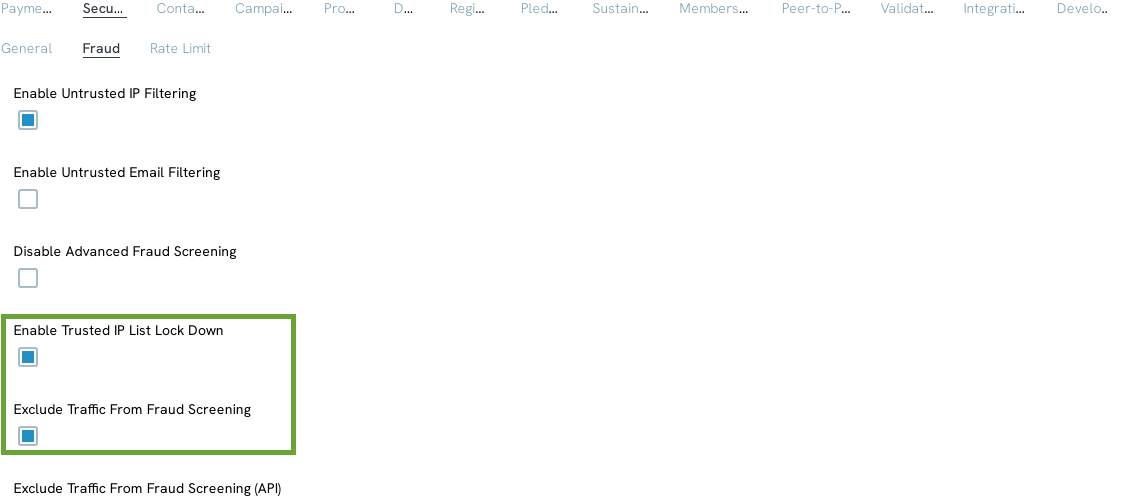
NEVER disable advanced fraud without enabling IP lock down and defining trusted IPs for private networks.
Location: From the web form > Advanced tab > Security > Fraud
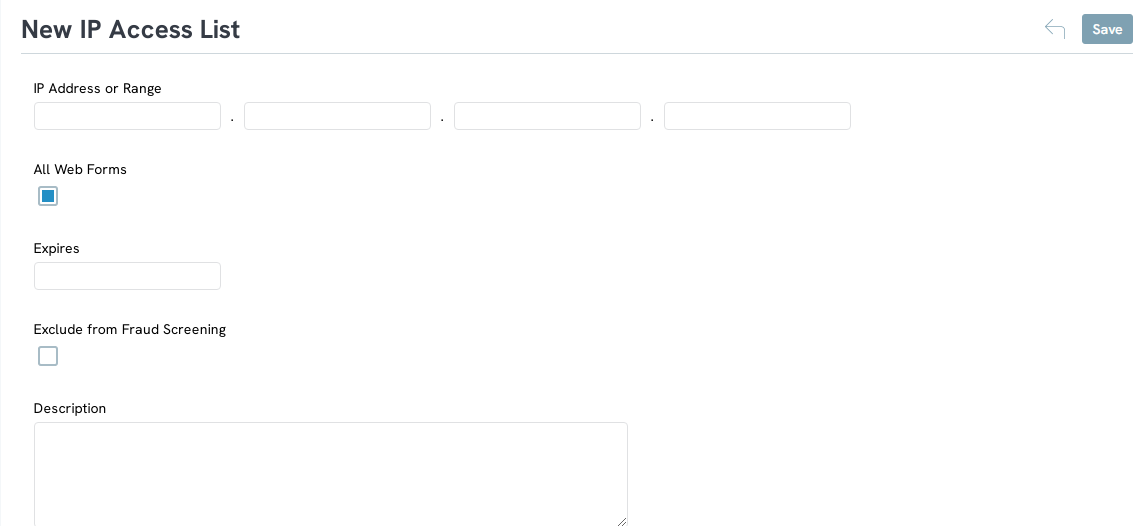
Instructions: Setting Trusted IPs
The next configuration that you will need to have is use to restrict who can use your form. This includes the ability for you to limit the form accessibility to only those IPs you have approved.
Next, add your Whitelisted IPs by navigating to:
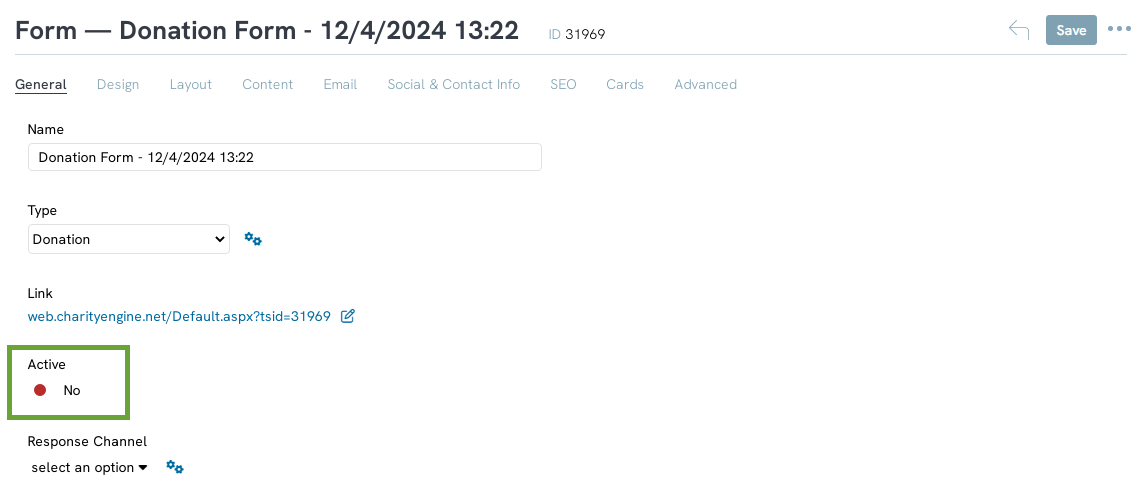
ALWAYS Disable Web Forms After Use
Disabling web forms after use will eliminate public access and avoid bad actors from accessing. To display a web form:
Step 1: Navigate to the Online App > Web Forms > Search & Manage > locate the web form > ACTIONS > Manage
Step 2: From the General tab > Active: No
Enable Fraud Settings Like Device Limitations
Device rate limits are an important security measure that helps prevent abusive behavior, such as brute-force attacks or excessive API requests, by limiting the number of requests or actions that can be performed from a single device within a specific timeframe. Implementing proper rate limits can help protect your system and resources from abuse and ensure a secure environment.
Here are some best practices for configuring device rate limits:
- Define reasonable limits: Determine the maximum number of requests or actions that should be allowed from a single device within a given timeframe. The specific limits will depend on your system's requirements, usage patterns, and resources. Consider factors such as the nature of your user interaction, the sensitivity of the data, and the expected user behavior.
- Differentiate rate limits based on risk: Assess the risk associated with different types of requests or actions and set varying rate limits accordingly. For example, critical operations like password reset or financial transactions may have lower rate limits compared to less sensitive actions. This ensures that high-risk actions are subjected to stricter limits, providing an additional layer of protection.
- Monitor and analyze request patterns: Continuously monitor and analyze request patterns to identify anomalies or suspicious behavior. Implement mechanisms that track and log excessive requests, failed login attempts, or other unusual activities. Analyzing these patterns can help in identifying potential security threats and adjusting rate limits accordingly.
- Consider burst limits: Burst limits allow temporary spikes in request rates for short periods, accommodating legitimate bursts of activity without triggering rate limit restrictions. Burst limits are useful for handling sudden traffic surges, ensuring smooth user experience during peak periods, while still protecting against abuse in the long run.
- Regularly review and adjust limits: Continuously monitor the effectiveness of your rate limits and review them periodically. Analyze system logs, user feedback, and security reports to identify potential weaknesses or areas where adjustments may be needed. Fine-tuning rate limits based on real-world data can enhance security while maintaining a smooth user experience.
By implementing these best practices for device rate limits, you can strengthen the security of your system, protect against abusive behavior, and ensure a reliable and secure user experience.
Enable Fraud Settings Like Device Limitations - At the Form Level
The following steps will allow you set device limits at the form level - allow you to differentiate rate limits based upon risk.
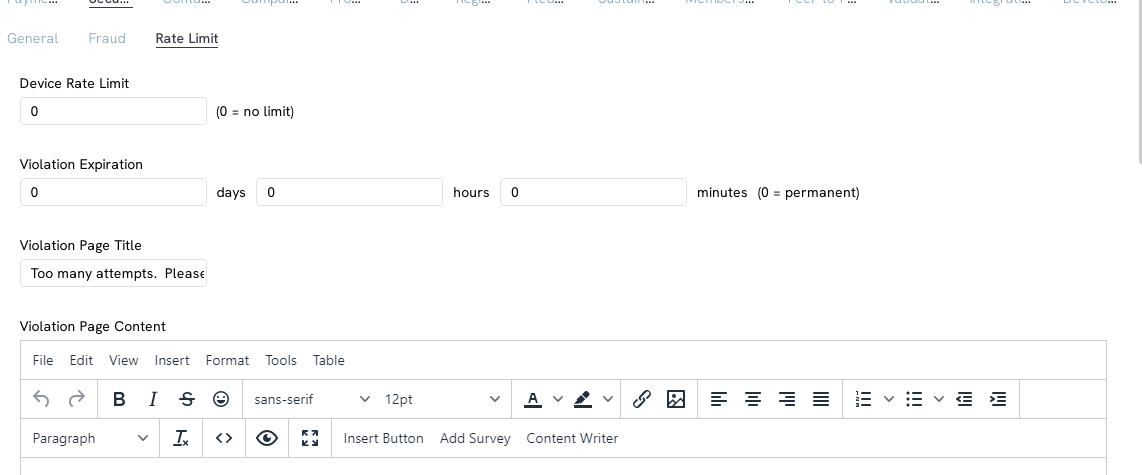
Step 1: Navigate to the Online App > Web Forms > Search & Manage > locate the form > Advanced > Security > Rate Limit
Step 2: Update Device Rate Limit
Enable Fraud Settings Like Device Limitations - Global Setting
The following steps will assist in setting device limits at the global level.
Please Note: This feature can be set to monitor against repetitive IPs and/or email addresses
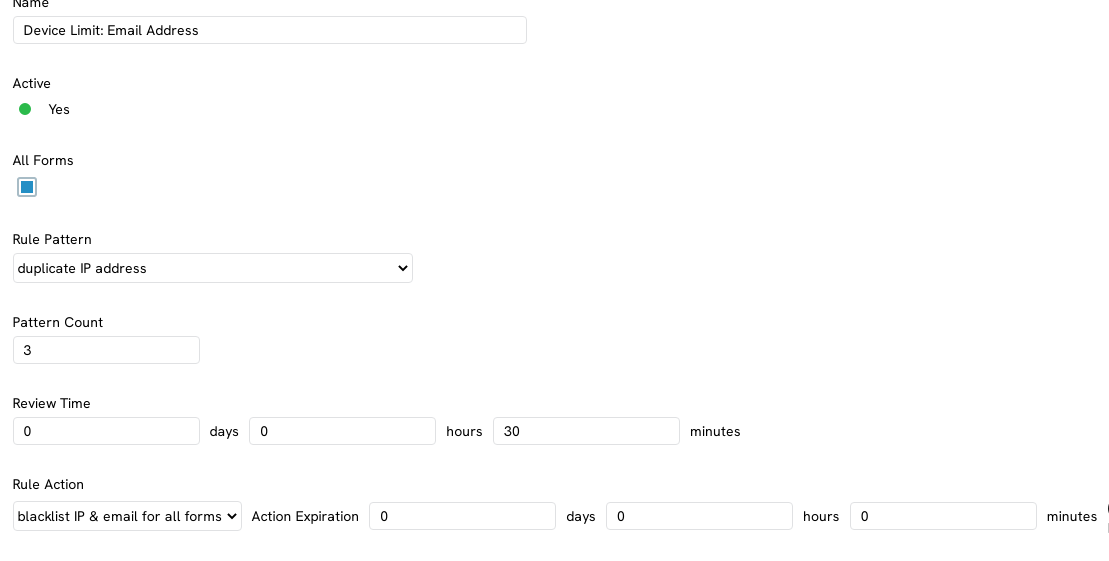
Step 1: Access the Configuration App > Security > Online Screening
Step 2: Click Create New
Step 3: Configure Settings
- Name: Internal name of rule
- Active: Set to Active Yes
- All Forms: Check box to apply to all forms, or deselect to apply the rule to one or more web forms
- Rule Pattern: Select the pattern necessary for this rule
- As a best practice, consider establishing "duplicate email address" and "duplicate IP address"
- Patter Count: set threshold based upon organizational risk evaluation
- Review Time: set threshold based upon organizational risk evaluation
- Rule Action: select appropriate rule action
- Action Expiration: set threshold based upon organizational risk evaluation
- Note - leaving as "0" will result in a permanent action of the IP/email
- Description: create a custom internal description for internal documentation
Manually Block/Blacklist an IP
Manual blocking can be applied for a specific IP or IP range.
Step 1: Navigate to the Configuration App > Security > IP Blacklist
Step 2: Select Create New
Step 3: Set blocking parameters
- IP Address or Range: Enter the IP address or IP range
- All Forms: Maintain on All Forms, or uncheck to select one or more web forms
- Expires: Set specific time parameter or leave as null for permanent blocking
Manually Block/Blacklist an Email Address
Manual blocking can be applied for a specific IP or IP range.
Step 1: Navigate to the Configuration App > Security > Email Blacklist
Step 2: Select Create New
Step 3: Set blocking parameters
- Email Address or Pattern: Enter the display name and domain
- All Forms: Maintain on All Forms, or uncheck to select one or more web forms
- Expires: Set specific time parameter or leave as null for permanent blocking
FAQs & Additional Information
Q. Does CharityEngine offer any fraud monitoring and tracking features?
A. Your donation forms are prime targets for malicious bad actors testing stolen credit card information - jeopardizing unsuspecting and innocent card holders. With CharityEngine, we have you covered with our standard fraud protection, but if you'd like true peace of mind, consider purchasing our Advanced Fraud Protection. Learn more here Transactions: Reviewing Fraudulent Transactions & Managing Fraud Events
Q. Help - we have recently experienced potential fraudulent activities on our web forms. What should we do next?
A. If your organization is currently experiencing a fraud attack or suspect fraud, there are a few recommended steps to take to prevent additional fraudulent activity. See more under this article section: Instructions - What Steps Should I Take If There Is An Active Fraud Attack.
