Introduction
Recurring donations make up a core pillar of support for your mission. Our CRM can help you build, nurture, grow, and manage a successful monthly giving program. With higher-than-average retention rates, recurring donations can be counted on to keep your nonprofit growing. Enhance communication and automate donation collection to focus on increasing your nonprofit’s impact. Sustainers are donors who choose to make regular and ongoing donations to your organization CharityEngine provides easy management of these recurring donors and their donations through our Sustainer App.
Table of Contents
- Introduction
- Help Center - New User Interface
- Introduction - A Basic Understanding of Sustainer Structure within CharityEngine
- Instructions - Creating a New Sustainer
- Instructions - Converting a One-Time Payment to a Sustainer
- Instructions - Search & Manage
- Instructions - Managing Existing Sustainers
- Instruction: How to Update a Sustainer's Payment Information
- How to Send a Sustainer Reactivation Link from the Donations app
- Instructions - Sustainer SAVE Drop Down Bar
- Email Communication - Declined/Failed Payment Communication Series
- How to Configure Your Billing and Auto Deactivation
- Email Communication - Reactivation for Lapsed Sustainers
- Instructions - Exposing Recurring Frequency on Web Forms
- Instructions - Report Builder
- Reporting & Monitoring Tools
- FAQs & Additional Reading
Help Center - New User Interface
Click here to access the Help Center new user interface article.
Prerequisites
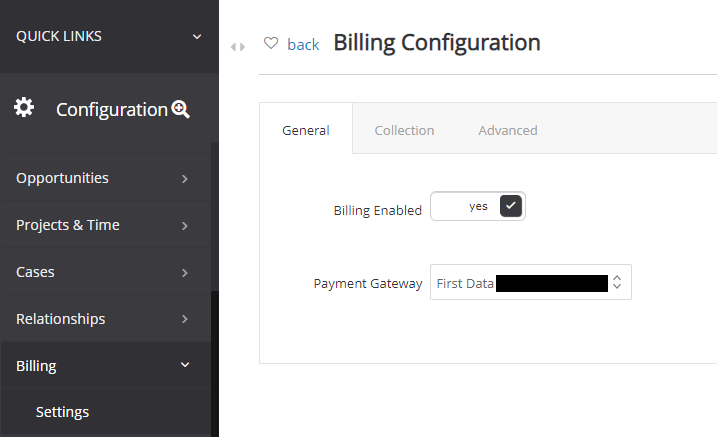
- Please ensure your organization's sustainer payment gateway has been properly set up. Visit Configuration App > General > Configuration Status. Results should read as No configuration issues detected. You're all set! To update your sustainer payment gateway (the payment process which will be defaulted to your sustainer processing, please view Configuration App > Billing > Settings
Introduction - A Basic Understanding of Sustainer Structure within CharityEngine
Similar to Pledges, Sustainers are structured first by creating a 'sustainer account'. Sustainer accounts are typically used in instances where a donor plans to give on a recurring basis (monthly, quarterly, annually, etc.) without a planned end date. The recurring account is the basis of capturing the donor, their 'recurring' donation amount, start dates, frequency of payment, and payment amounts. Other attributes can be assigned to the sustainer record including funds, initiatives/campaigns, solicitor, associated opportunity, etc.
Once a sustainer account has been established, invoices/installments will be generated (either manually or automatically based upon the assigned set up). Invoices allow CharityEngine end users to determine if payment has been received or payment is outstanding. Note: invoices are also referred to as "installments".
Once an invoice/installment is open, a transaction will connected to the open invoice/installment. If payment is successfully received, the invoice/installment will be closed. If payment is not received - or the payment was declined (i.e. declined credit card or ACH payment), the invoice/installment will remain open to allow CharityEngine users to track outstanding balances.
As payments are collected with a unique transaction ID, the sustainer account will reflect the total collected since the start of the sustainer account.
In this example, the donor "Lawrence Smith" has committed to monthly recurring gift of $15.00. To date, $570.00 has been collected, starting on March 4th, 2020. The last monthly payment was scheduled for 04/05/2023 and the next payment is scheduled for 05/05/2023. The upcoming 05/05/2023 invoice/installment can be located on the Collection tab. Prior payments (approved, declined, pending) can be located on the Payments tab and will reflect the specific transaction ID associated with this Sustainer Account ID - 2278159. 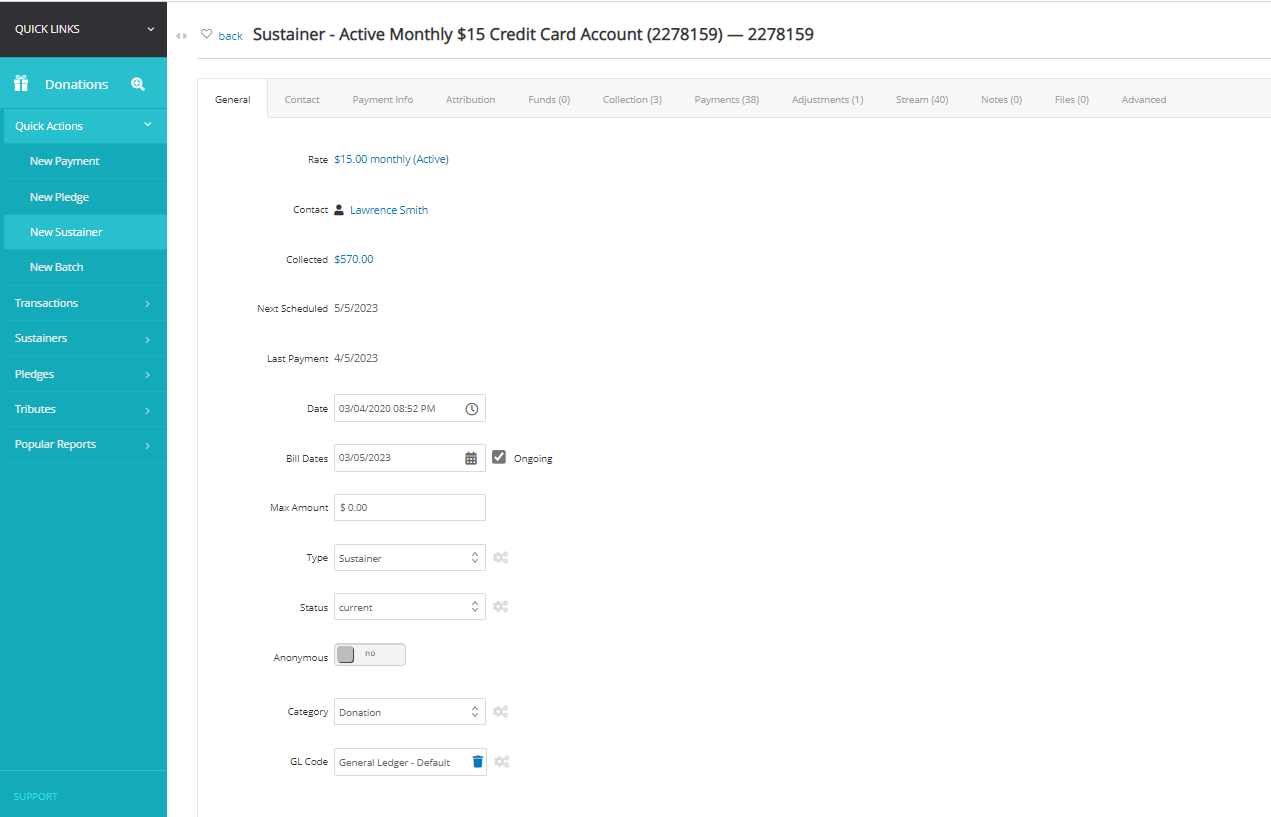
Instructions - Creating a New Sustainer
Step 1: Create new sustainers by navigating to the Donations App > Sustainers > Search & Manage > Create New.

General Tab
Step 2: The General tab contains the basic information to fill out for the sustainer.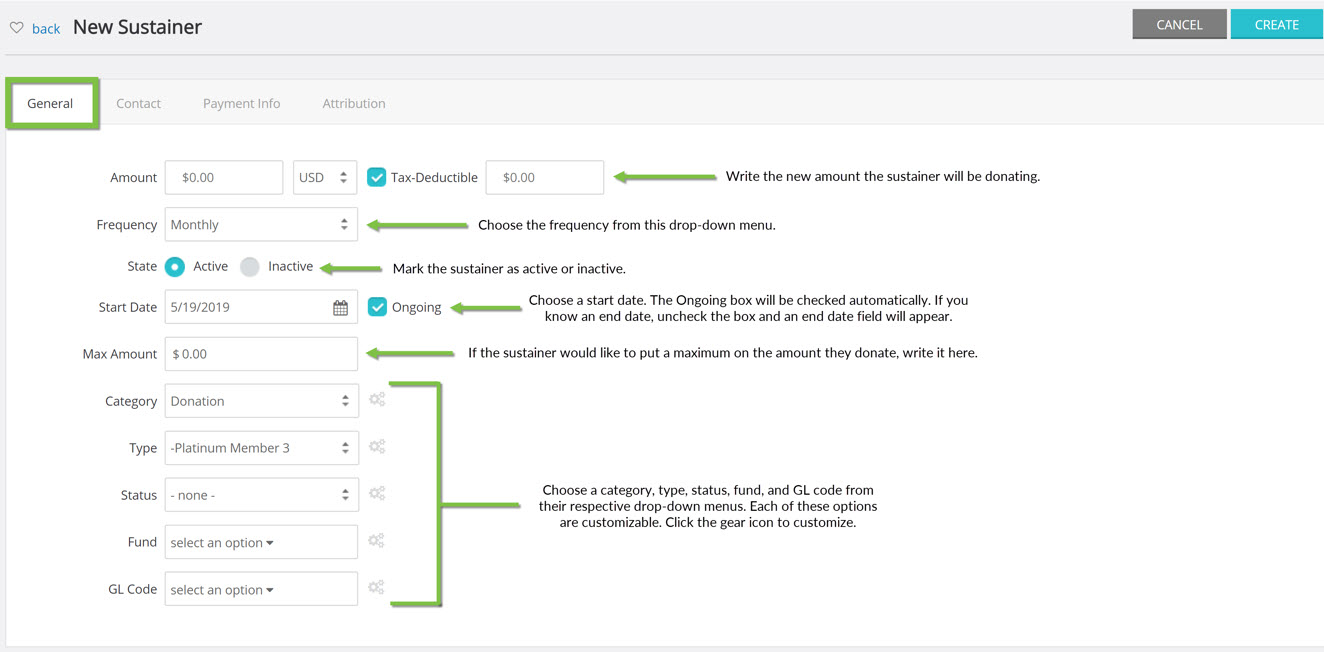
Contact Tab
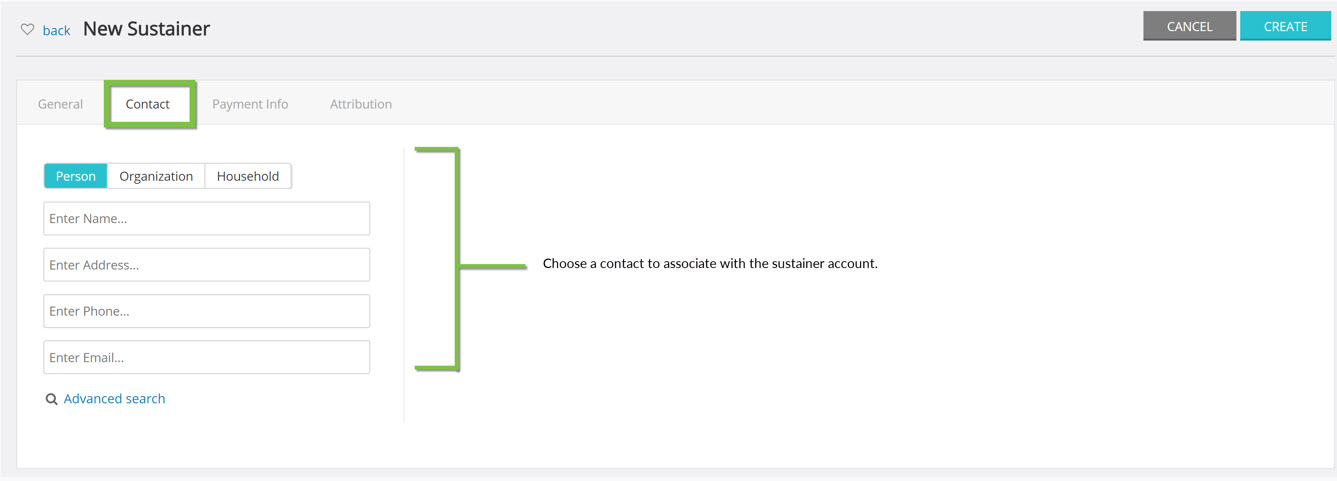
Step 3: Associate the new sustainer account with
Payment Info Tab
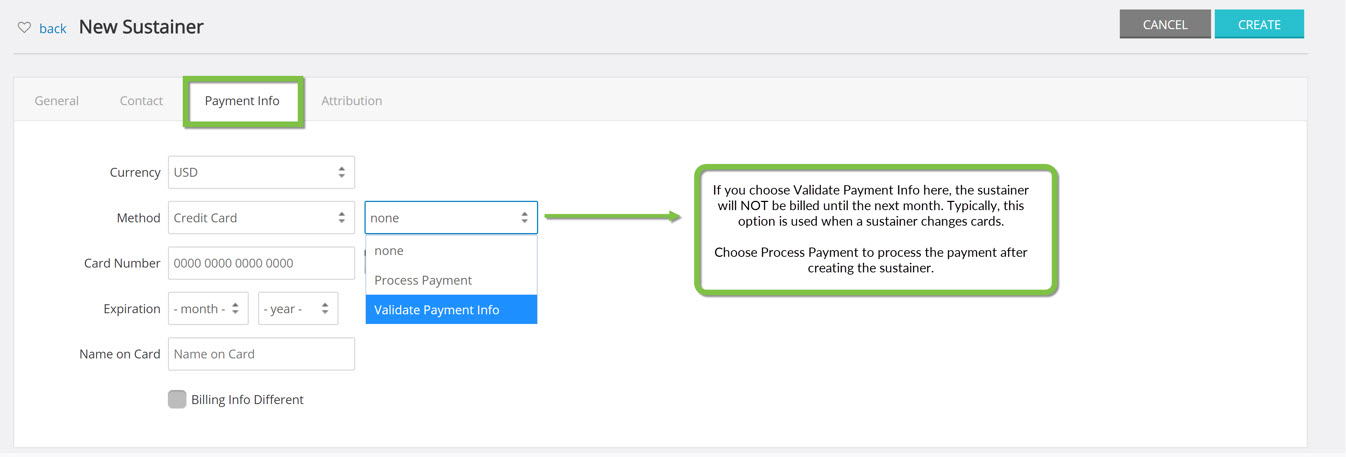
Step 4: Indicate the currency type and the payment type the donations will be made in. This can be changed later.
Attribution Tab
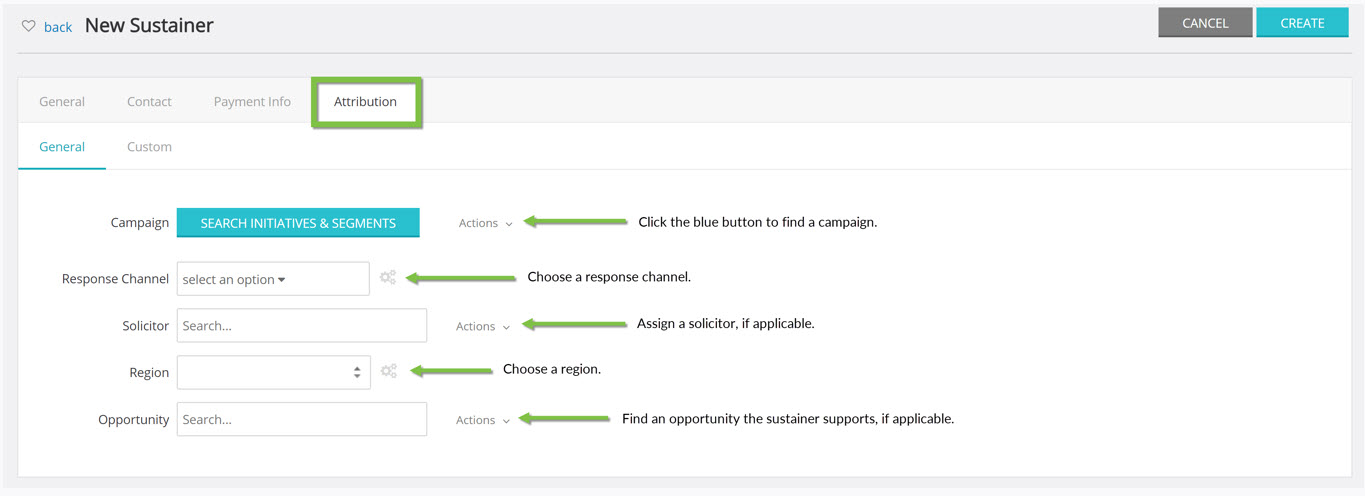
Step 5: If the sustainer will have an attribution with each payment, indicate it here.
Refunding/Voiding a Sustainer Payment
Step 6: Refunding or voiding a sustainer payment is the same as refunding or voiding any other transaction. Please see our Refunding and Voiding documentation for more details. However, there is one notable difference.
When you find a sustainer payment under Transactions and try to void or refund it, a pop-up box will appear first.
It will ask if you would like to cancel the invoice/installment. Yes is selected by default. If you select No, the processor will try billing the invoice/installment

Instructions - Converting a One-Time Payment to a Sustainer
If a donor made a one-time payment but intended the payment to be the initial recurring payment series, you can easily convert this payment in a few quick steps.
Step 1: Navigate to the Donations App > Transactions > Search & Manage > locate the payment in question > ACTIONS > Convert

Step 2: You will be presented with a pop-up to select Frequency of sustainer record as well as Next Payment for the sustainer record. Click COVERT.

Step 3: Click OK on the confirmation of "Are you sure you want to convert this transaction into a sustainer account (recurring gift)?
Step 4: You will receive confirmation of the sustainer record creation.
Step 5: Now, you will see the new sustainer account with a total collected amount of $25.00 based upon the original one-time transaction. The next scheduled billing date as assigned in step 2. On the Payments tab, the original one-time transaction will be showcased here as a Sustainer type.
Instructions - Search & Manage
Basic Filters
The Sustainer Search & Manage page has a set of basic filters to use to narrow a search.

Advanced Filters
The Sustainer Search & Manage page also has an Advanced Filter drop-down.
NOTE: The Quick Filter will refresh the page automatically when a filter is chosen. If you plan on using the Advanced Filters, input Advanced Filters information first to save yourself a click! Once Advanced Filters are chosen, change any one of the Quick Filters, and the page will refresh with both Advanced and Quick Filters considered.
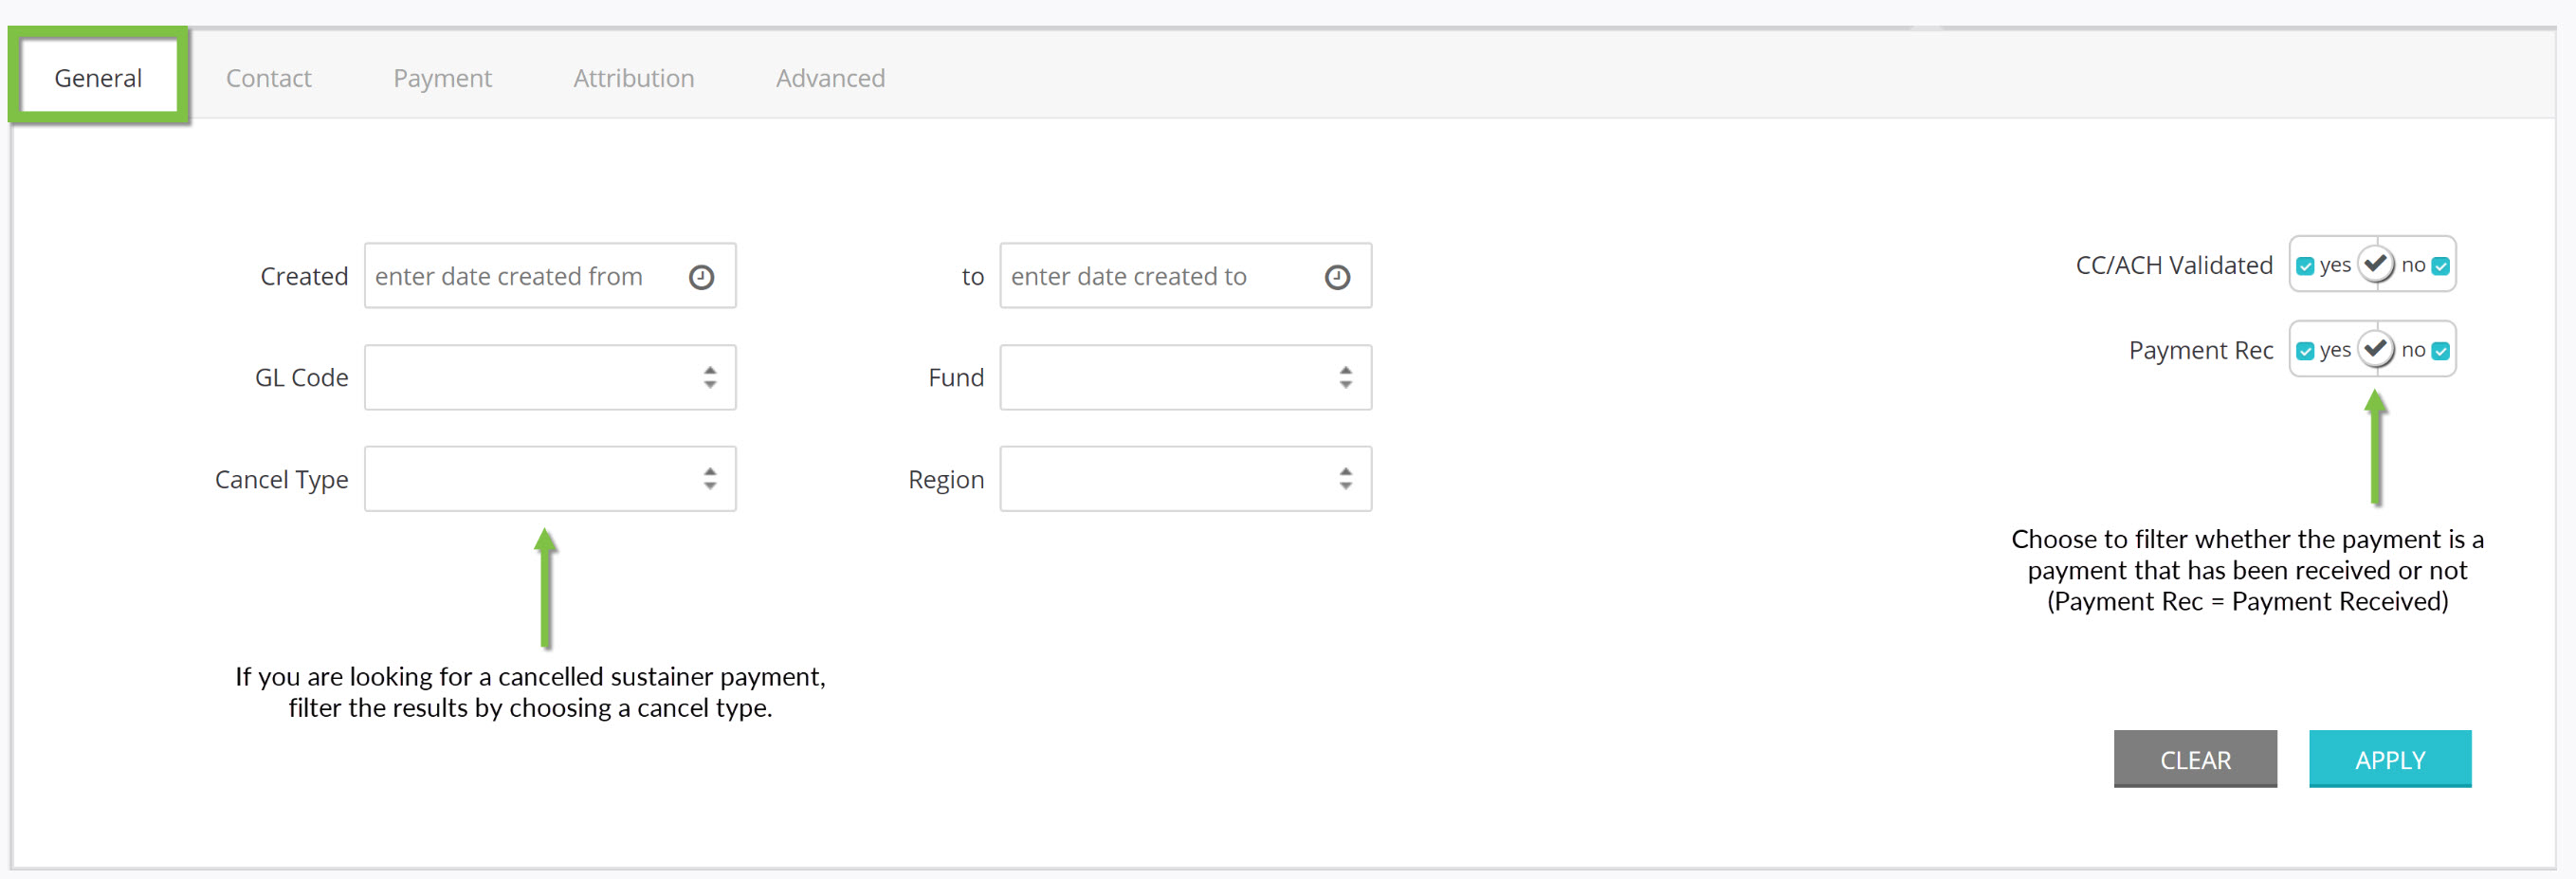
General Tab
The General tab contains general search fields.
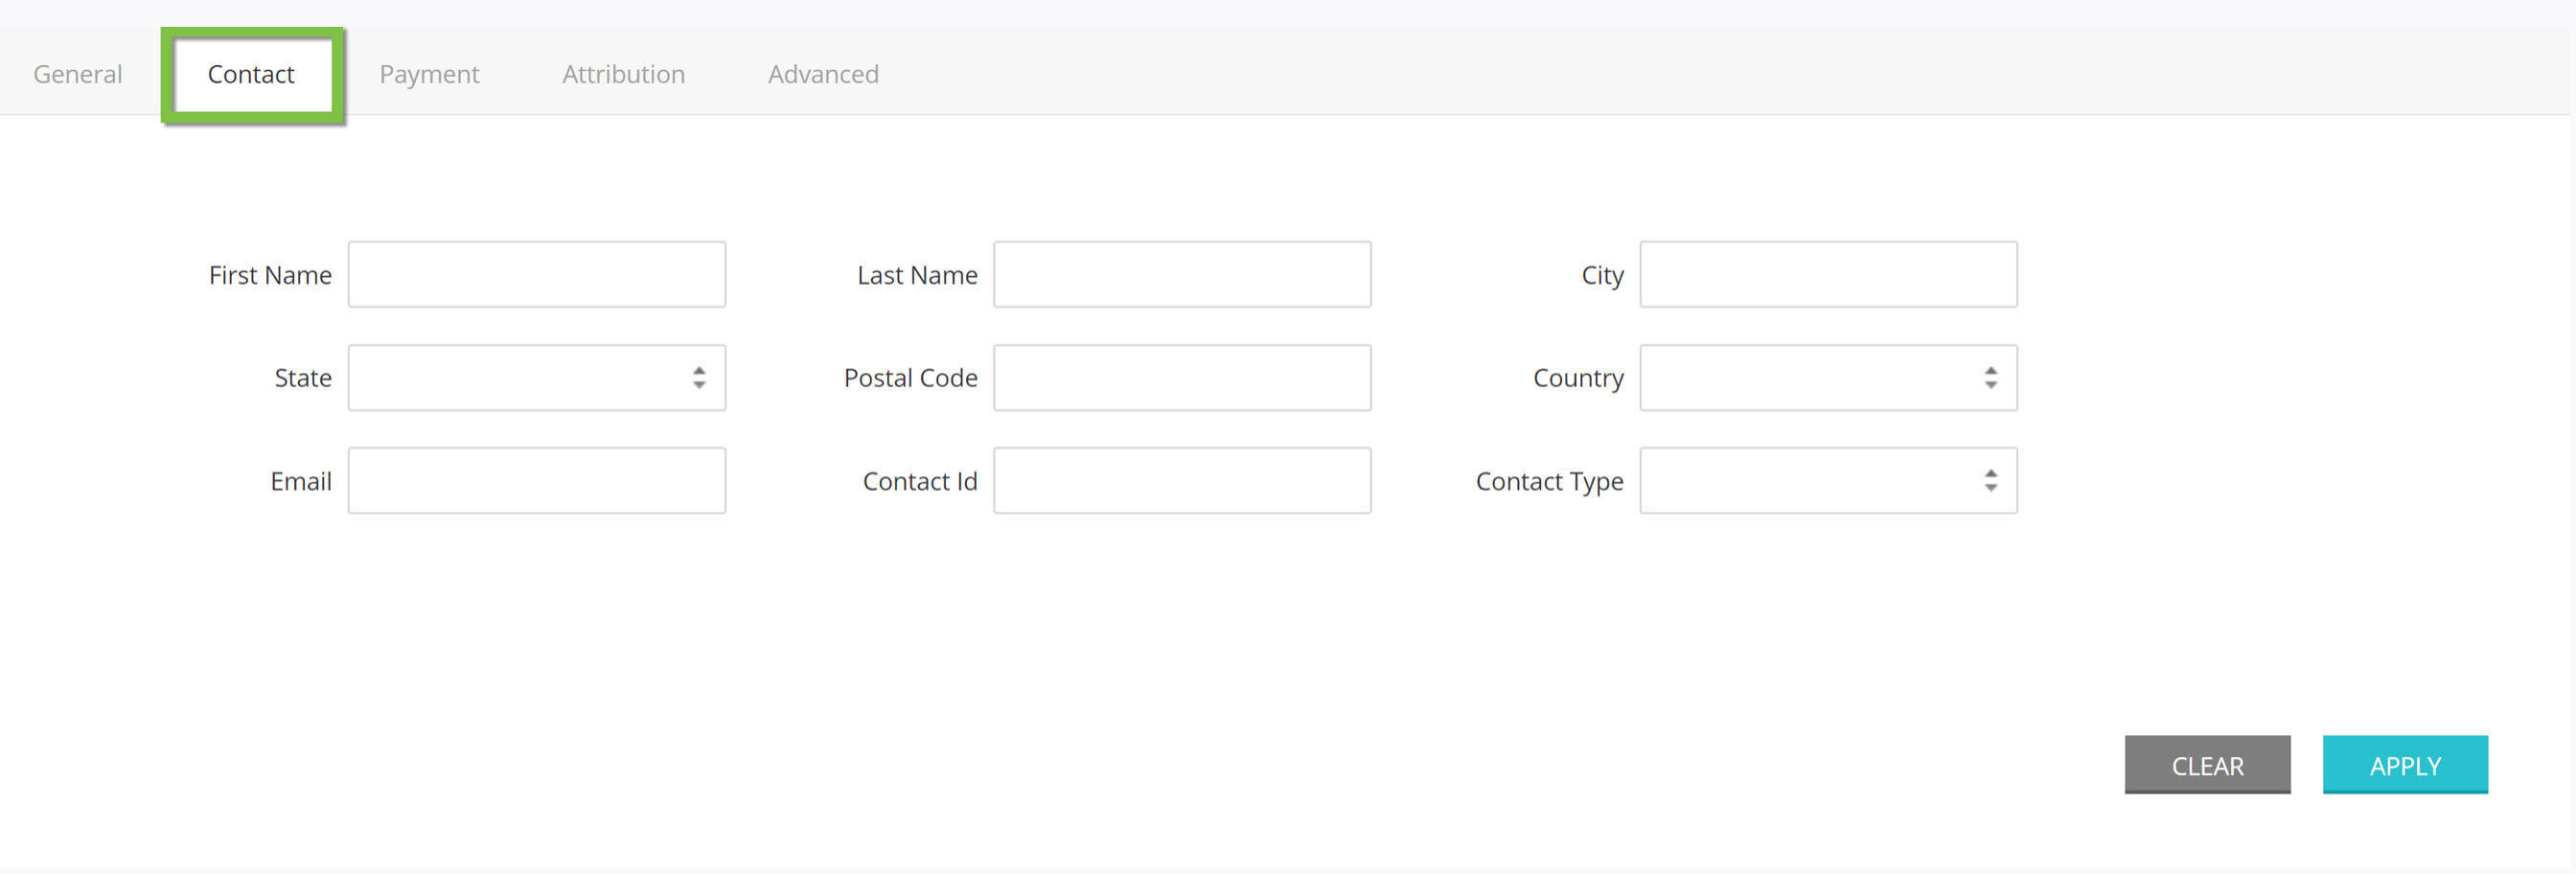
Contact Tab
The contact tab contains search fields specific to contacts.
Payment Tab
The Payment tab contains search fields specific to payments.

Attribution Tab
The Attribution tab contains search fields specific to attributions.

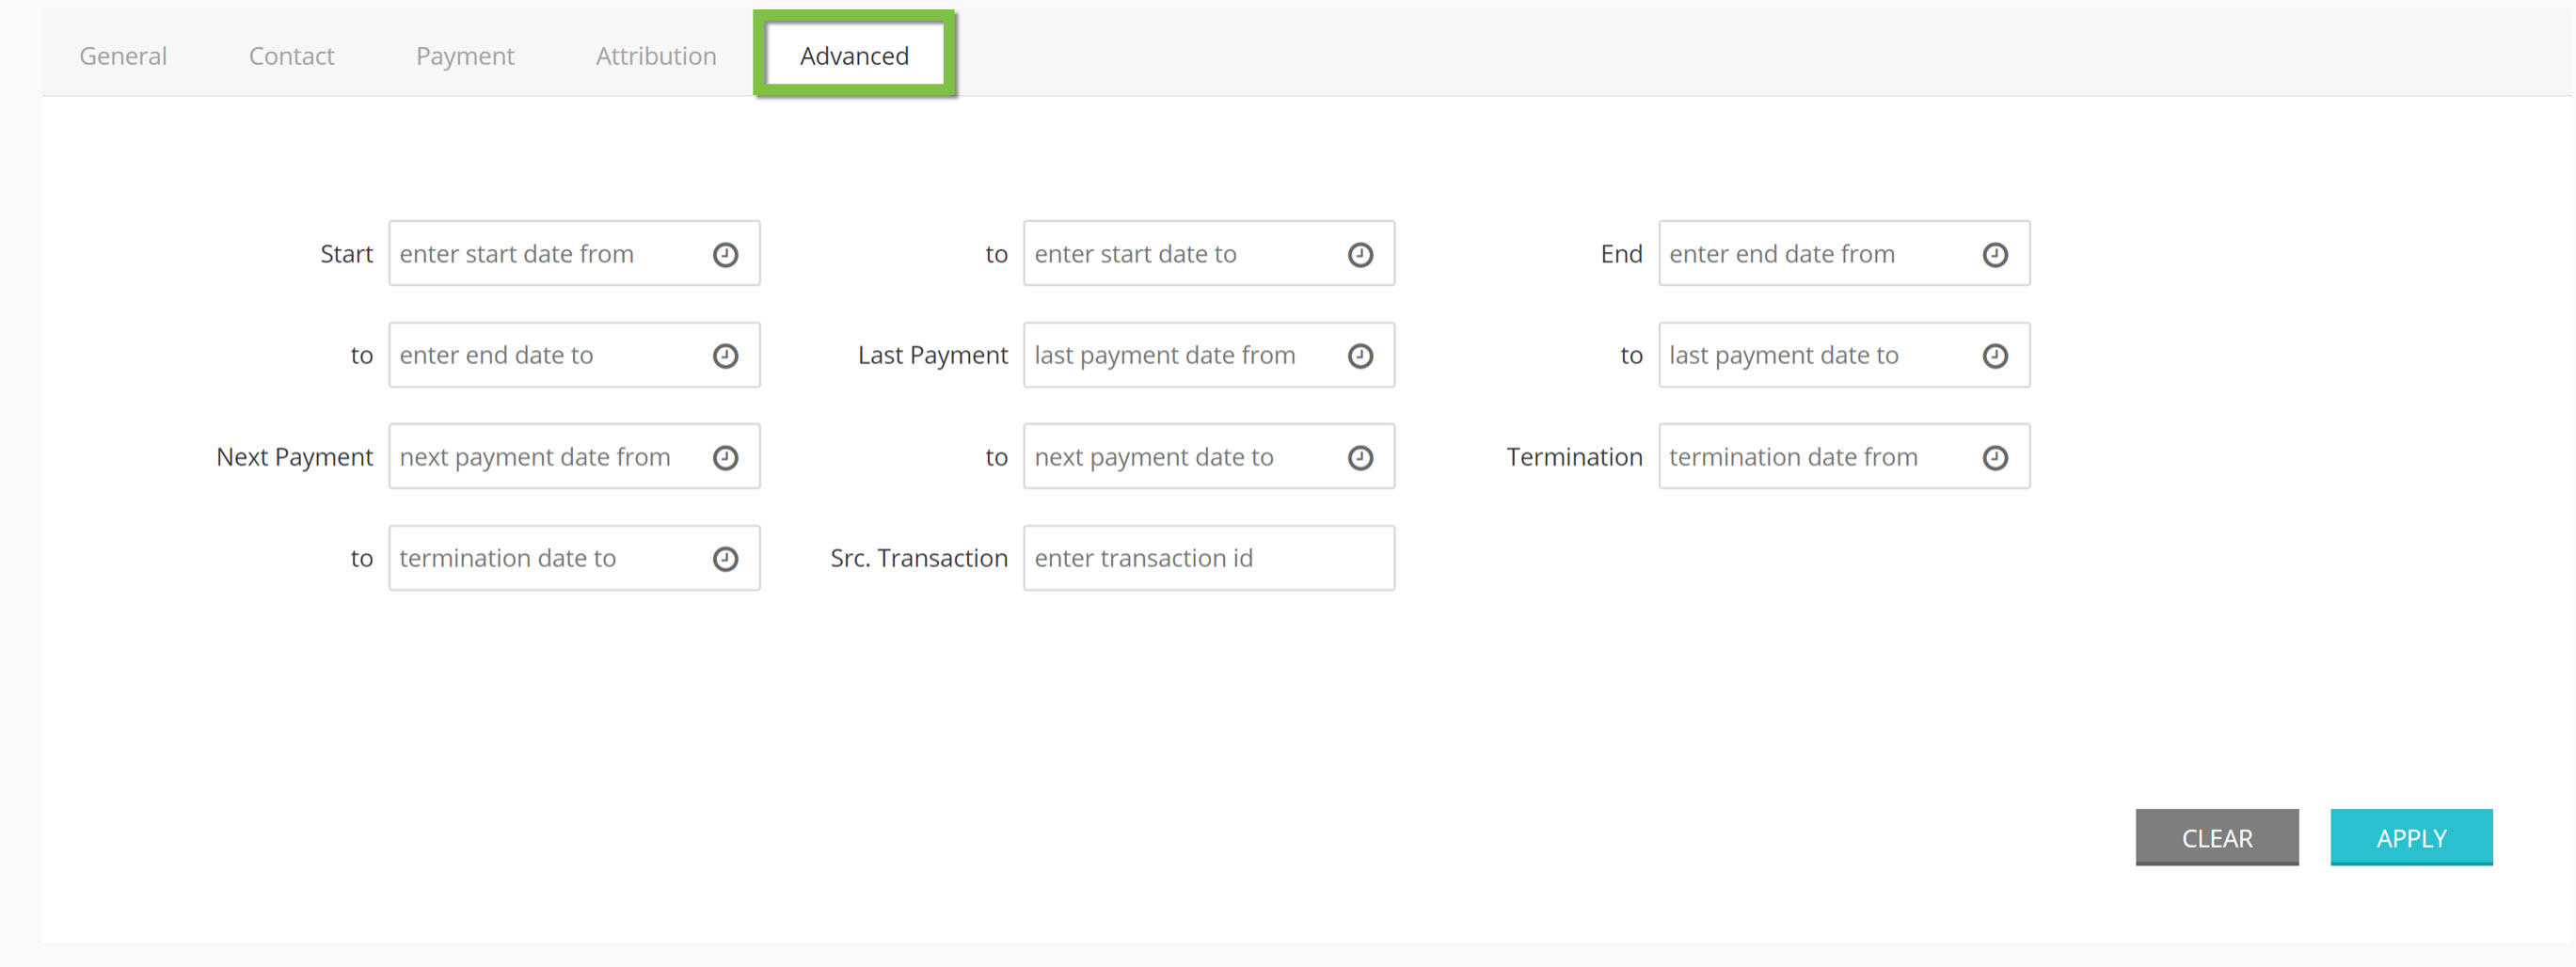
Advanced Tab
The Advanced tab contains more advanced search fields.
Active Filters
On the listing screen, a list of Active Filters will appear. Simply click the X to the right of the filter in order to delete it and adjust the search criteria.

Instructions - Managing Existing Sustainers
Step 1: To edit a previously created sustainer, navigate to the Donations App > Sustainers > Search & Manage > locate your sustainer's account > ACTIONS > Manage
General Tab
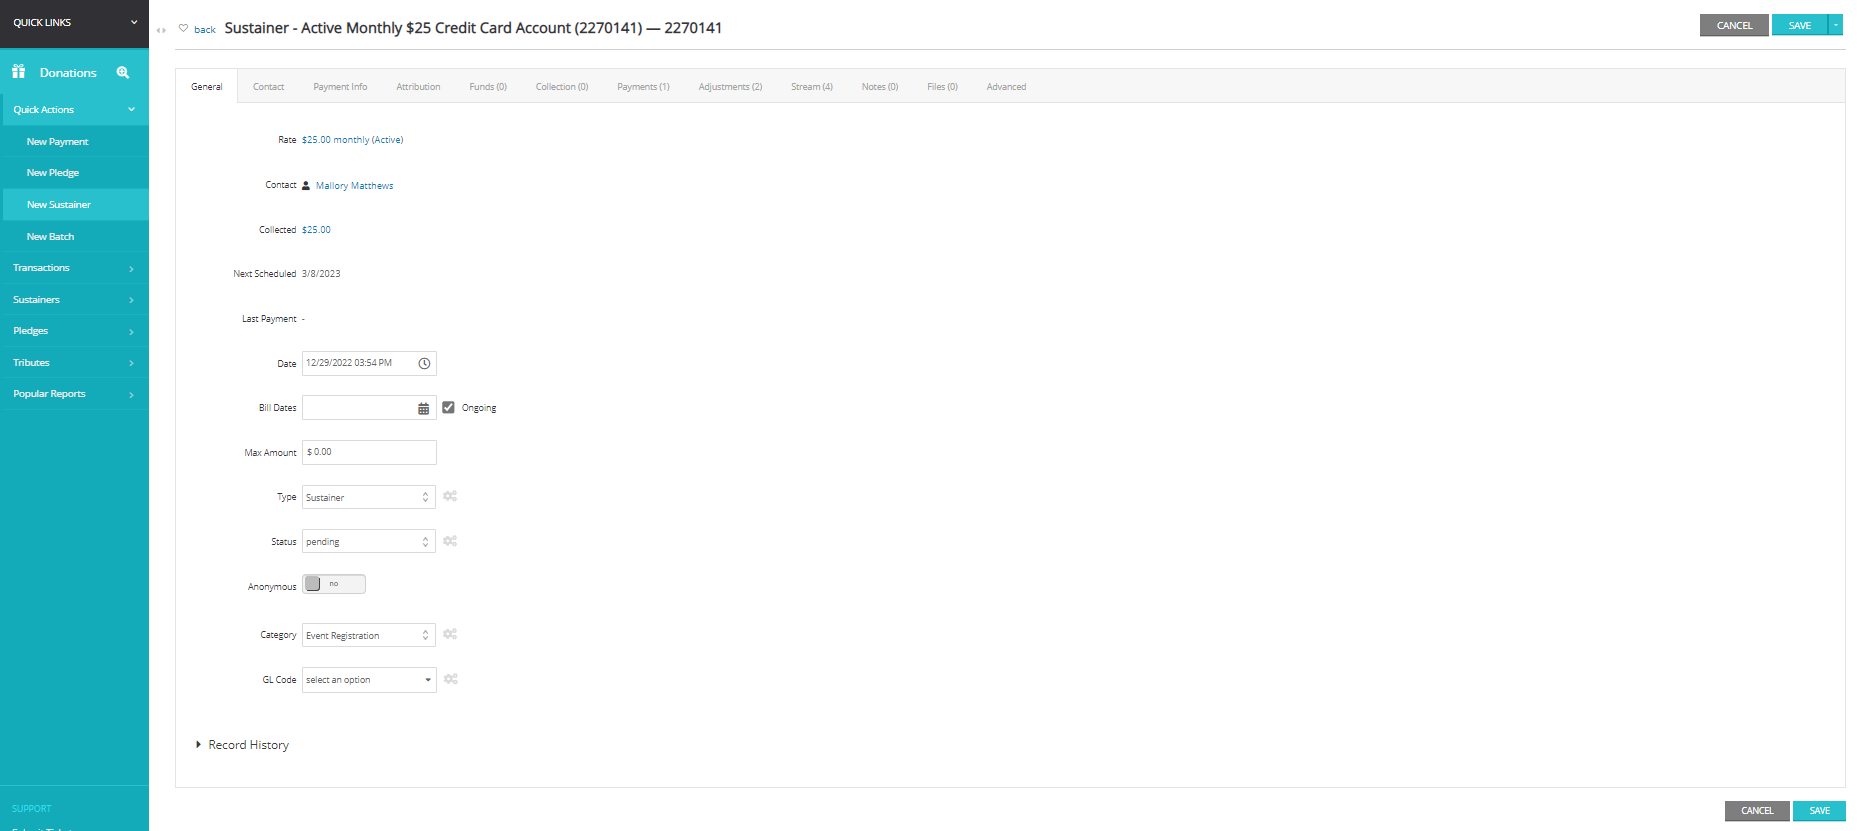
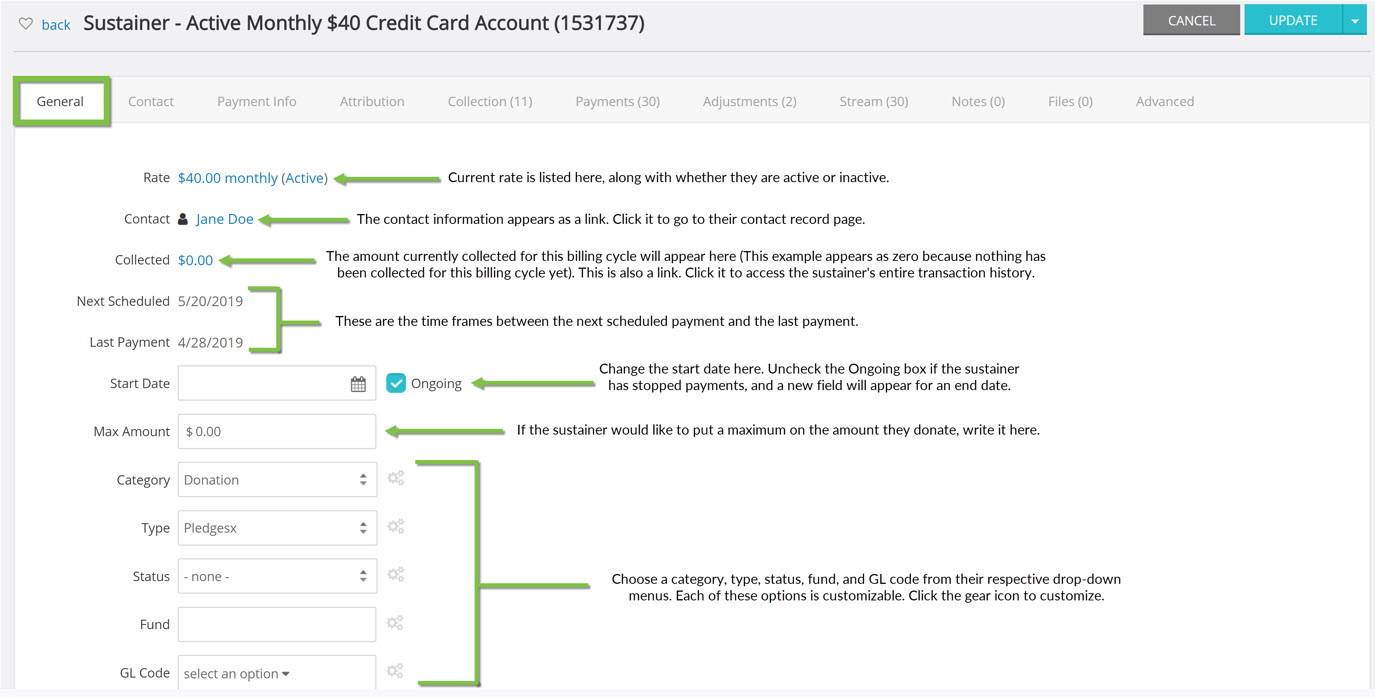
Step 2: The General tab contains the basic information relating to the sustainer, including a link to their contact page, their current monthly rate, their next scheduled payment, etc.
NOTE: The Start Date and Max Amount indicate stopping points for sustainers. invoices/installments will stop being generated either once the end date comes around or if the maximum amount has been reached.
Contact Tab
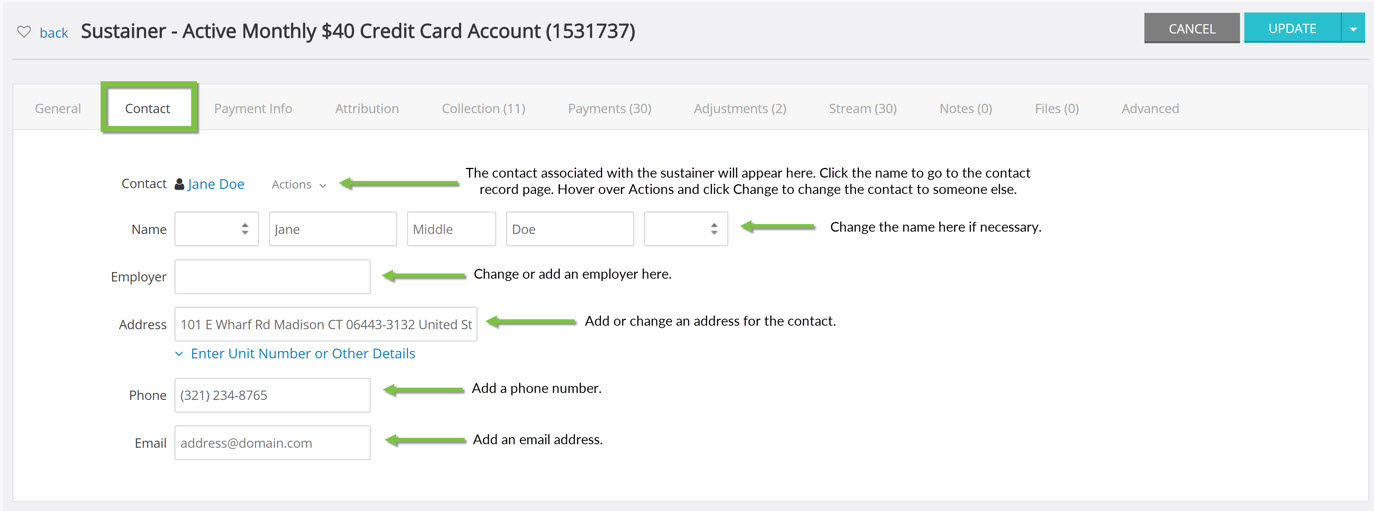
Step 3: The contact tab lists all the contact information related to the sustainer.
Payment Info Tab
Step 4: The Payment Info tab contains all of the information regarding the payment of the sustainer donation. Edit this information here, including changing the currency, billing information, and payment method.
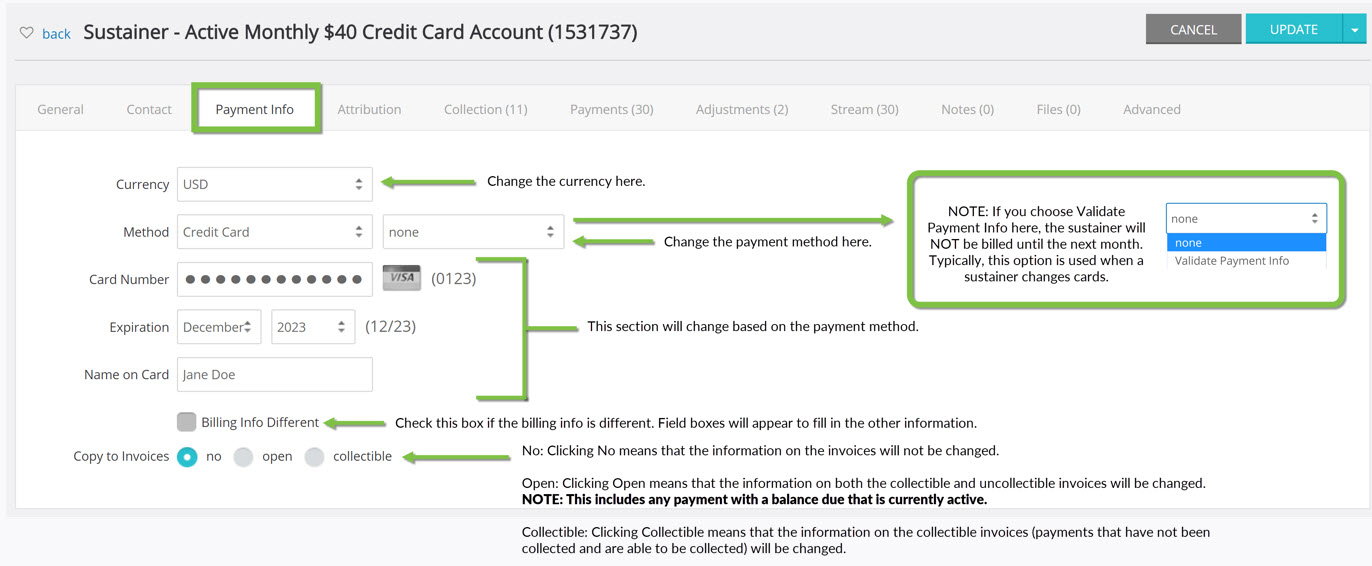
NOTE: If Validate Payment Info is chosen, a Processor option will appear. Choose to either use the default processor, or choose another processor from the drop-down menu. Please see the note in the screenshot above regarding Validate Payment Info.

Attribution Tab
Step 5: The Attribution tab is the space to create attributions for a sustainer payment.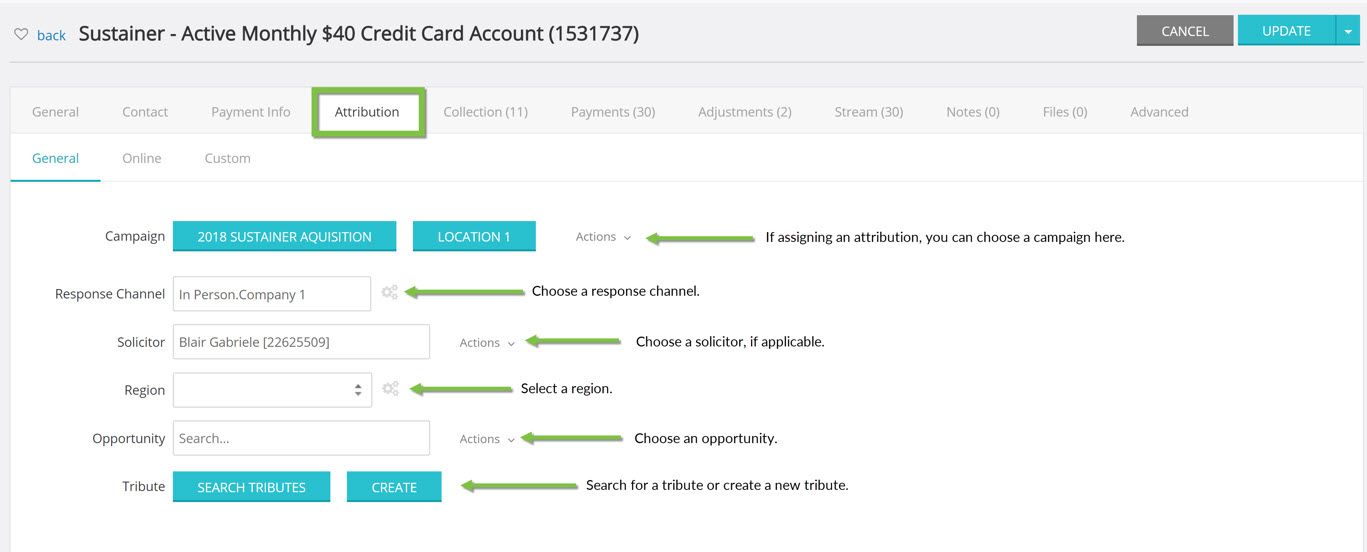
Collection Tab
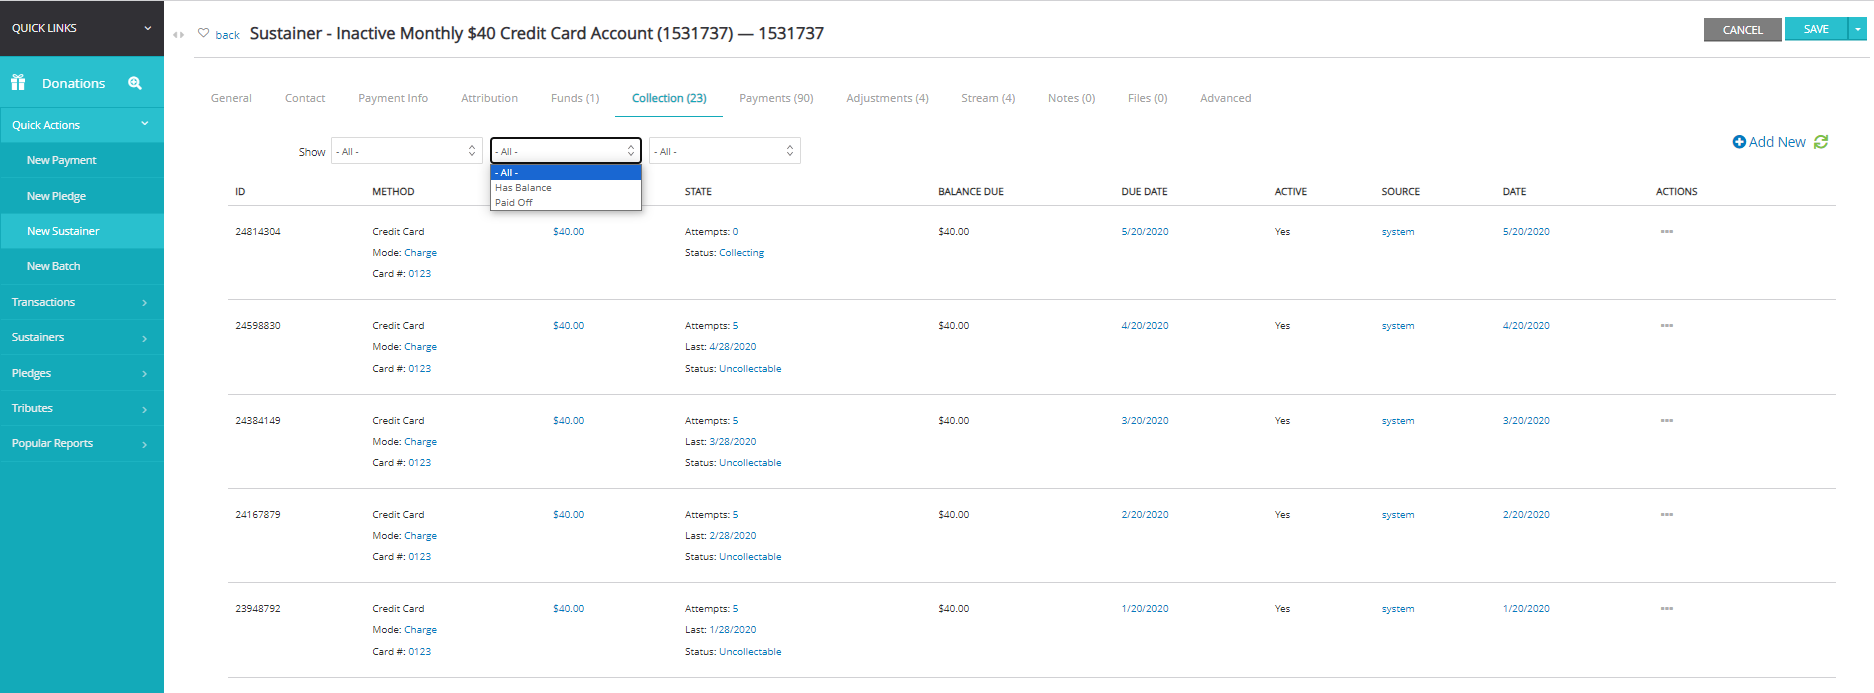
Step 6: The Collection tab is the space for all of the transactional history of the payments that have been collected or have been attempted to be collected. Under this tab, find each attempt at collecting, how many attempts have been made, and whether a payment has been determined collectible or uncollectible.
Use the Collections quick filter to sort individual invoices for statuses such as collectible/uncollectible or has balance/paid off.
Under the ACTIONS expose addition easy access features to manage and process an invoice.
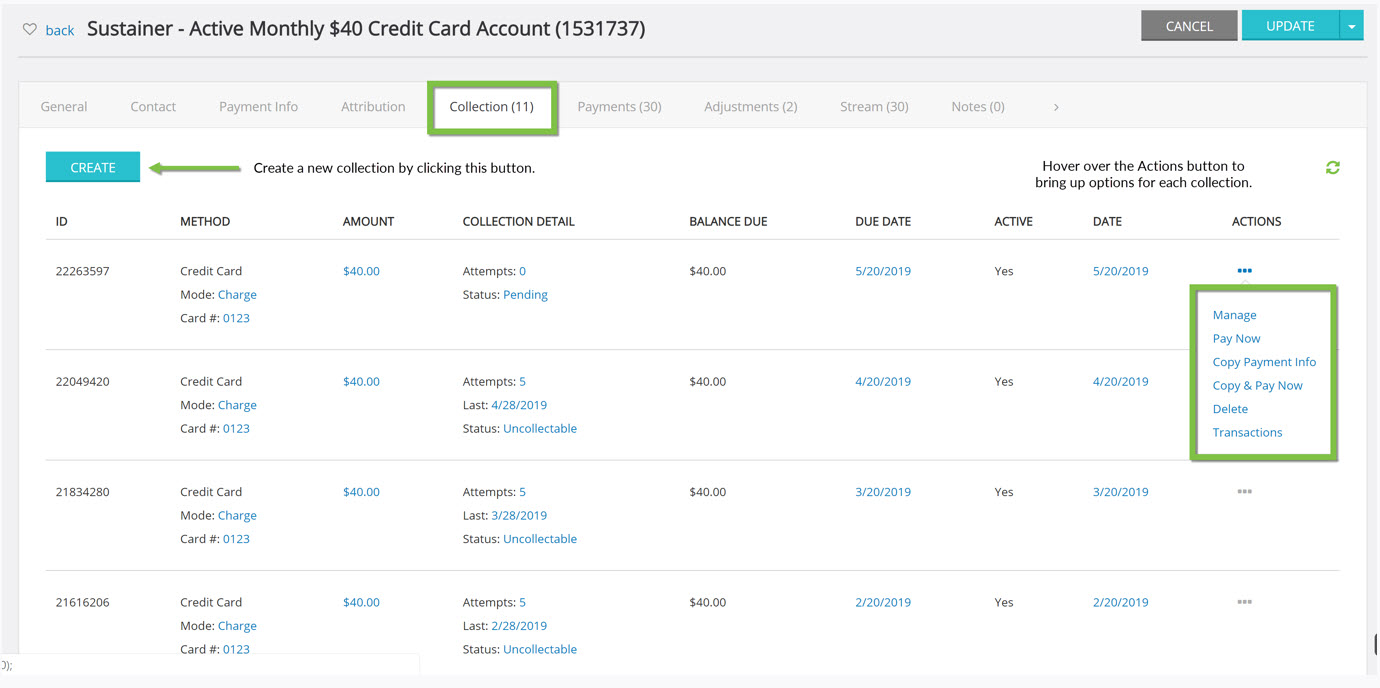
NOTE: The system will allow a payment to be declined a customizable number of times before marking it as uncollectable. Find this customization by clicking Configuration > Billing Configuration > Collection Tab.

Payments Tab
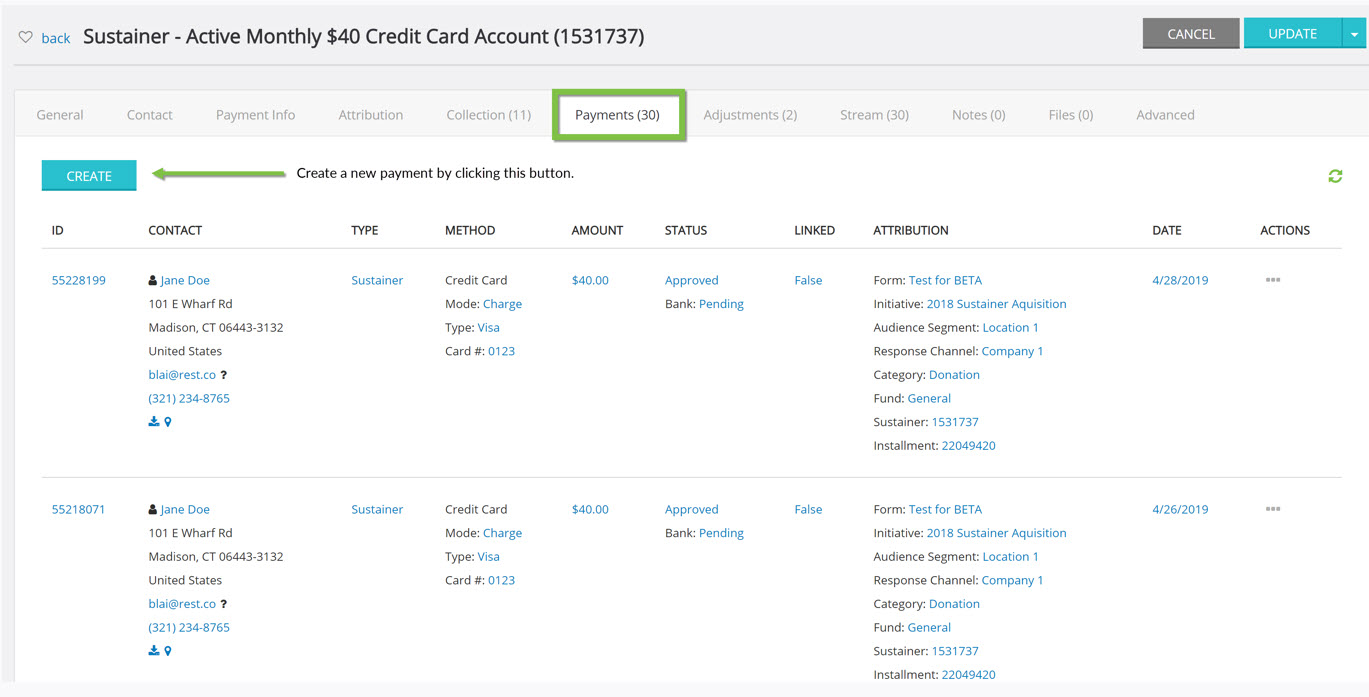
Step 7: The Payments tab is the space for all payments listed under this sustainer contact, not just the ones that are automatically collected. This tab works similarly to the Donations listing screen—refund, chargeback, etc. are all available for each listing under this tab.
Adjustments Tab
Step 8: The Adjustments tab keeps track of every adjustment made to the sustainer account. In this example, the bill rate was raised and then lowered again, so it is marked Downgrade and Upgrade. Add Notes to these adjustments under the Notes tab.
Note: Admins are not the only ones who can make changes. If an end-user updates their info through the User Center or sustainer reactivation, they will appear as the user in this tab.

Advanced Tab
Step 9: If you would like to override the default processor, find the drop-down in the Advanced tab.

Instruction: How to Update a Sustainer's Payment Information

Alternatively, you can navigate to the Contacts App > Organizations & People > Contacts > locate the contact record > ACTIONS: Manage > Go to: Sustainers


Step 2: After clicking on Manage, you will be able to do things like update donation amount, next payment date, or change the payment method.
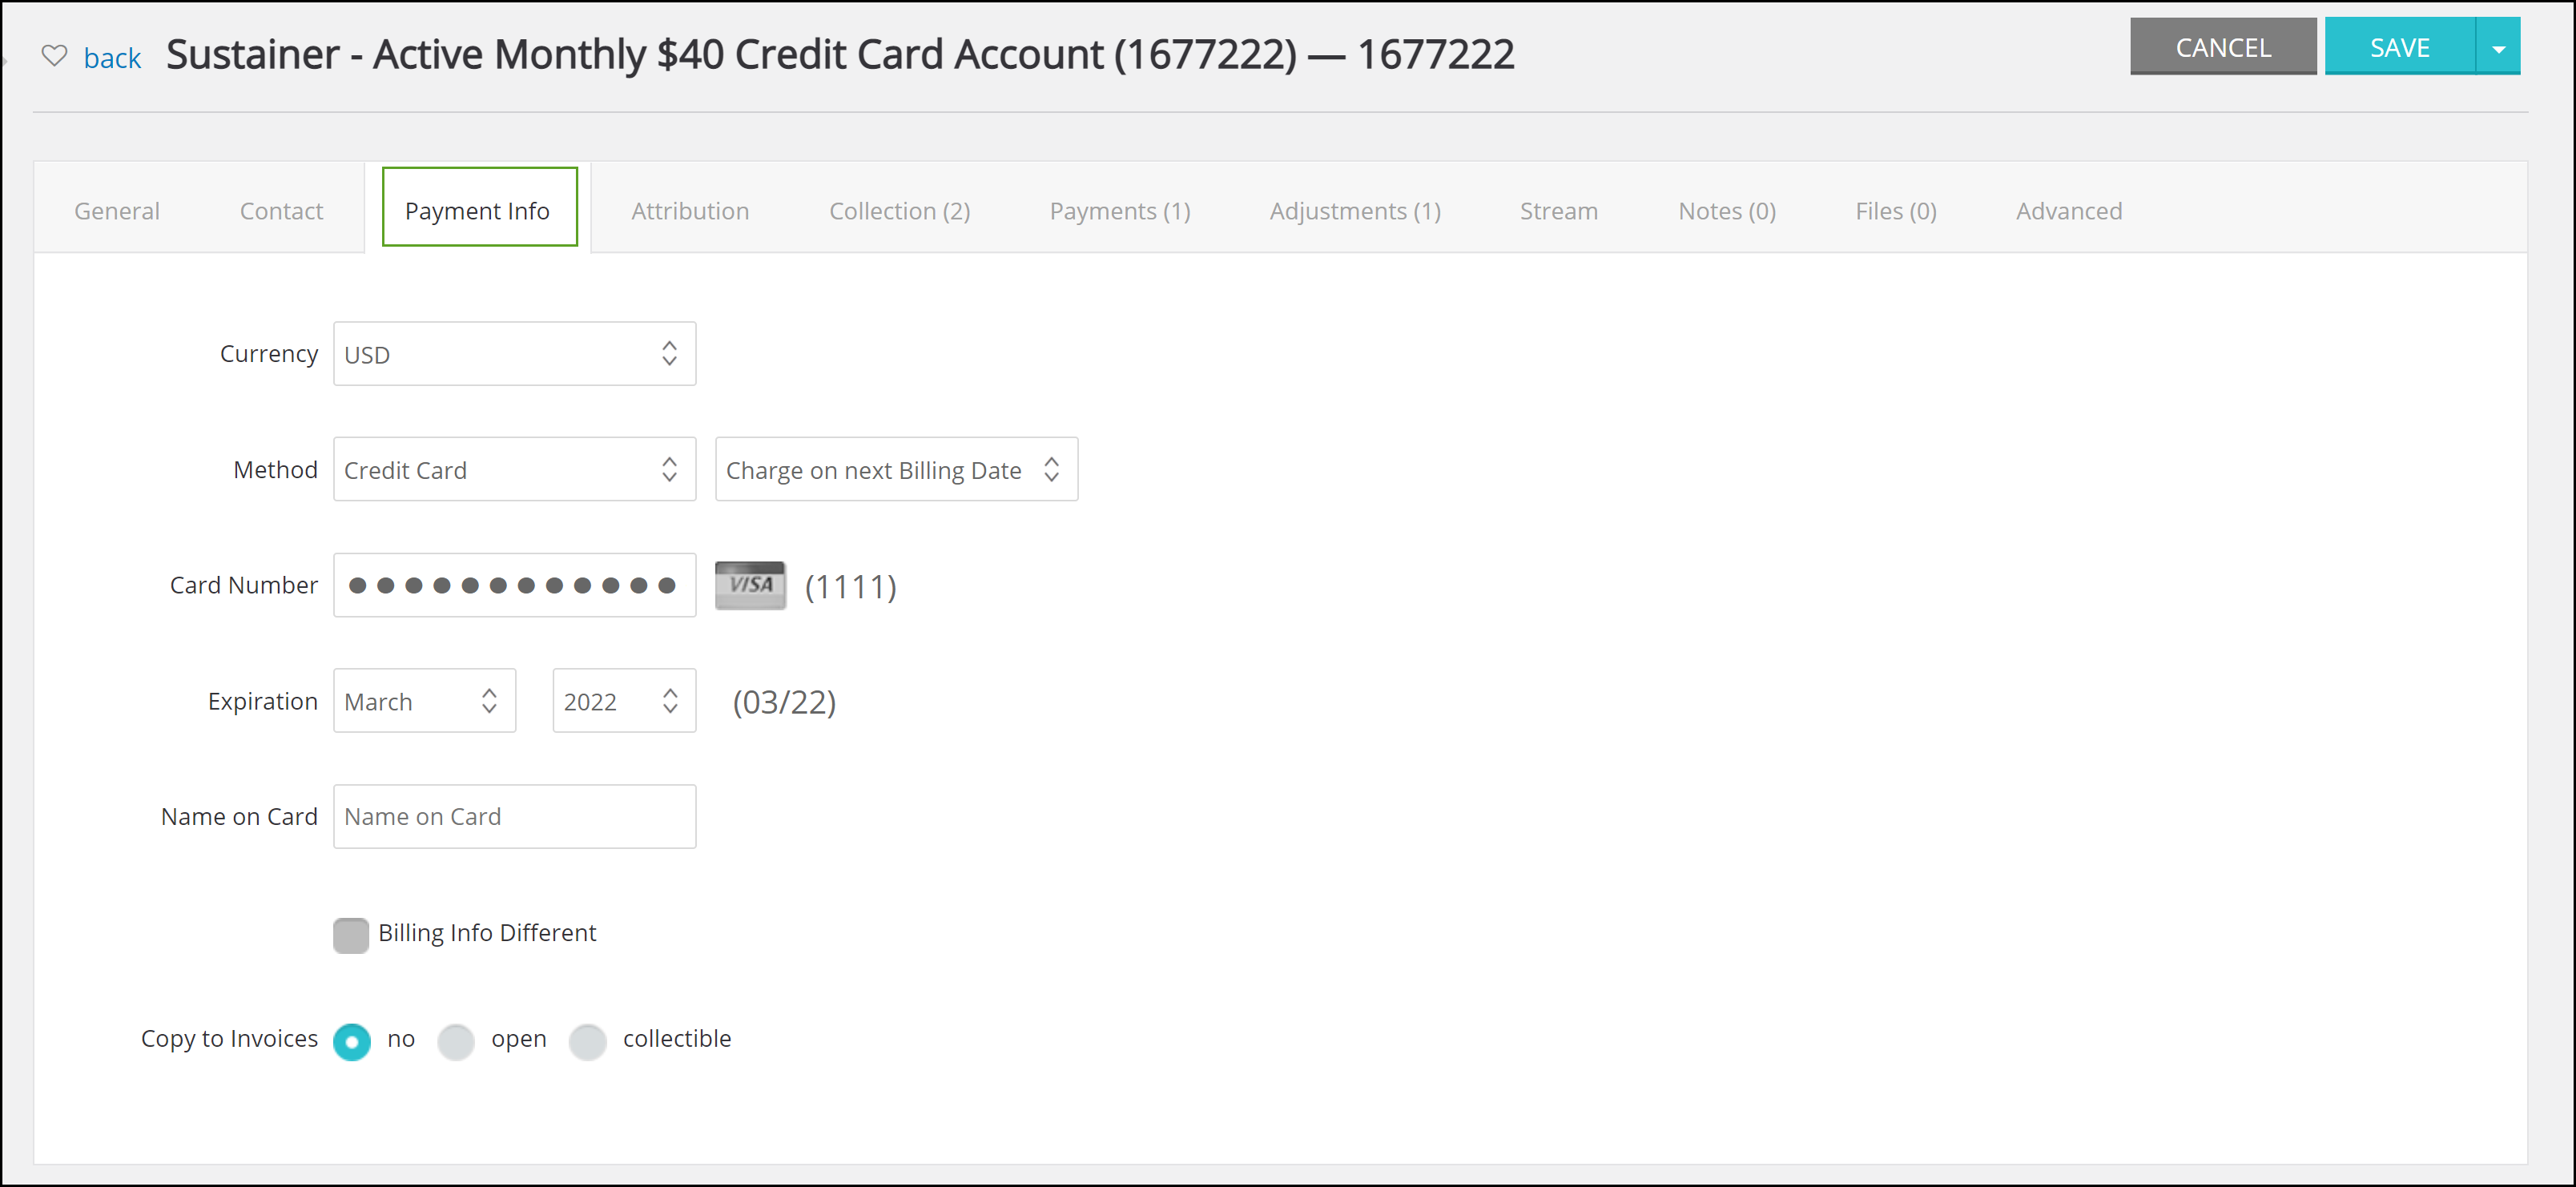
Step 4: Enter the new Credit Card information and in the dropdown next to the payment method, select Validate Payment & Charge on Next Billing Date.
-
- Selecting this option will verify that you have a good credit card number by making a $0.01 authorization on the credit card.

Step 5: The last step is to decide whether this new payment information should apply to any open or collectible invoices/installments.
- Selecting this option will verify that you have a good credit card number by making a $0.01 authorization on the credit card.
-
- Typically, if payment has been failing you will want to copy to collectible invoices/installments so that should be selected.
- Selecting none means that only newly created invoices/installments will use this new payment information.
- Selecting open will be applied to any open invoice/installment that has not been attempted for collection.

Step 6: When you are done updating payment information and your invoice/installment settings, click SAVE.
How to Send a Sustainer Reactivation Link from the Donations app
In the Donations App, Under Sustainers, click on Search and Manage.
Then, click Manage on the specific sustainer you want to send the reactivation link to.
Next, click on the drop-down arrow next to the 'Save' button and click on 'Reactivation-Link'
Next, a pop-up box will appear for you to fill out the following information: 
On the next page, you can load in a template message to send to your sustainer or create an email to send to them.
After your message has been created, go into the Tokens tab and search for 'Reactivation URL'
This will then create the customized link to send to the donor. 
Then, you can click on the 'Next' button and send the email
Click Process

Instructions - Sustainer SAVE Drop Down Bar
In the top right corner of the page to manage a sustainer is the Save drop-down bar. Clicking the arrow next to the bar will bring up a list of options.

New Payment
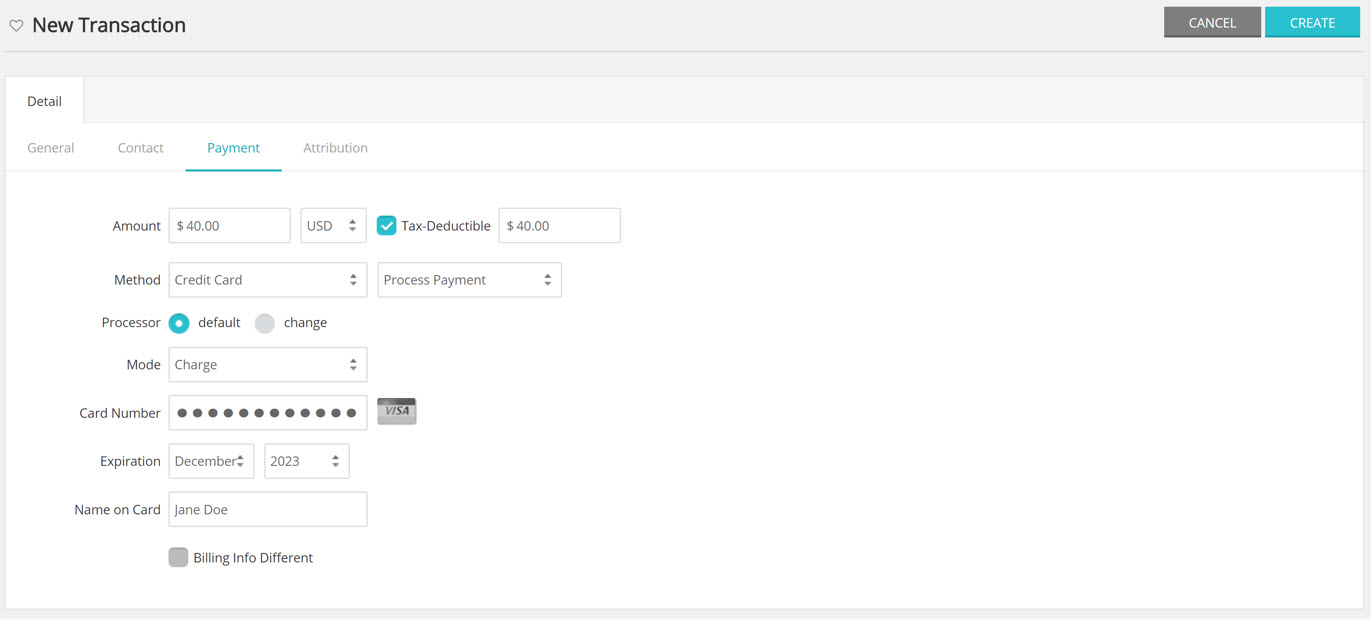
Clicking New Payment will bring you to the New Transaction screen (Payment Tab) with the sustainer’s information automatically populated.
New invoice/installment
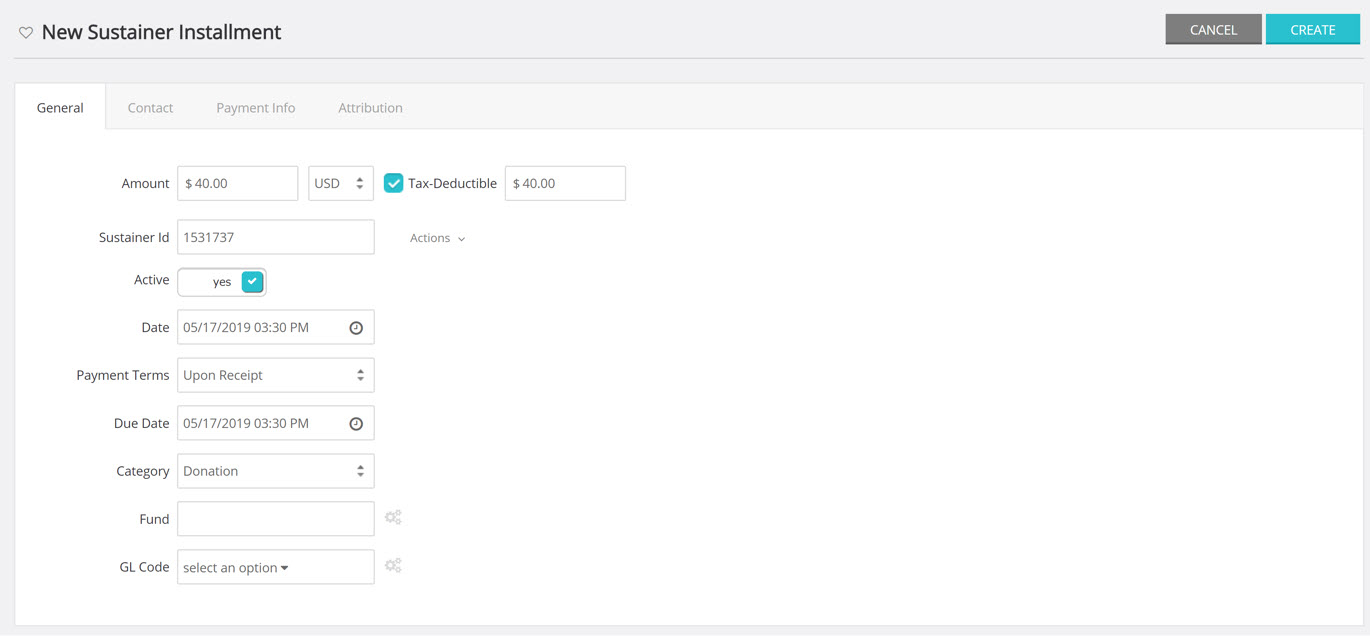
The New invoice/installment option will bring you to the New Sustainer Installment page. Here, create a new invoice/installment if it is necessary.
NOTE: On the day the sustainer is billed, the system automatically creates a new invoice/installment for the following billing cycle. When one invoice/installment is filled, the next one is created automatically.
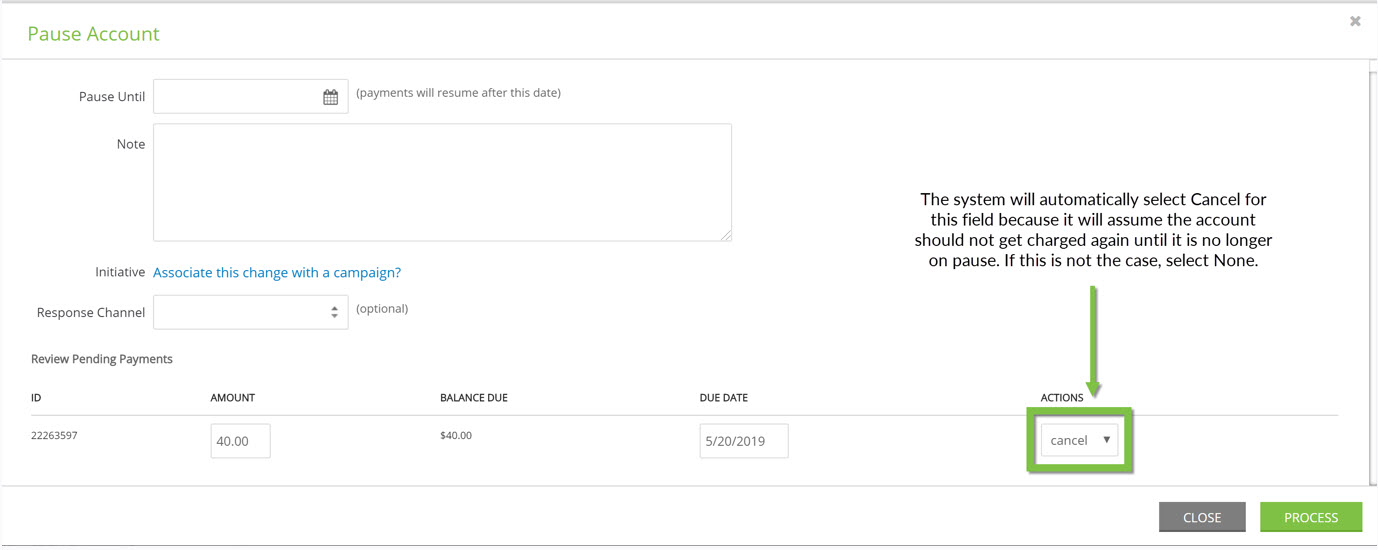
Pause
If a sustainer wants to discontinue payments for a period of
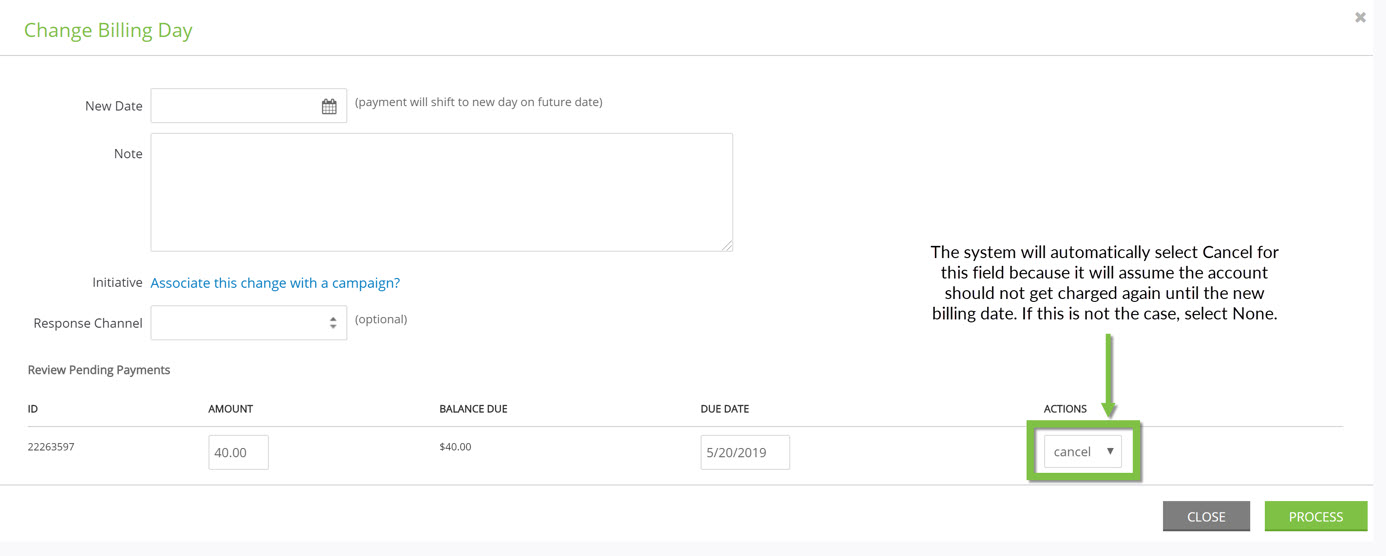
Billing Date
Clicking Billing Date allows a user to change the date that the sustainer is billed every month. A pop-up box will appear with details.
Change Rate
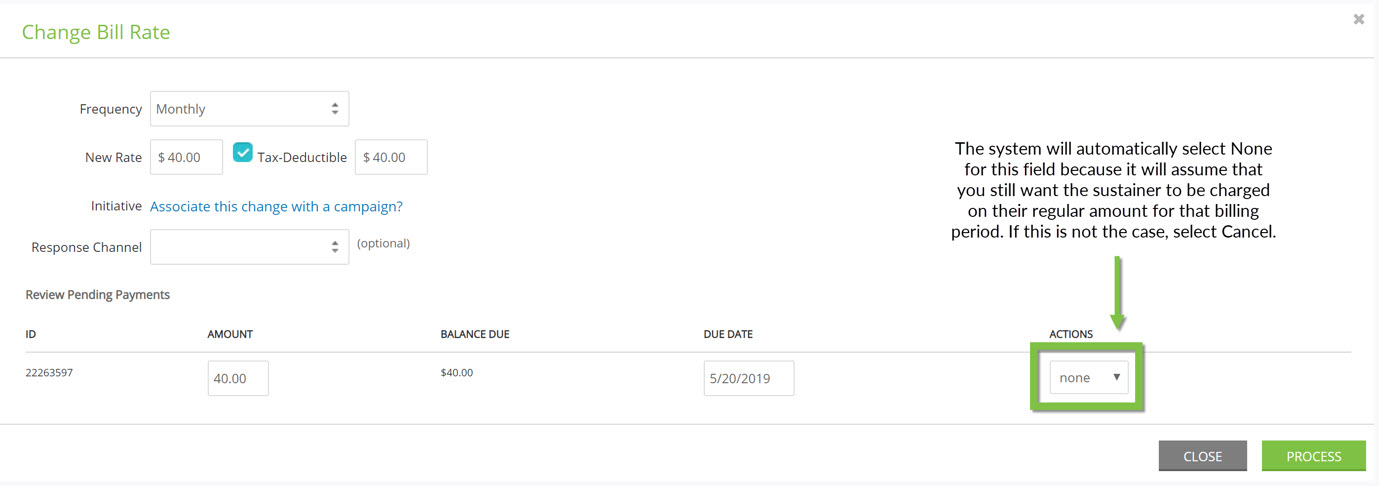
Change the monthly billing rate at any time by clicking Change Rate. Change the amount by clicking in the field box and typing a new amount. When the amount is changed, you have the opportunity to change the amount of the next invoice/installment. You may choose to Cancel here so that the current invoice/installment can be canceled and a new one with the new amount can be generated.
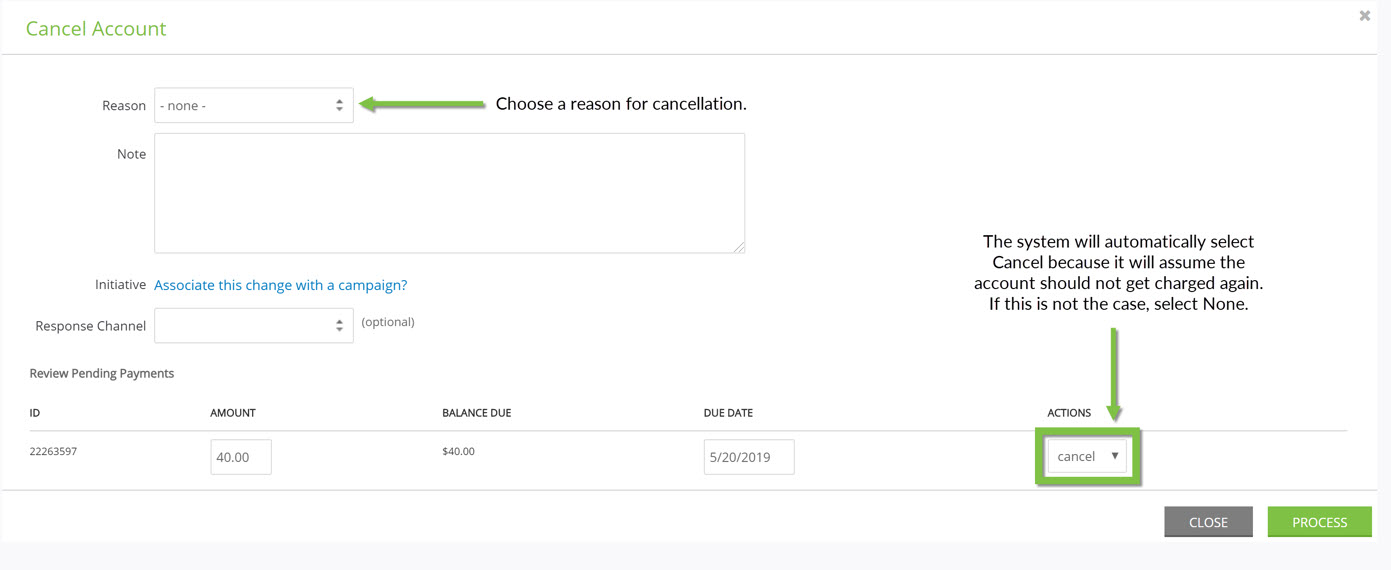
Cancel
Choose Cancel if the sustainer wants to cancel their account.
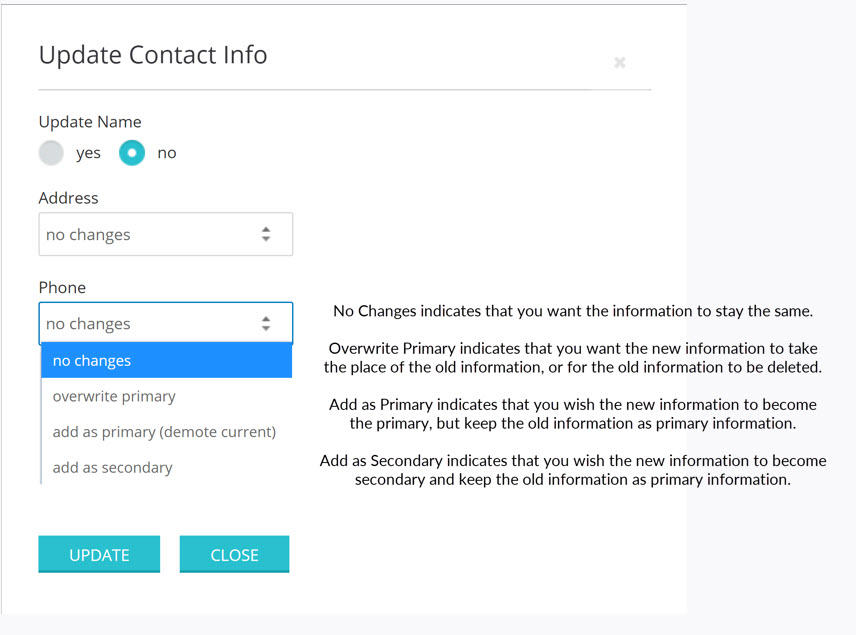
Update Contact Info
A pop-up box will appear when you click Update Contact Info. Choose whether or not to update the name, then change the address and phone number if necessary. The drop-down menu will offer four options.
Create & Move
Create & Move will take the sustainer account and reassign it to a new contact. A pop-up box will appear to warn you when you click on this link.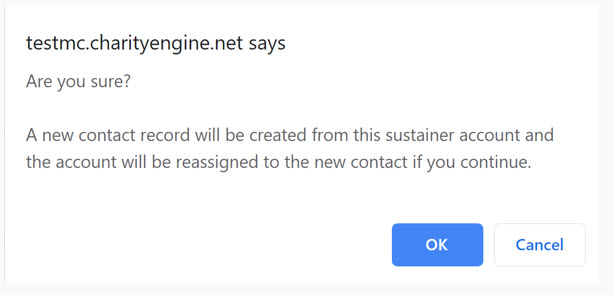
New Note and New File
Create new notes and new files associated with this sustainer account from here. For more information, see our Notes and


Email Communication - Declined/Failed Payment Communication Series
The ability to identify and proactively communicate with donors is critical when a recurring payment has failed. This may be due to an expired card, as an example. CharityEngine makes it easy for you to create a proactive communication series designed to be initiated if a sustainer fails to make a successful payment. With development of an email communication series, you can proactively have donors update their payment information.
Step 1: Create your communication by navigating to the Campaign App > Create & Publish > Creative > Create New
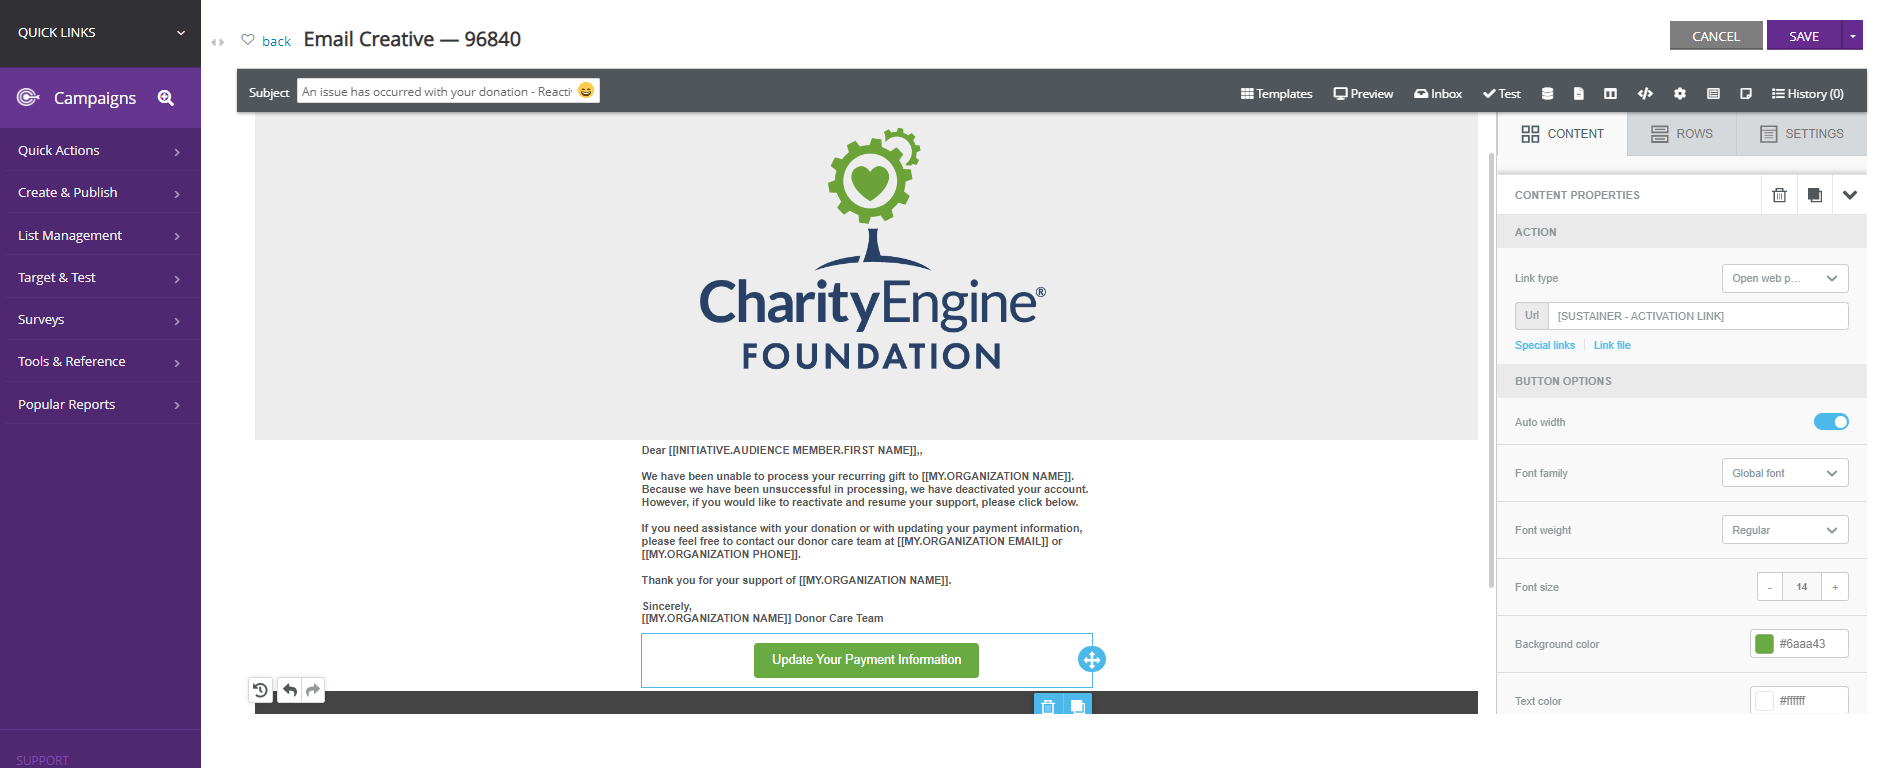
Step 2: Create your content
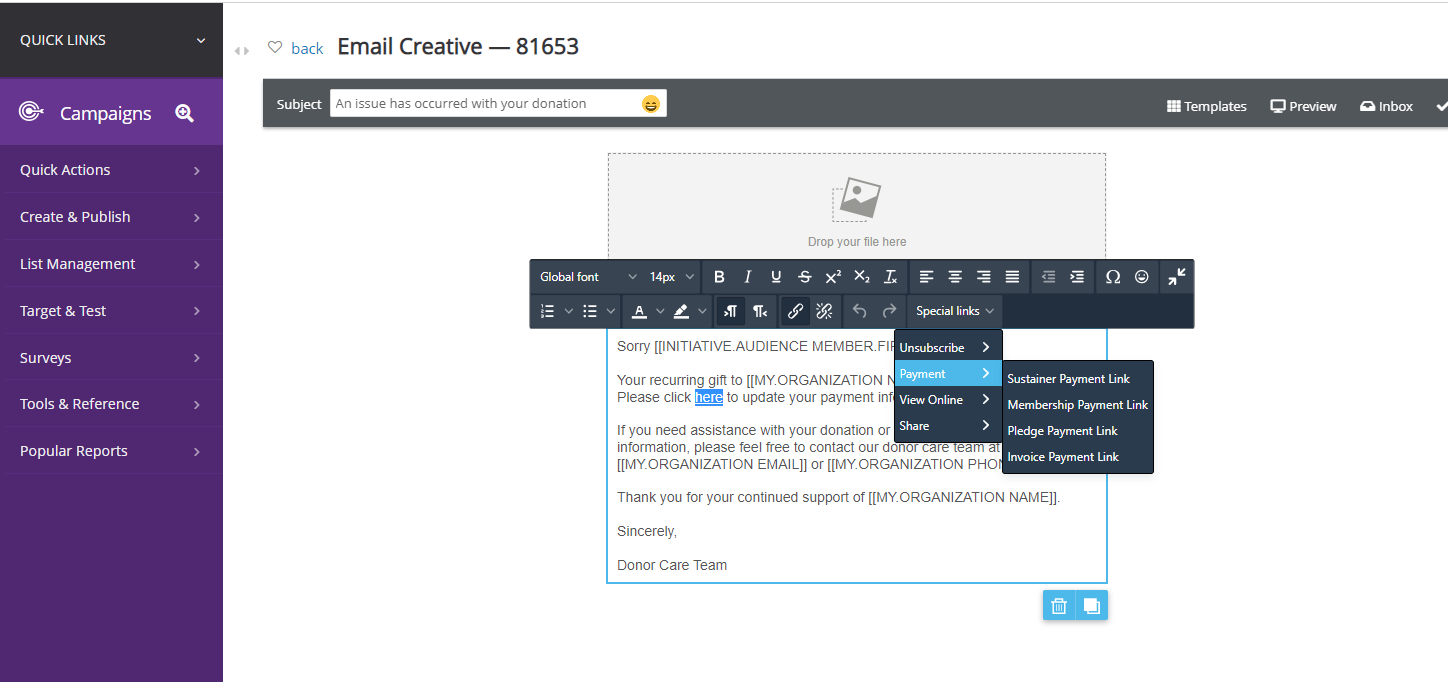
- Note: To recreate the Update Your Payment Information button, highlight the language and navigate to the Content tab > click Special links > select Sustainer Payment Link
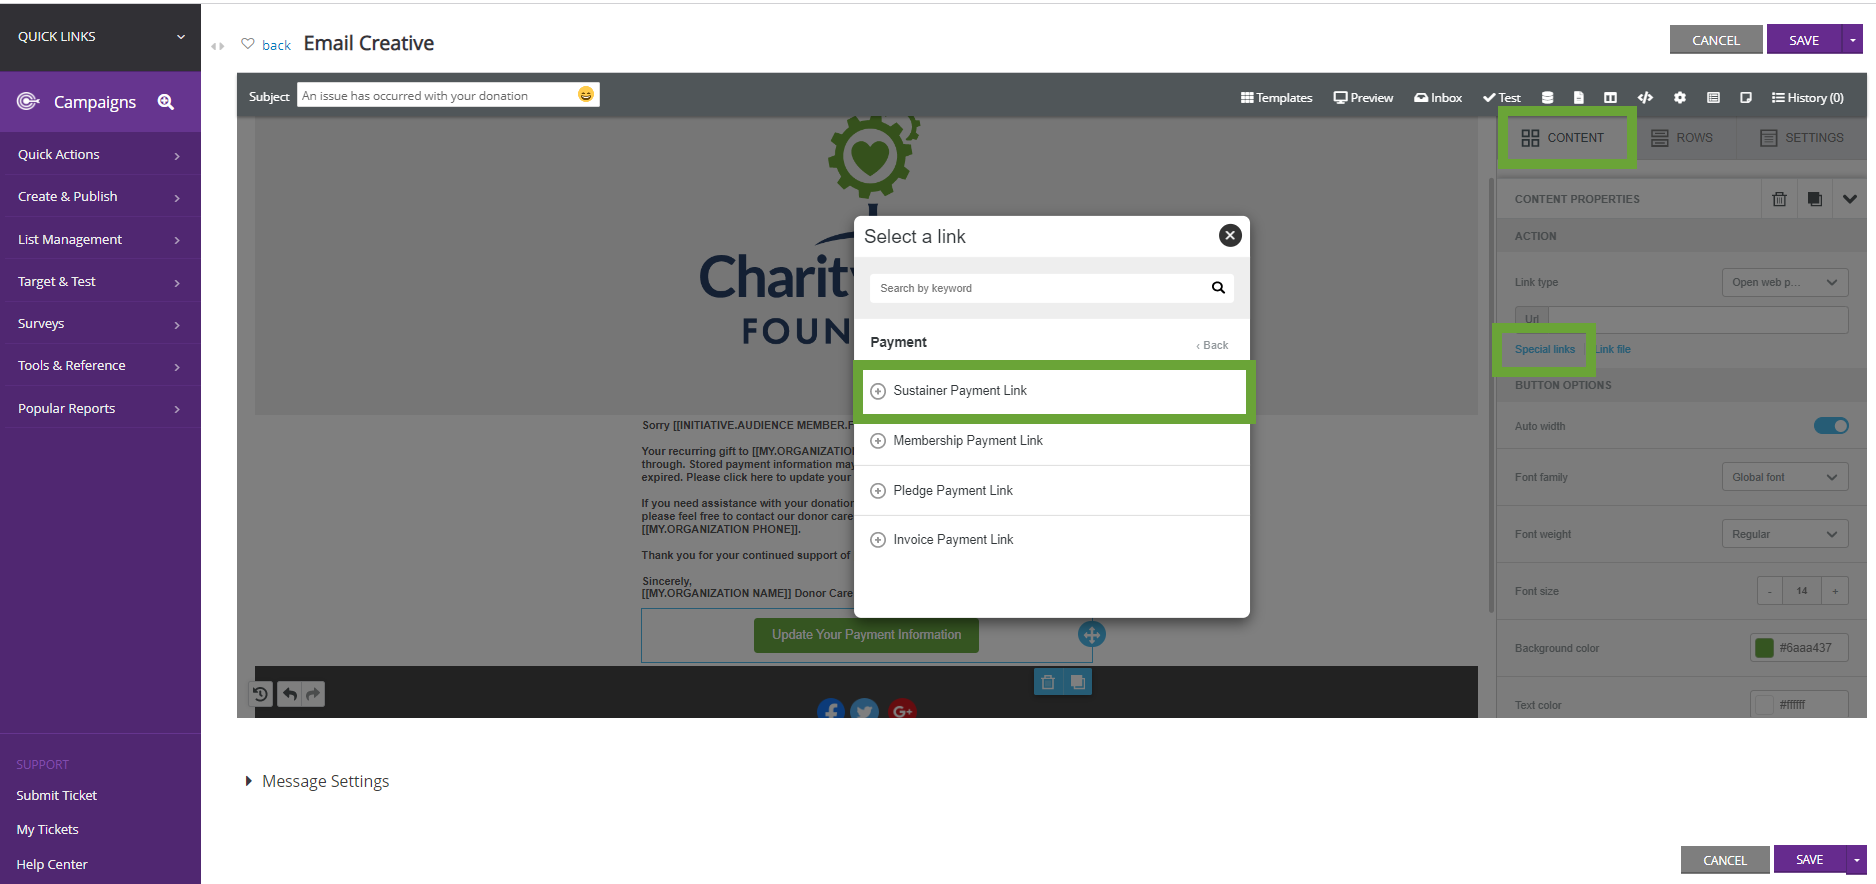
Step 3: Click SAVE to secure your changes
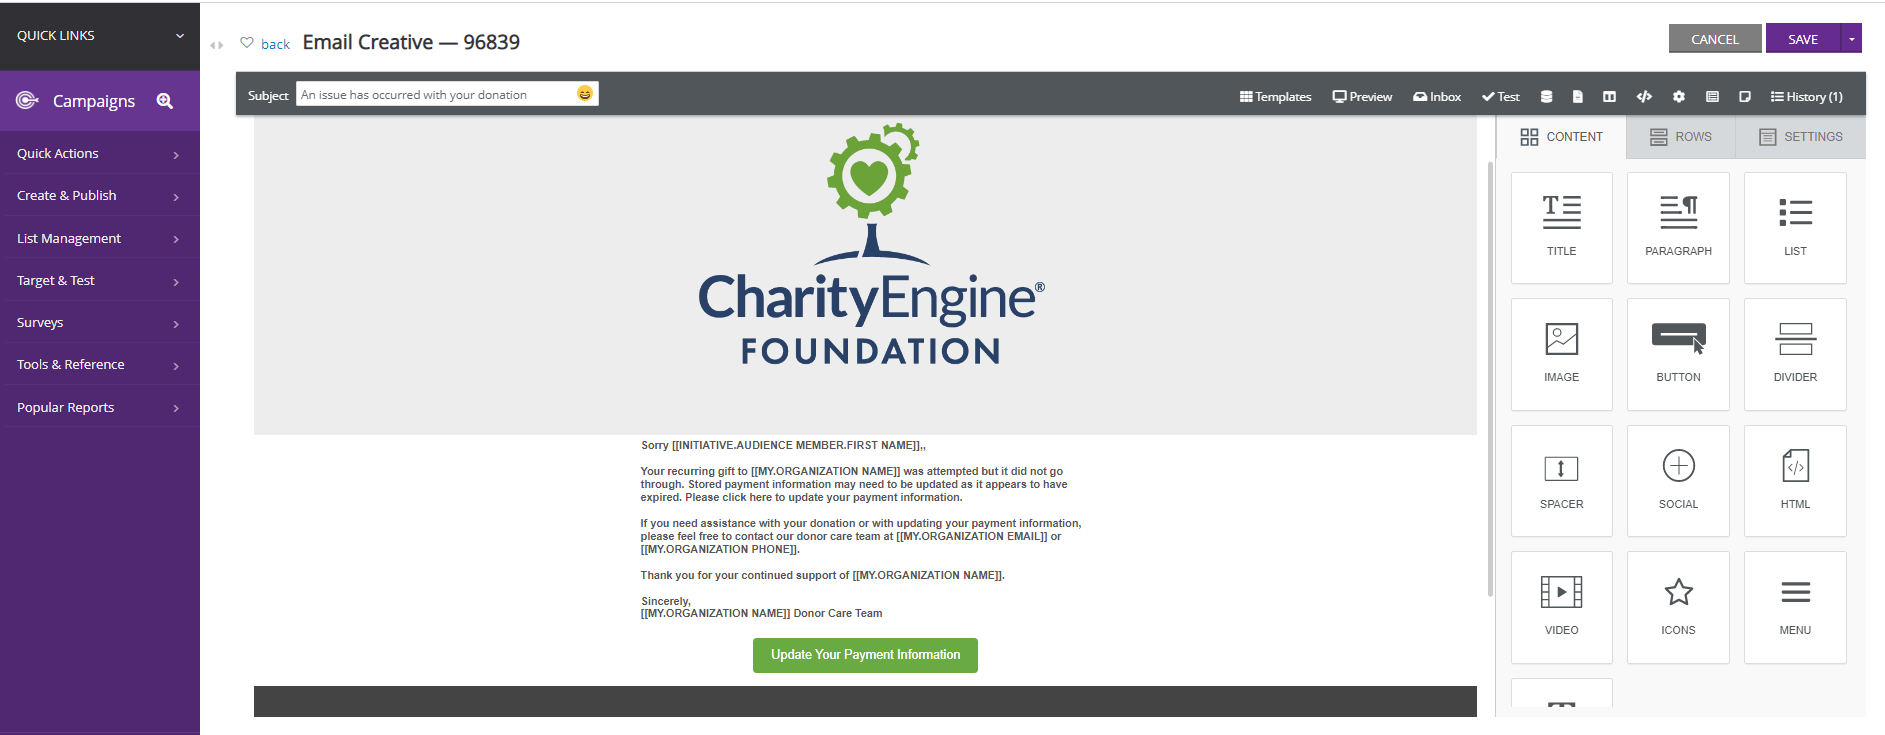
Step 4: Now that the email creative has been created, begin to create the automated communication series. Navigate to the Campaigns App > Communication Series > Create New > click Failed Payment > Continued

Step 5: Name the communication series (required), select date range and description and click CREATE
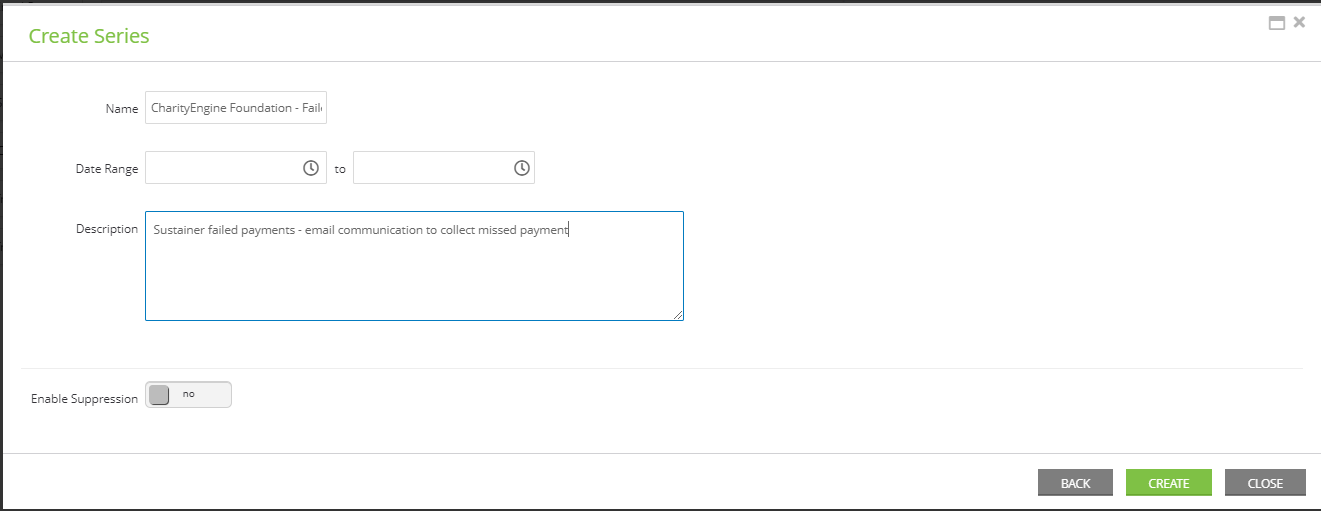
Step 6: Use the Click Here to Add Email Step

Step 7: Click on change message to attach the creative developed in step 1

Step 8: Click SAVE and on the pop up click SAVE

Note: A query will be automatically created designed to identify sustainers who have outstanding invoices/installments with balances > $0 and failed collection attempts for the day prior.
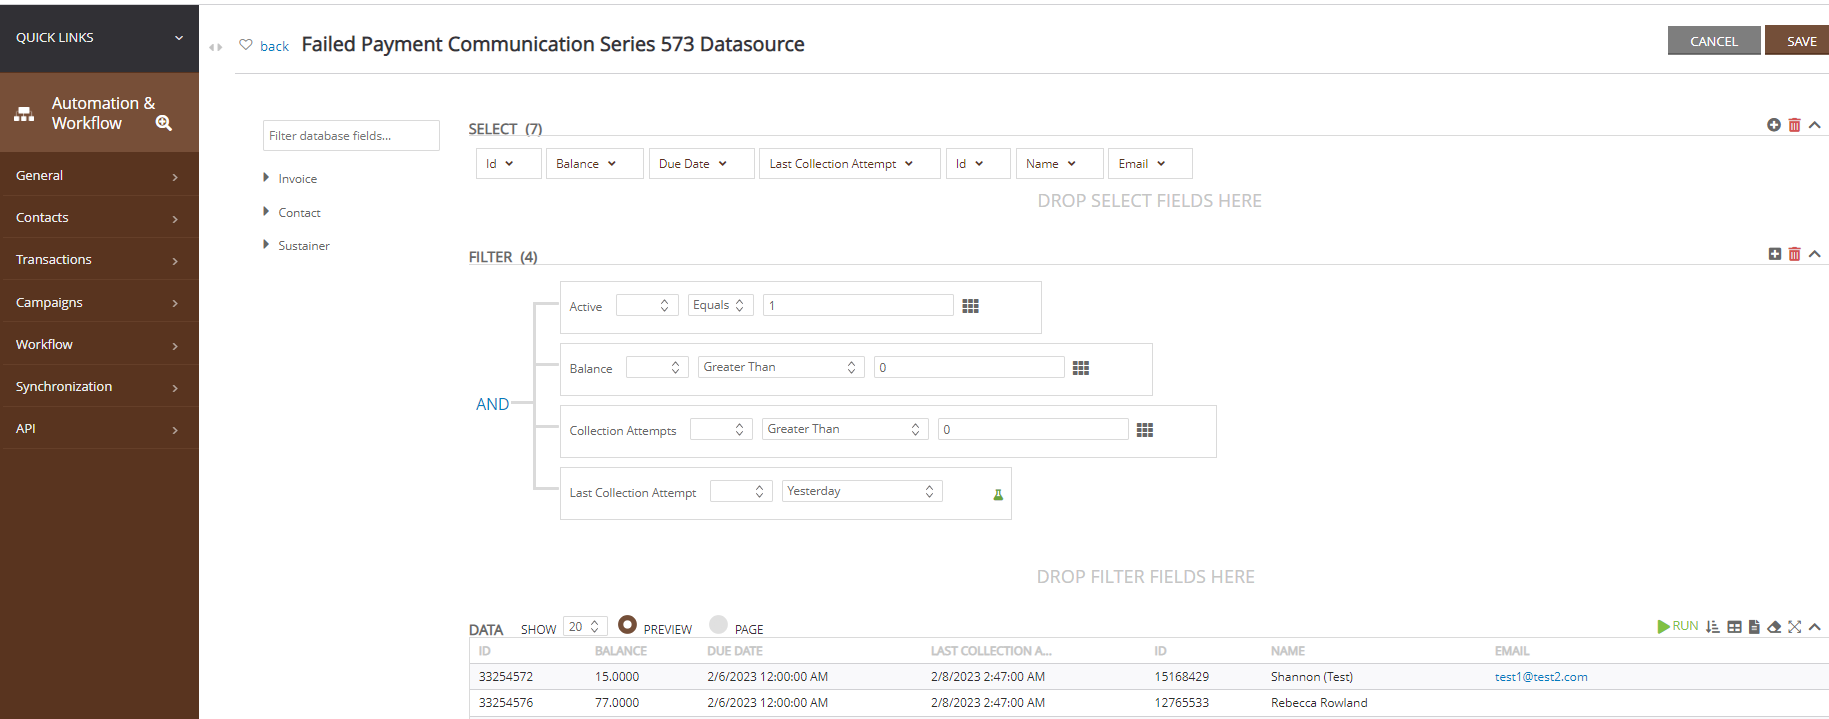
Step 9: Initiate the Declined Communication Series by returning to Campaigns App > Create & Publish > Communication Series > locate your series > ACTIONS > Launch

Step 10: The communication series will now report as Active. Navigate to the ACTIONS listing to pause or delete in the future. Under Campaigns App > Create & Publish > Initiatives to monitor sending performance.
Note: If an initiative returns as Failed, hover over the Failed label to determine reason of failure - this could include no audience members in that daily send.
When your donor receives the Failed Payment Communication Series, the Update Your Payment Information will be linked to the Bill Payment App allowing the donor to self-service and provide updated payment information.

How to Configure Your Billing and Auto Deactivation
As a part of good data hygiene, deactivating sustainers who have had several declined payments is an important action. This will prevent the database from trying to charge donors who have not updated their payment information. This action will also ensure that accurate reporting of lost future revenue.
You will need to configure your billing and auto deactivation settings to have CharityEngine automatically deactivate sustainers after a certain number of failed payments.
First, you will need to configure your billing settings. Navigate to Configuration> Billing > Configuration > Collection Tab.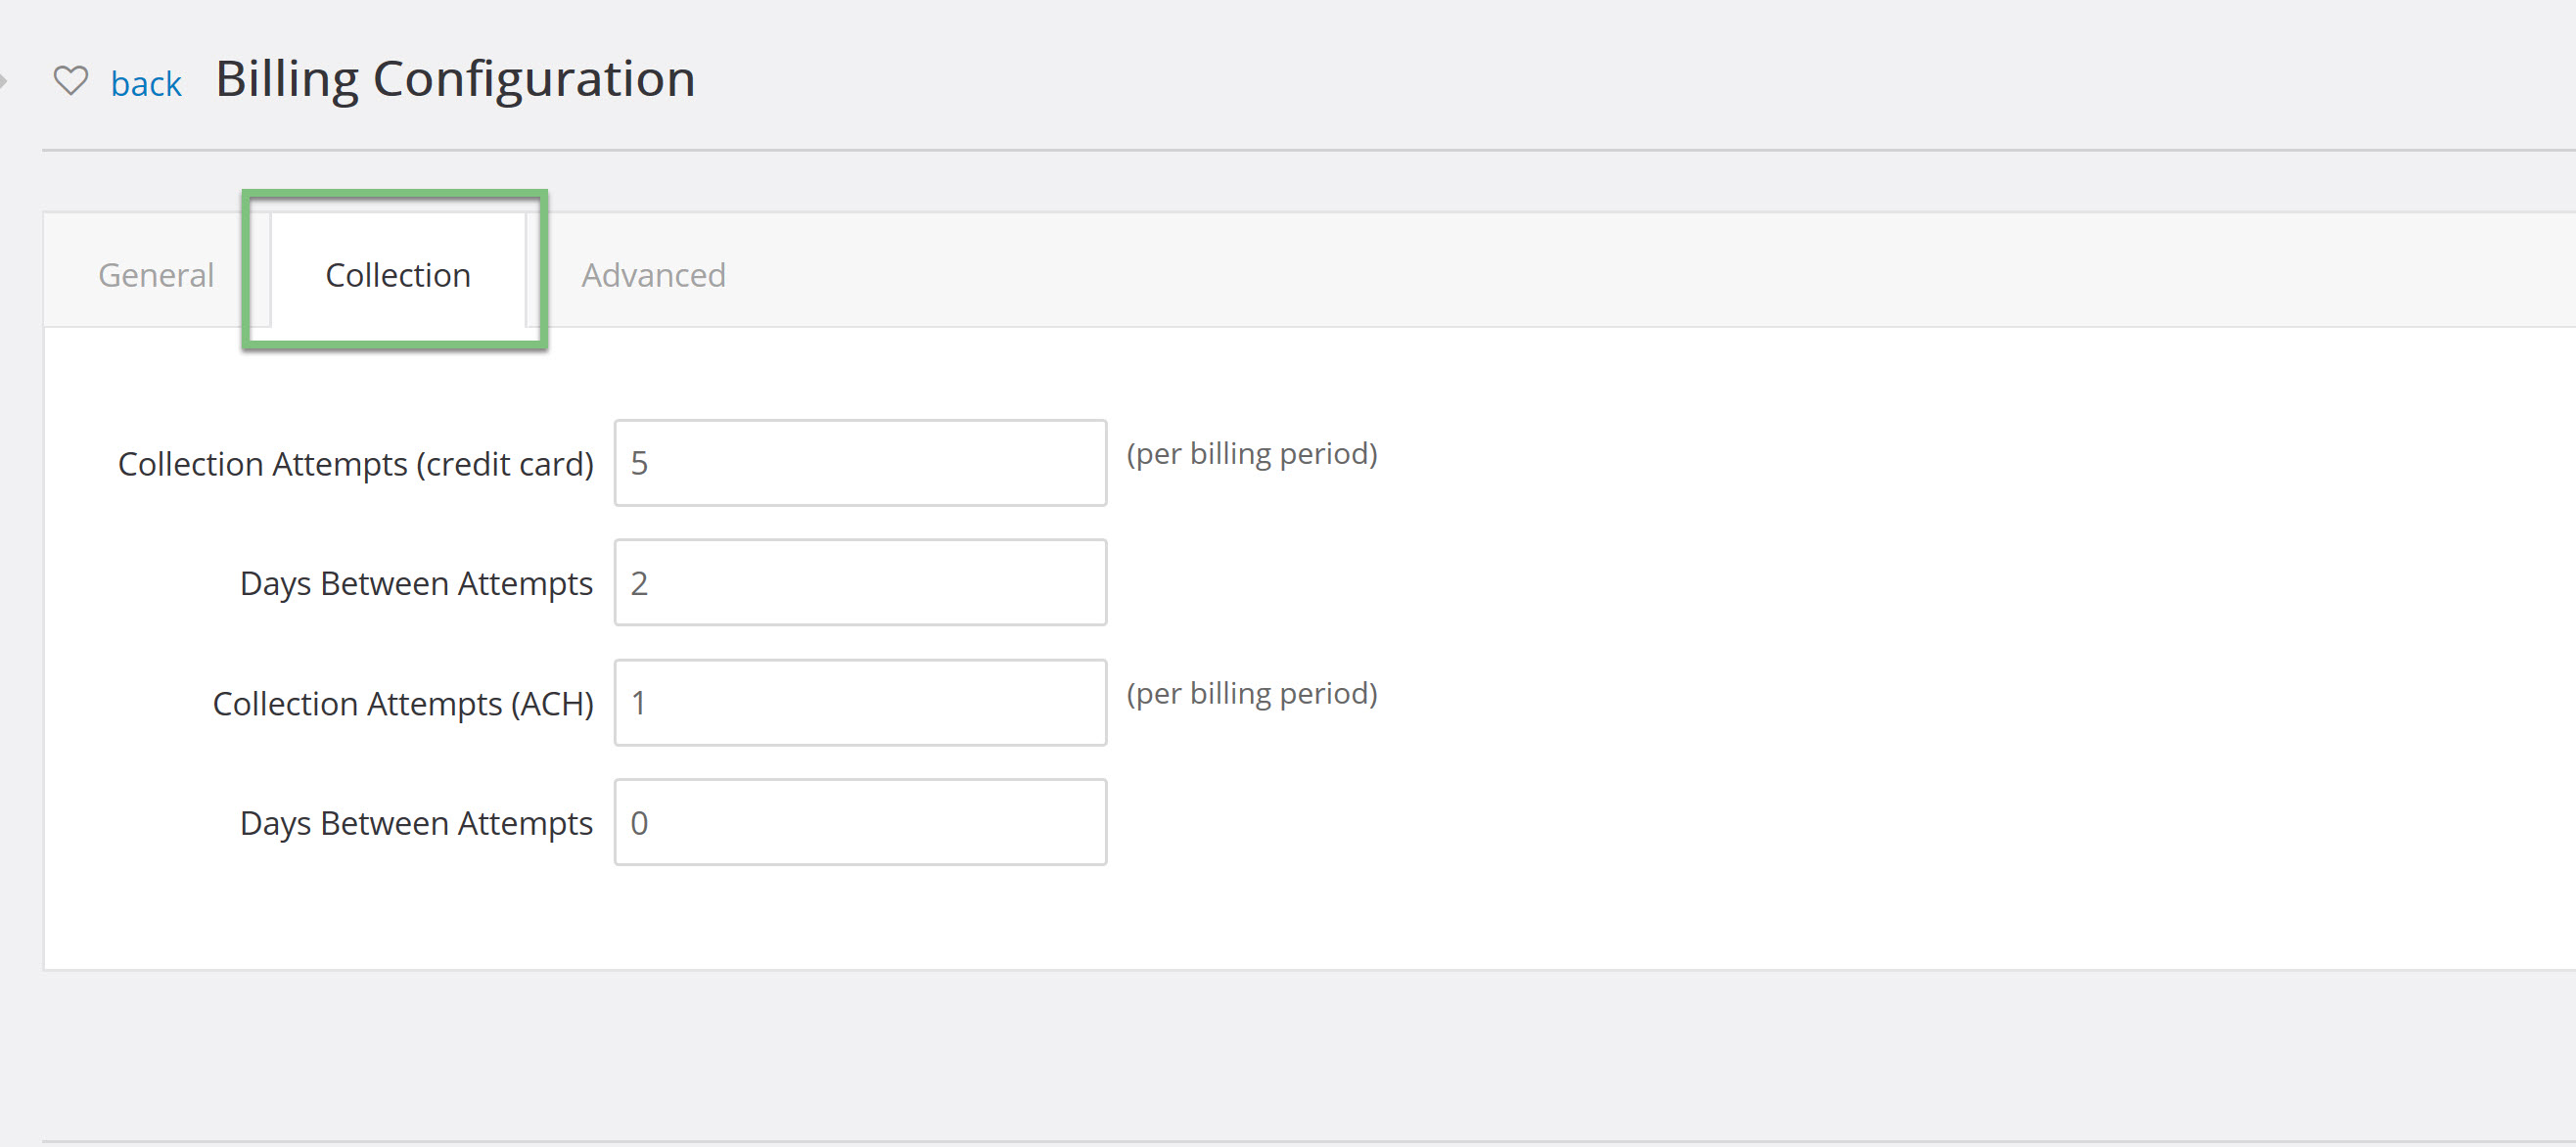
You will need to configure the number of collection attempts, or how many times per billing period that an attempt was made to charge the sustainers payment method, for both Credit Card and ACH.
Note: The reason there are different rules for Credit Cards vs ACH is that additional collection attempts for ACH can cause the donor to be charged by their bank for the failures. Our guidance is that users configure only one attempt per invoice/installment for ACH sustainers.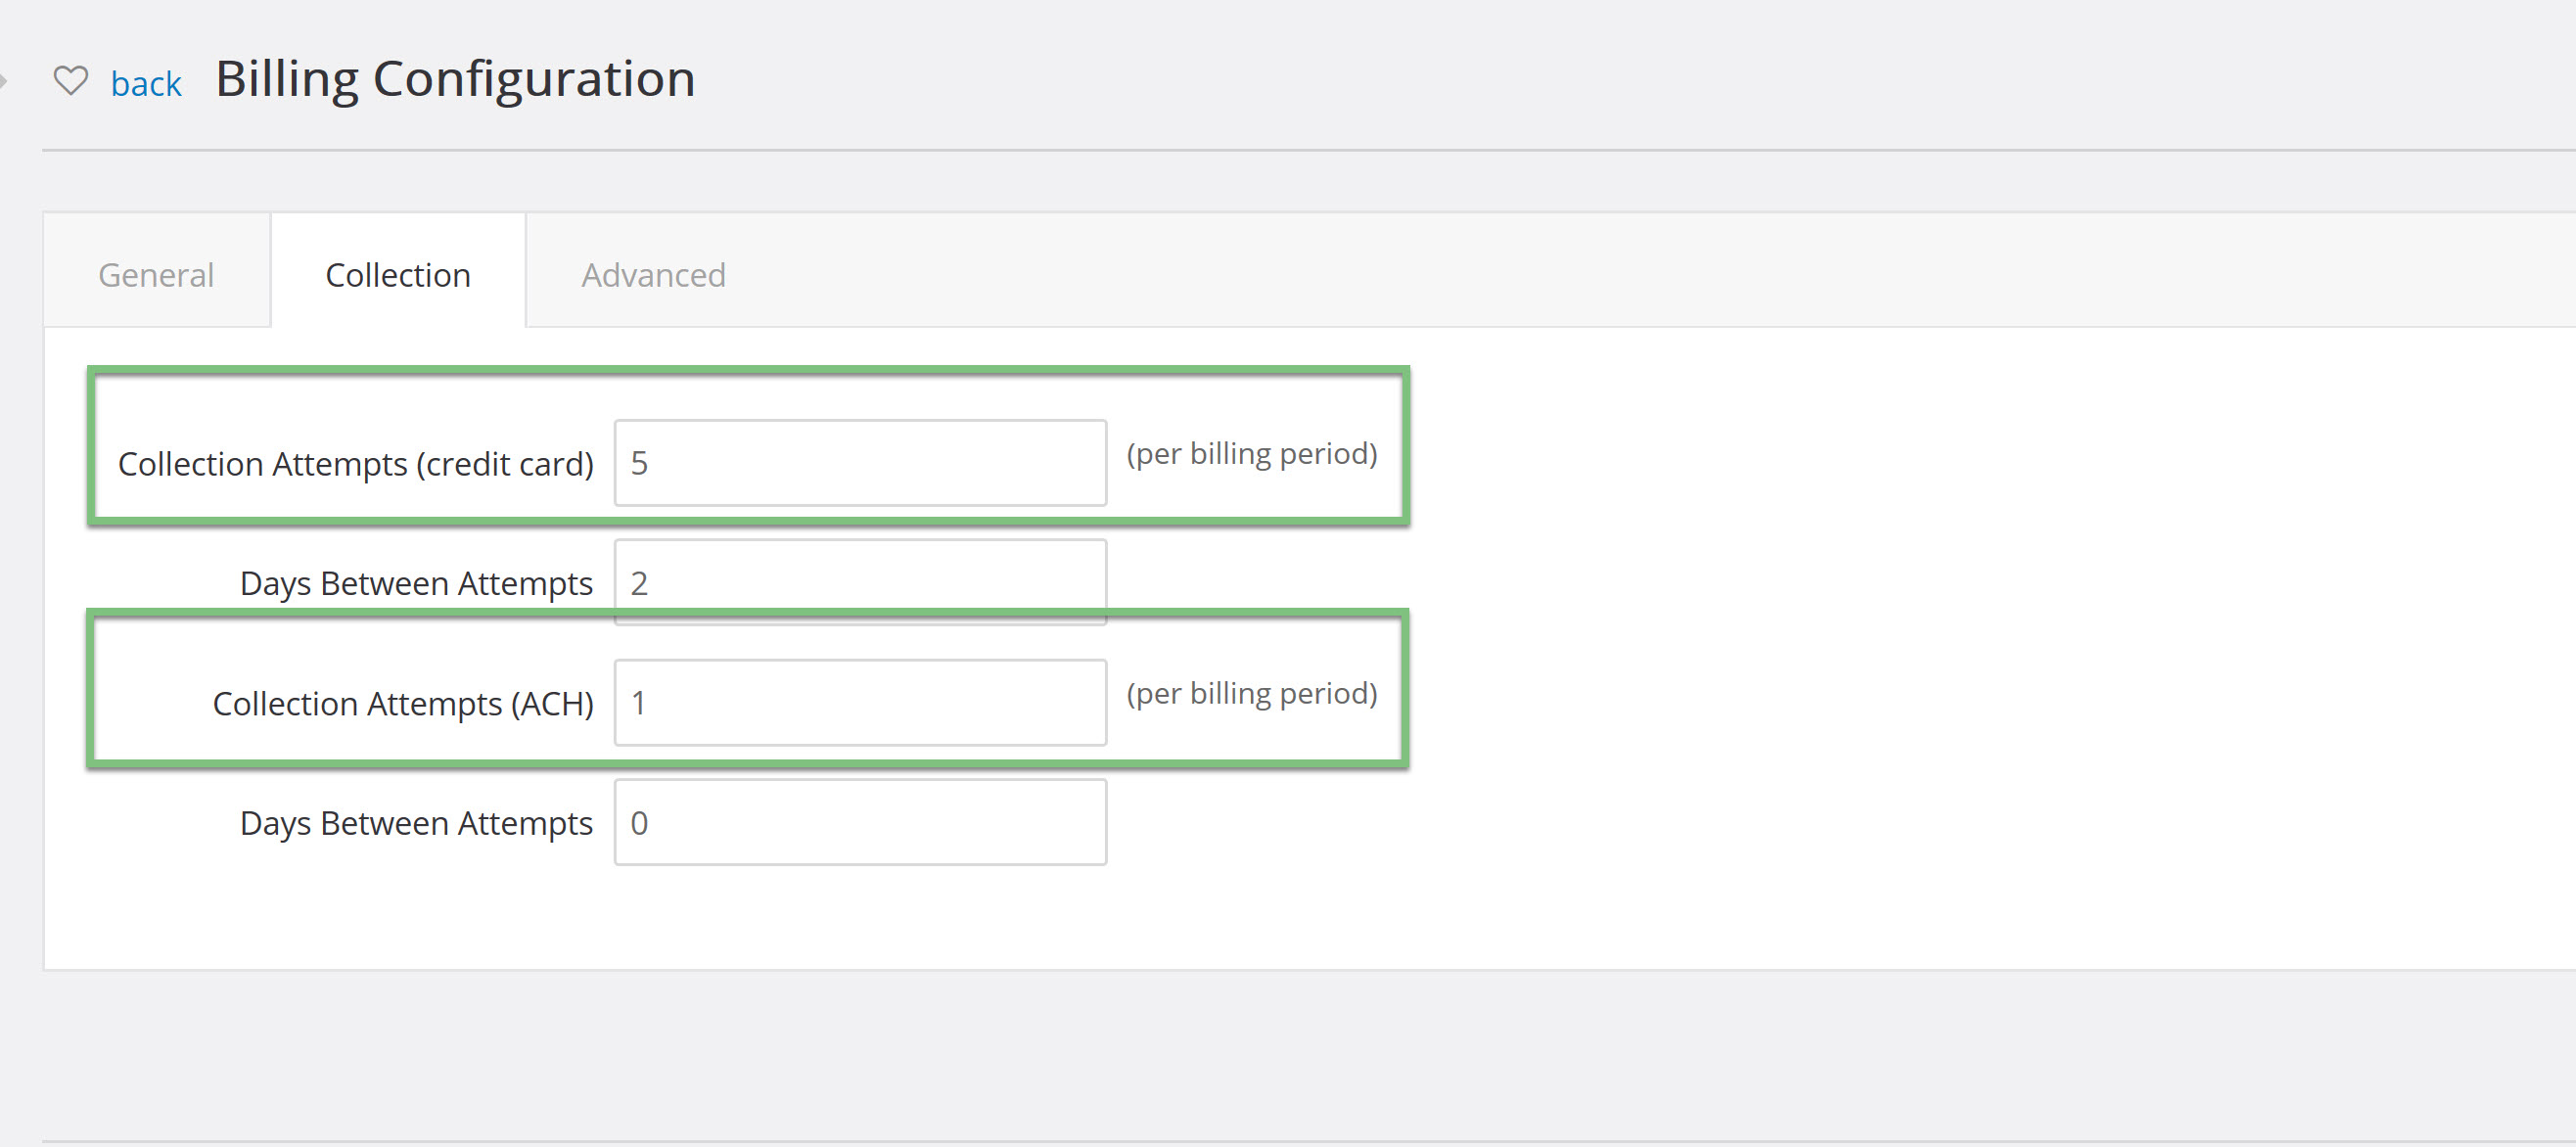
You will also need to configure how many days will pass in between the attempts.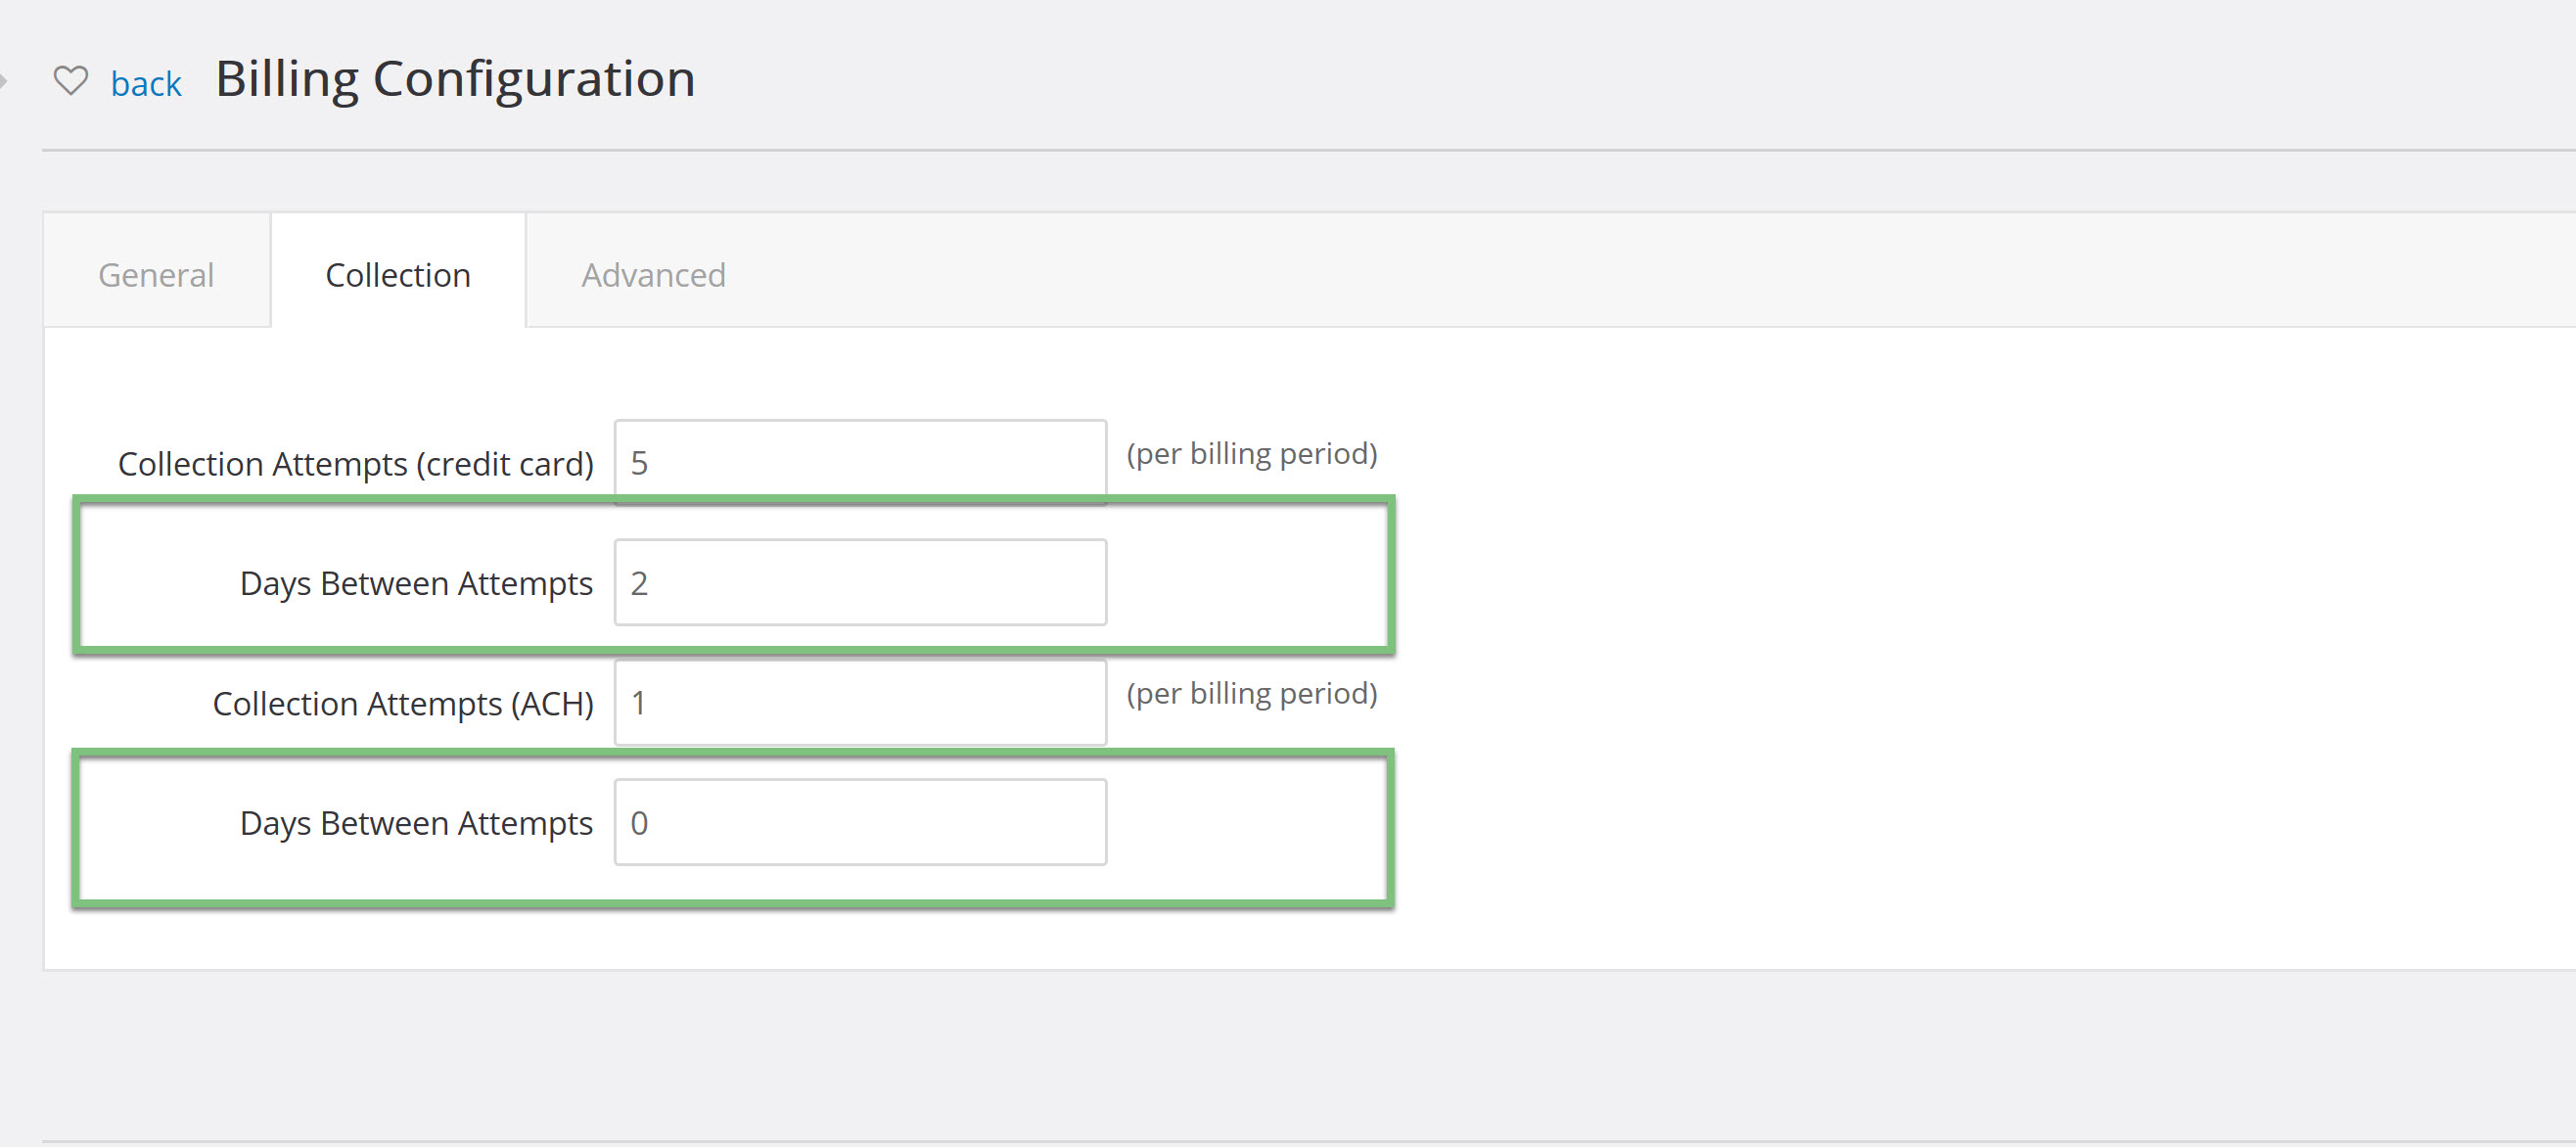
Once your configurations have been made for Billing attempts, you will need to configure your setting for sustainer deactivation.
To configure your auto sustainer deactivation settings, navigate to Configuration > Sustainers > Deactivation. You will need to configure the settings for both Credit Card and ACH, just as you did for the billing configurations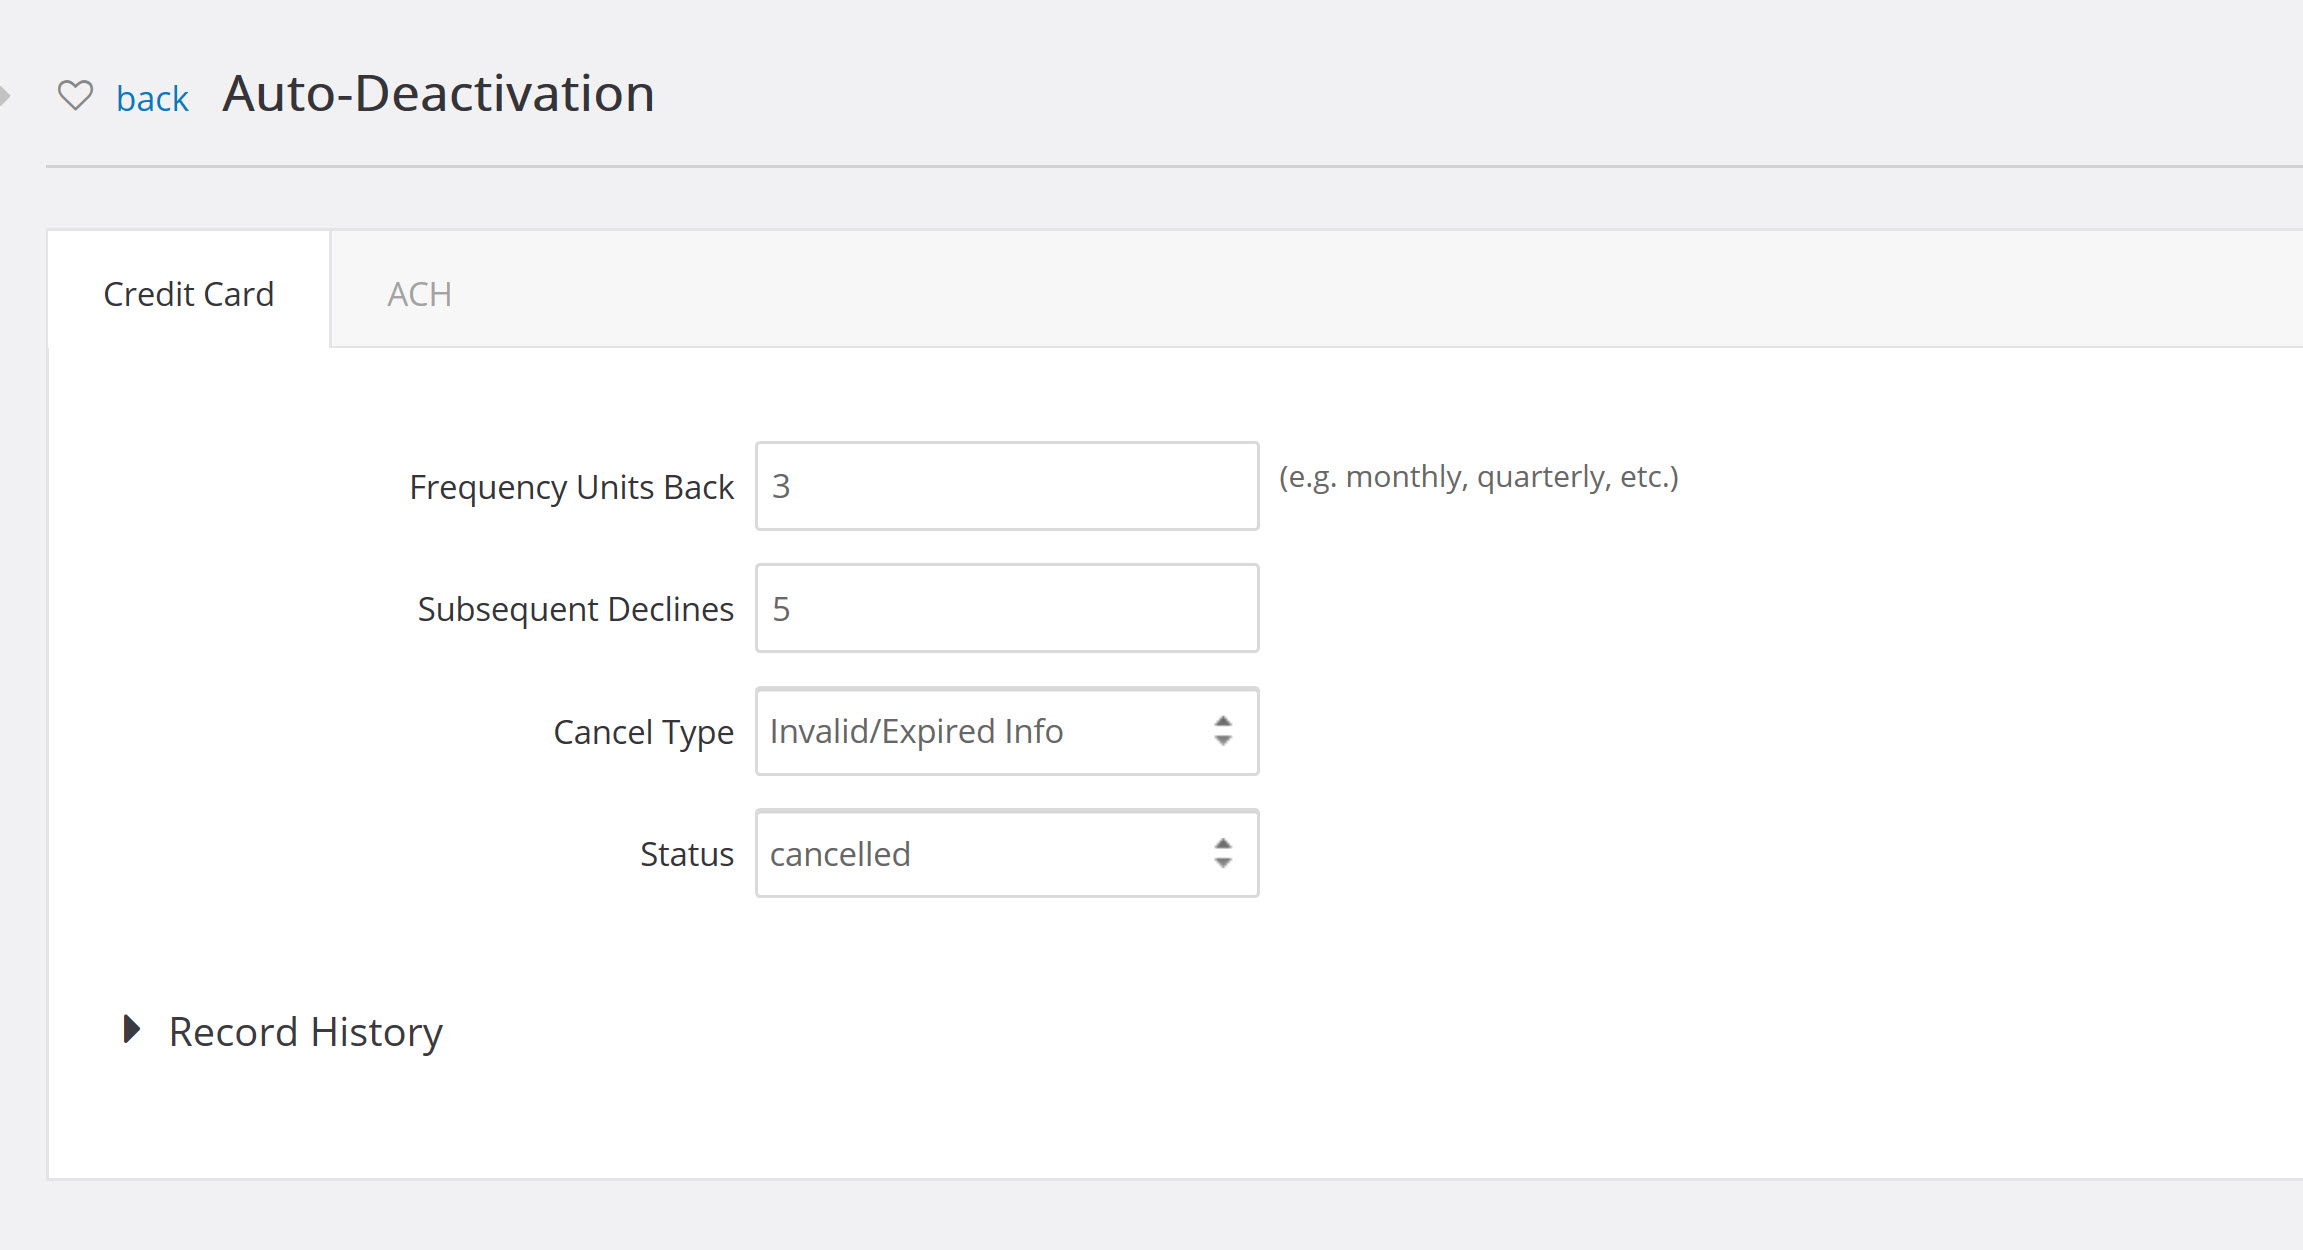
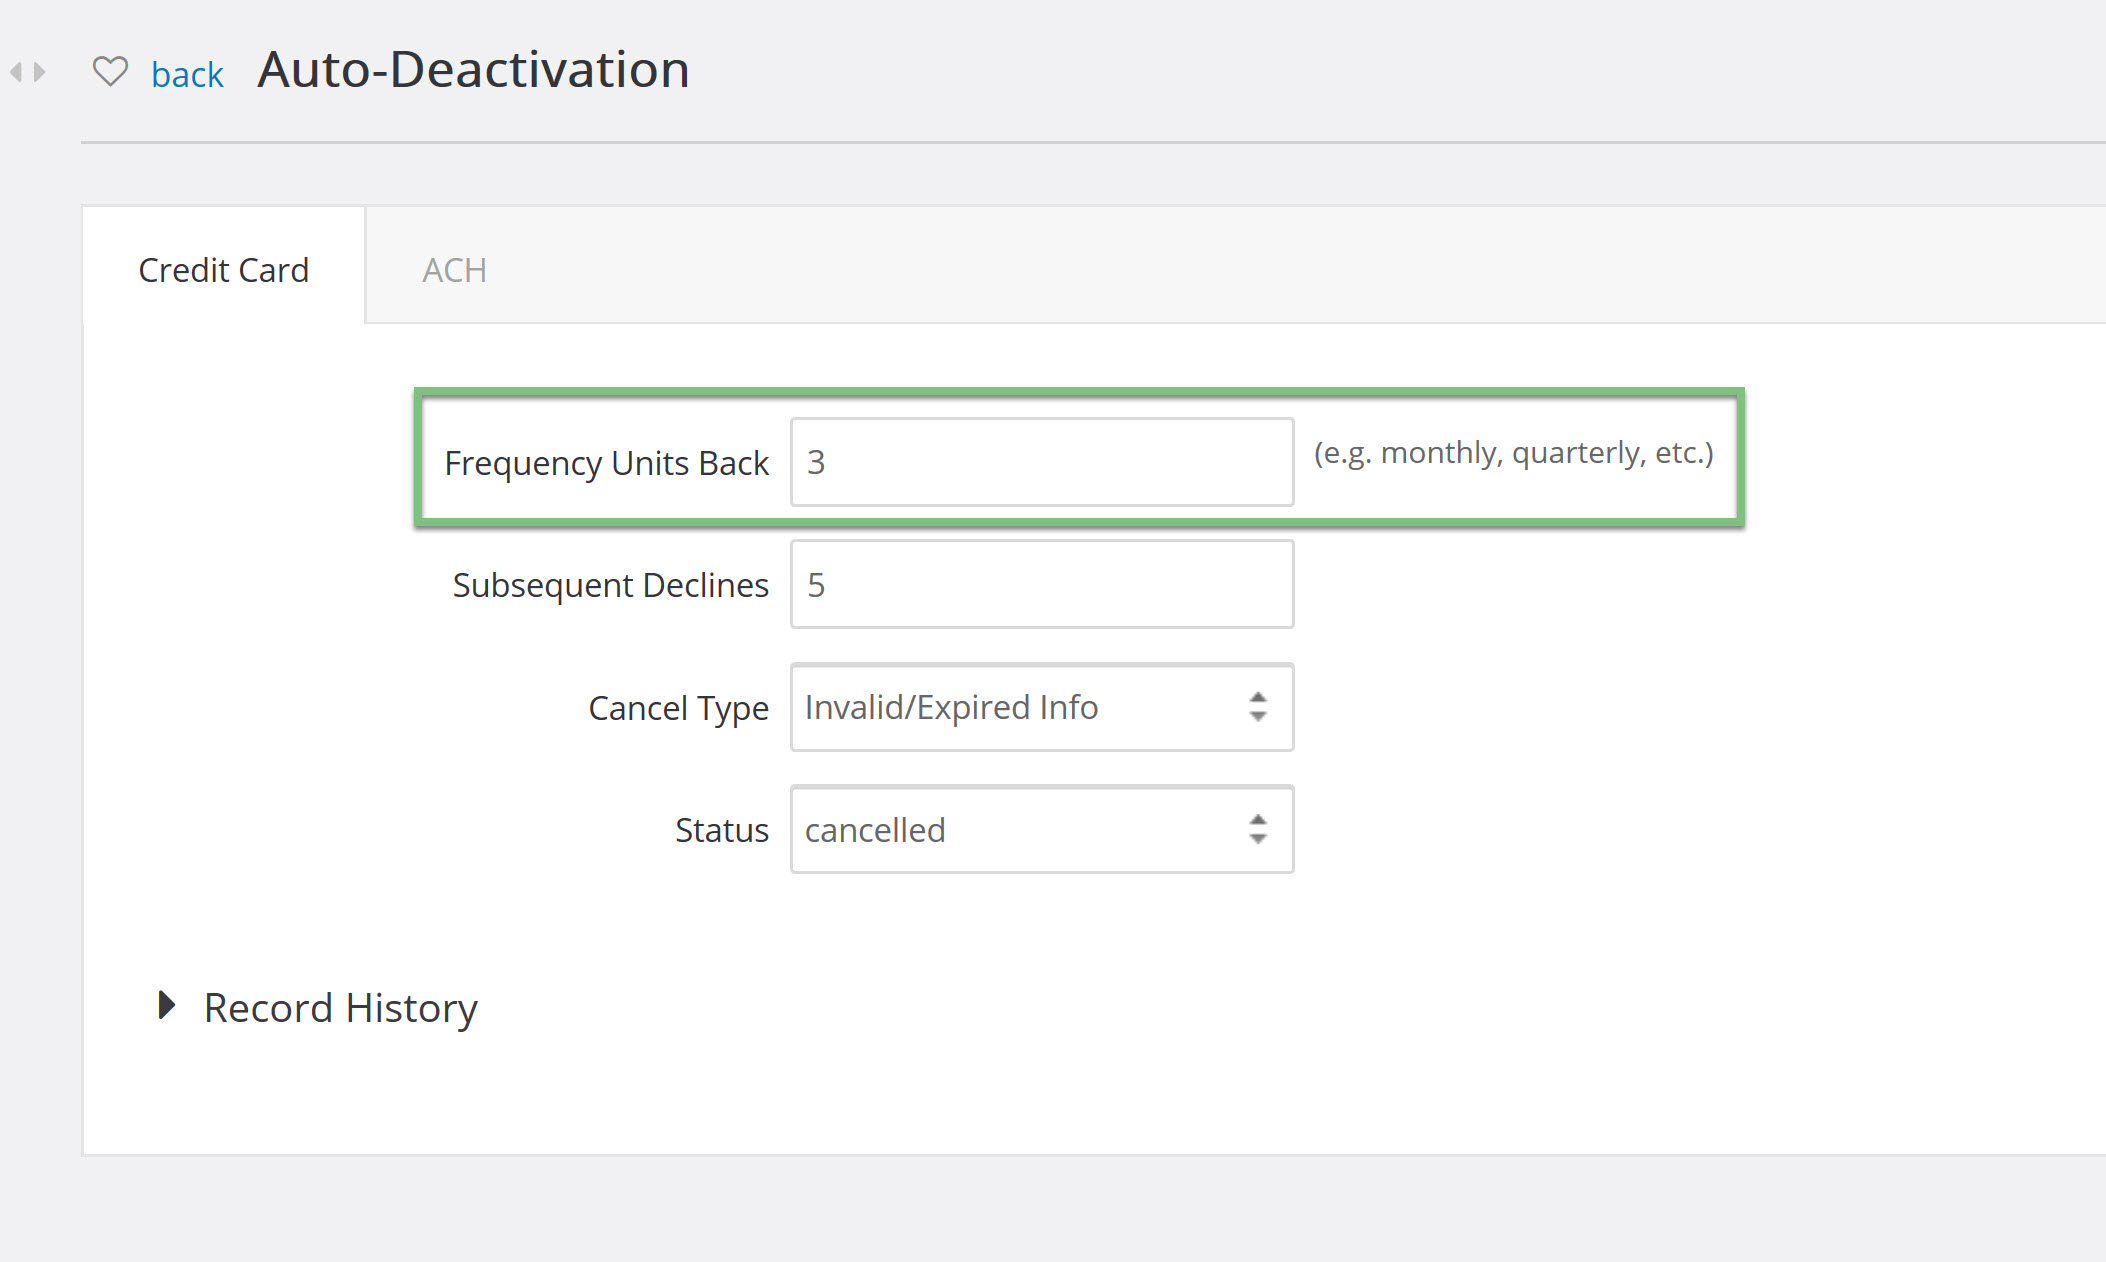
The first setting you need to configure is the frequency. This will determine how far back CharityEngine will look for failed payments. For example, if you want the system to search for the last 3 months, you would enter 3 into the frequency units back. Frequency units refers to the number of invoice/installment periods regardless of the frequency type, meaning if someone is a monthly donor, then the deactivation job would go back three months, if the donor is a quarterly donor then the tool would evaluate on the last three quarters.
Next, you need to determine how many declined payments within the frequency units it will take to auto deactivate the sustainer. 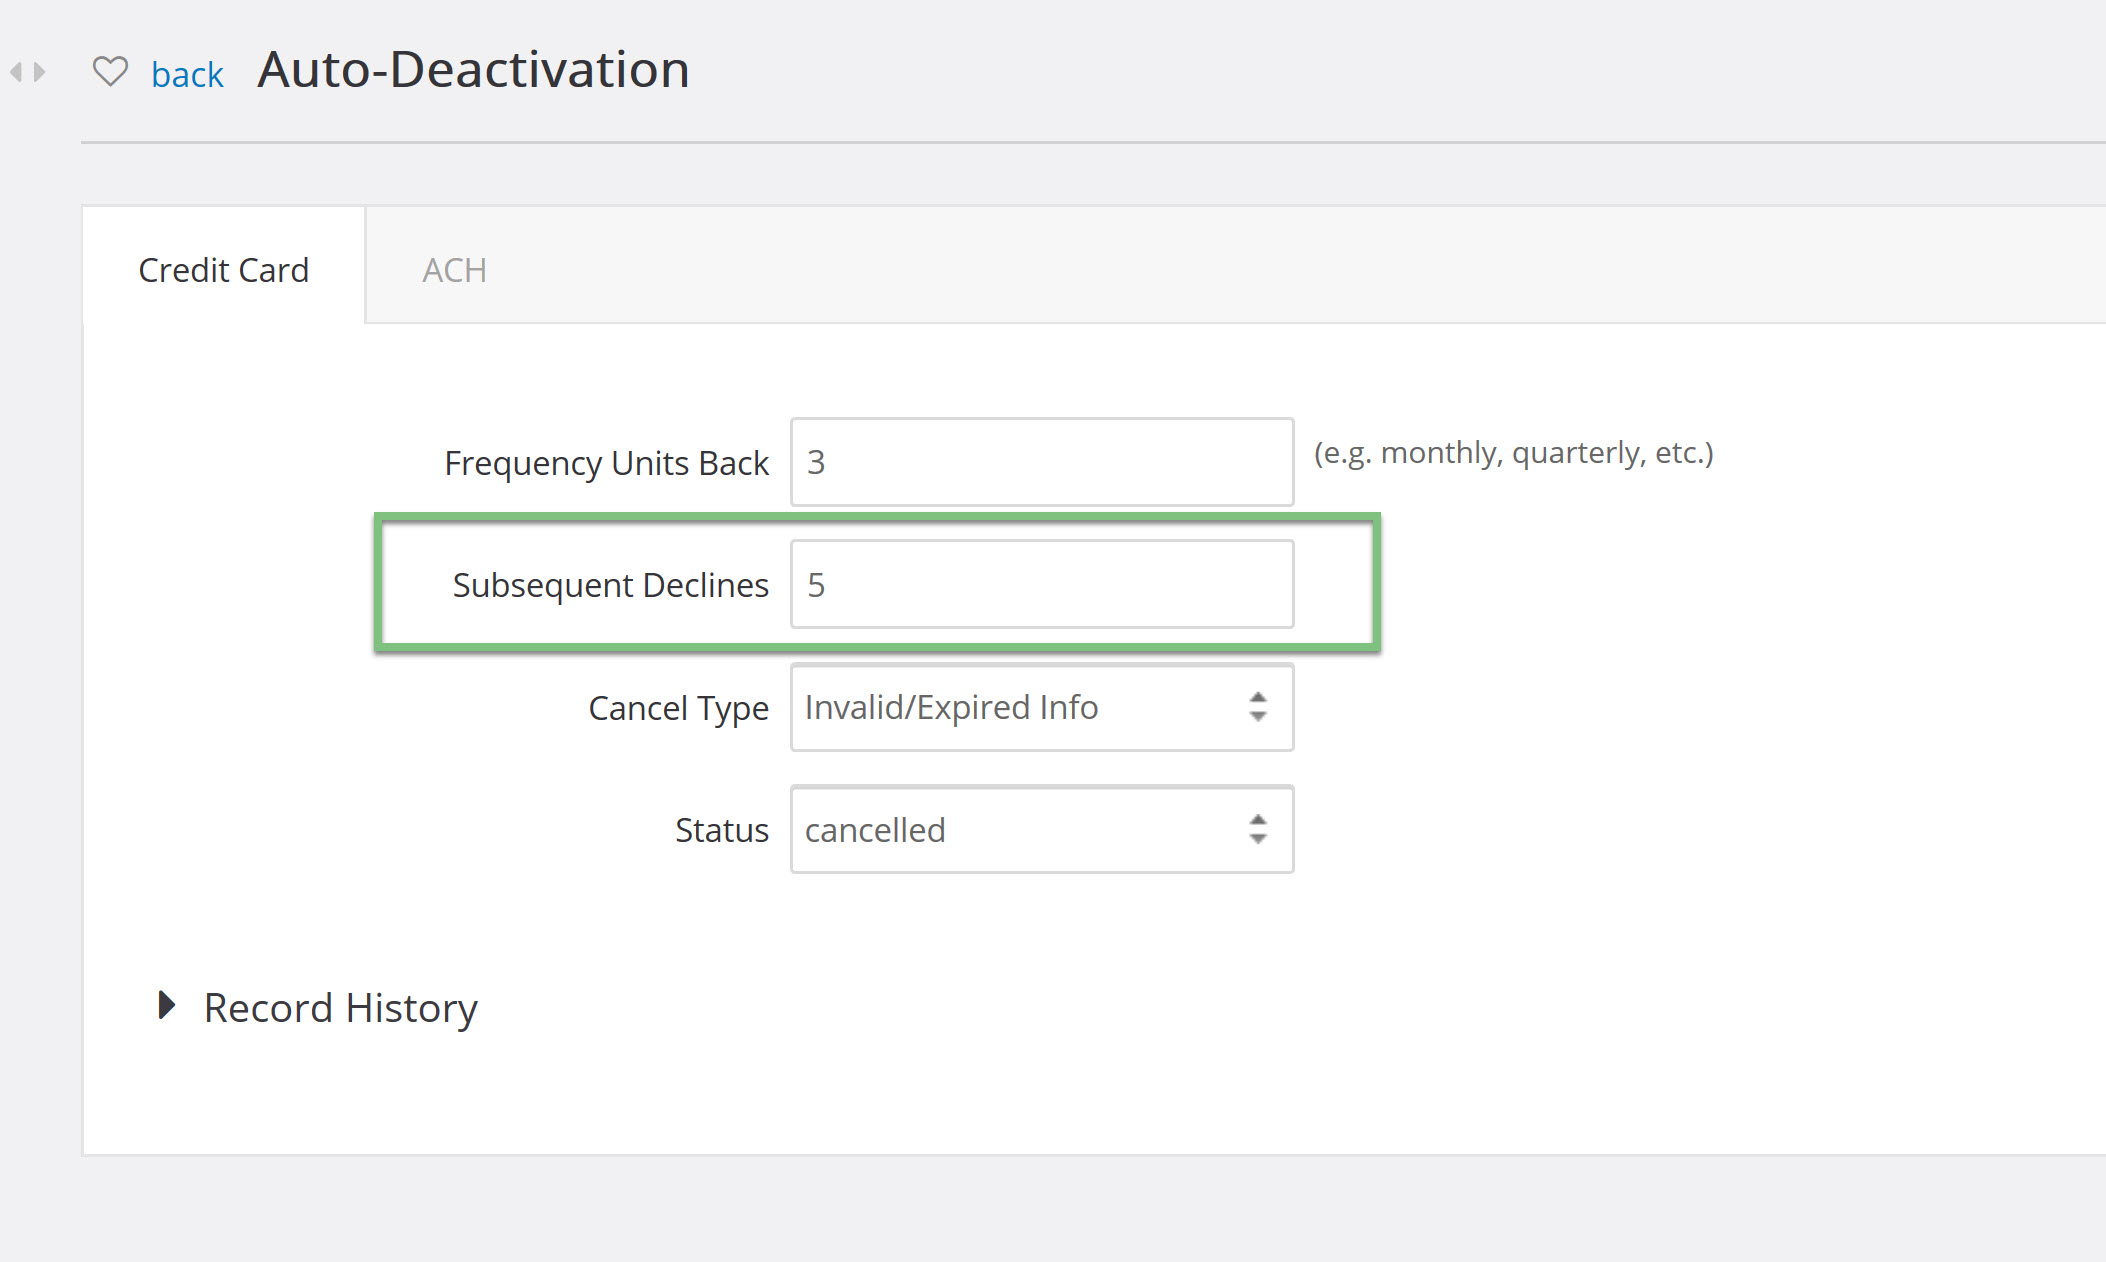
With the above configurations, if a sustainer has had 5 consecutive declined payments within the last 3 months, quarters, years, etc (depending upon their configured frequency), they will be auto deactivated.
Note: The auto deactivation configurations and the billing configurations directly impact each other and for the system to work properly, they must not have conflicting configurations. For example, if your collections attempts are set to 3 attempts in your billing configurations and your subsequent declines
The last configurations that will need to be set are the cancel type and the status. Use the dropdowns to select your type and status.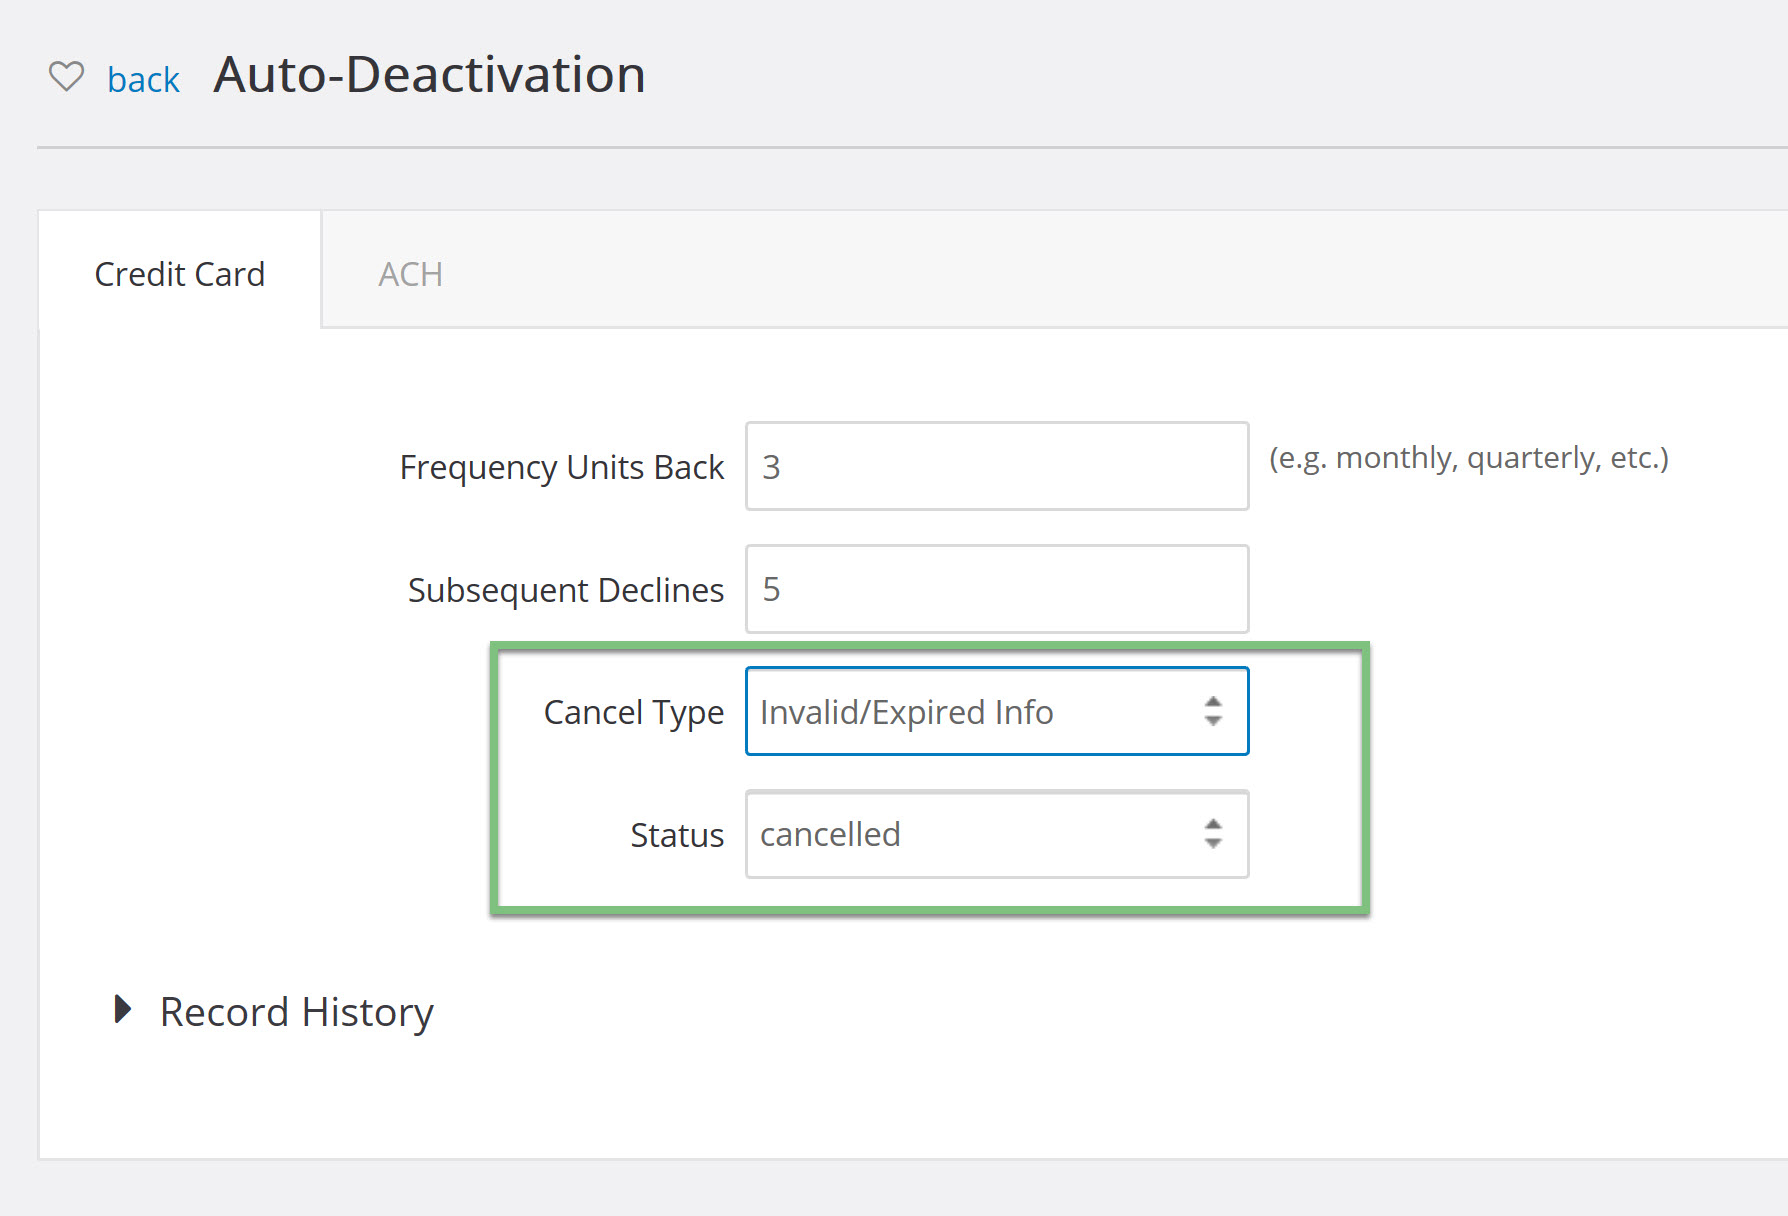
Once you have configured your billing and auto deactivation settings, it is helpful to create a trigger to automatically deactivate the sustainers.
Step 4: Now that the email creative has been created, begin to create the trigger by navigating to the Automation & Workflow App > Workflows > Triggers > Create New > Type: Sustainer Deactivation (auto) > NEXT

Step 5: Add your Date Trigger Job Name (required), adjust start date, email notifications for each job, and adjust the email subject as needed. Click NEXT
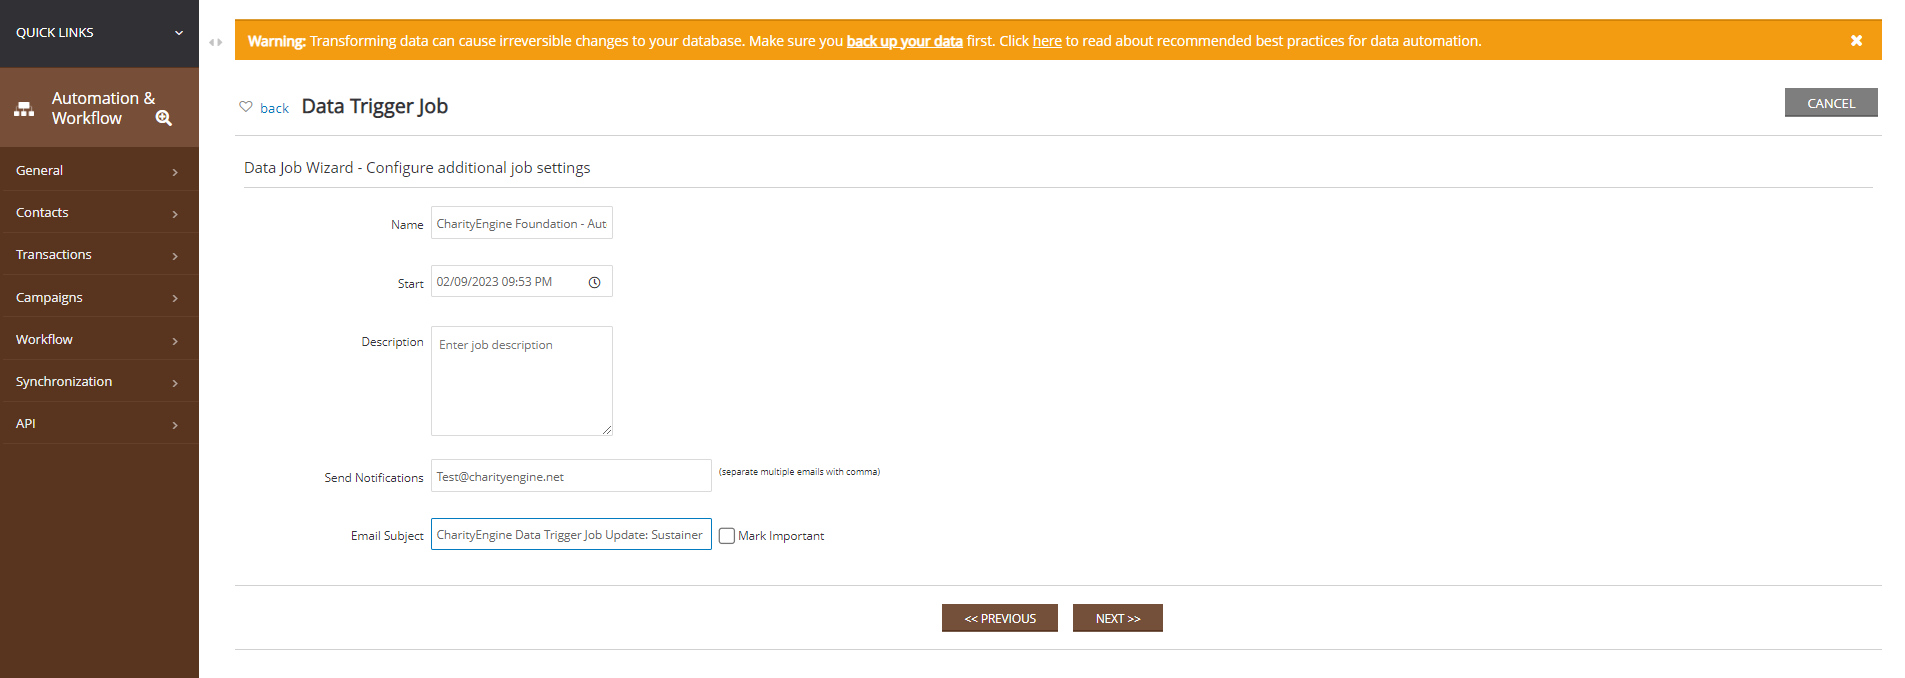
Step 6: Review your job details and click FINISH to initiate the trigger job.
Step 7: You will be navigated to the Workflow Trigger Jobs listing screen. Navigate to ACTIONS > Schedule

Step 8: Enter your Schedule Name (required) and start date. The Data Job will autofill. Click SAVE to secure and expose additional options.
Step 9: Navigate to the Notification tab to update any recipients to receive notification. Then navigate to the Trigger tab to schedule the frequency in which sustainers should be deactivated. In this example, sustainers who failed payment based upon configuration frequency will occur once a week on Mondays at 800am.
Step 10: Click SAVE to secure.

Email Communication - Reactivation for Lapsed Sustainers
Sustainer Re-activation can be needed for several reasons. If a sustainer account has expired or their form of payment has been declined, you may want to attempt to collect for a few months and then cease collection attempts. As a final attempt, you can send them a re-activation email that will provide a link to a re-activation form. The form will allow the sustainer to update any of their information that may have changed and re-activate their account. If no action is taken, the donor's sustainer record will be deactivated systemically for proper reporting and forecasting of future fundraising dollars. This will encourage your sustainer to continue to support your mission.
Step 1: Create your communication by navigating to the Campaign App > Create & Publish > Creative > Create New
Step 2: Create your content
- Note: To recreate the Update Your Payment Information button, highlight the language and navigate to the Content tab > click Special links > select Sustainer Payment Link

Step 3: Click SAVE to secure your changes
Step 4: Create a query to identify deactivated sustainers. Begin by navigating to the Automation & Workflow > General > Queries > Create New > Filter: Donations > Select: Sustainers > click CONTINUE
Step 5: Add the following to your query
- Fields: Sustainer ID, Contact ID, Termination Date
- Filter:
- Active field - Equals "0" (representing inactive)
- Termination Date - Equals "Last 30 Days" (use the beaker icon to select)
- Cancel Type - Equals "Cancelled by system"
The query should appear as below - click SAVE and Name (required) the query.

Step 6: From the SAVE drop down select Automated Email

Step 7: Enter your Name of the schedule (required), enter Dates, and locate/select the Message created in step 1. Click SAVE.

Step 8: Schedule the email communication by navigating to the Trigger tab

Under Campaigns App > Create & Publish > Initiatives to monitor sending performance.
Note: If an initiative returns as Failed, hover over the Failed label to determine reason of failure - this could include no audience members in that daily send.
When your donor receives the Failed Payment Communication Series, the Update Your Payment Information will be linked to the Bill Payment App allowing the donor to self-service and provide updated payment information.

Instructions - Exposing Recurring Frequency on Web Forms
Should the organization wish to expose recurring donations with varying frequency types, users can configure to meet the alignment and needs of the organization.
Step 1: Start by navigating to the Online App > Web Forms > Search & Manage > locate the identified web form > ACTIONS > Manage
Step 2: Navigate to the Layout tab
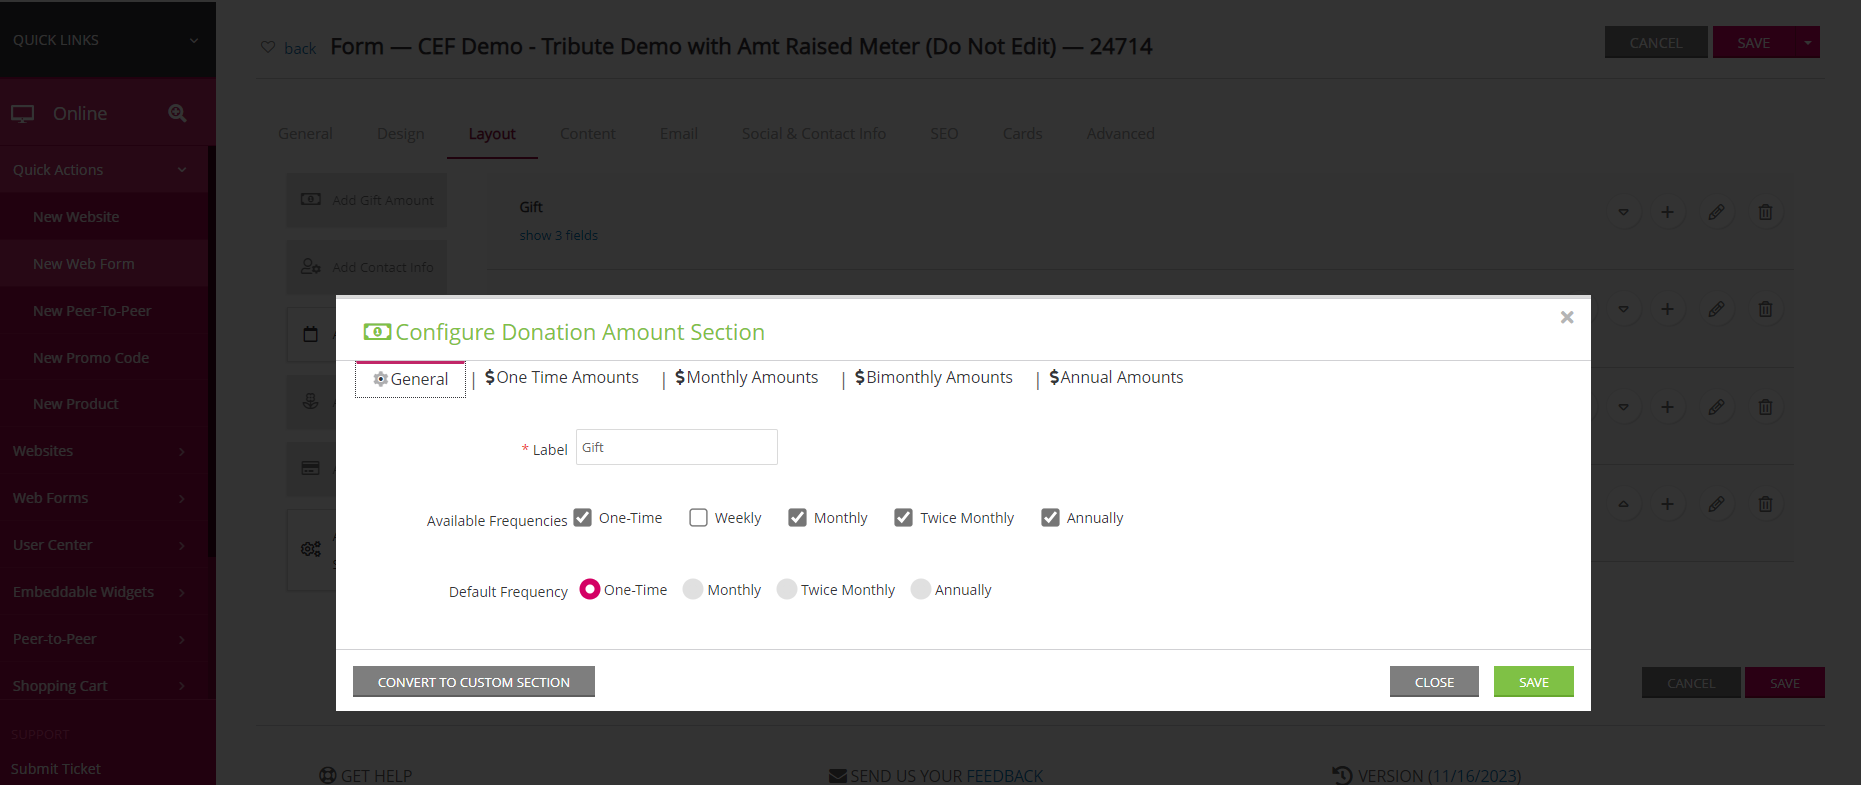
Step 3: Click on the pencil icon within the Gift field box
Step 4: From the General section the user can select all available frequencies of recurring gift types
Step 5: From the subsequent options, create custom gift strings and assign default values
Instructions - Report Builder
Report Builder
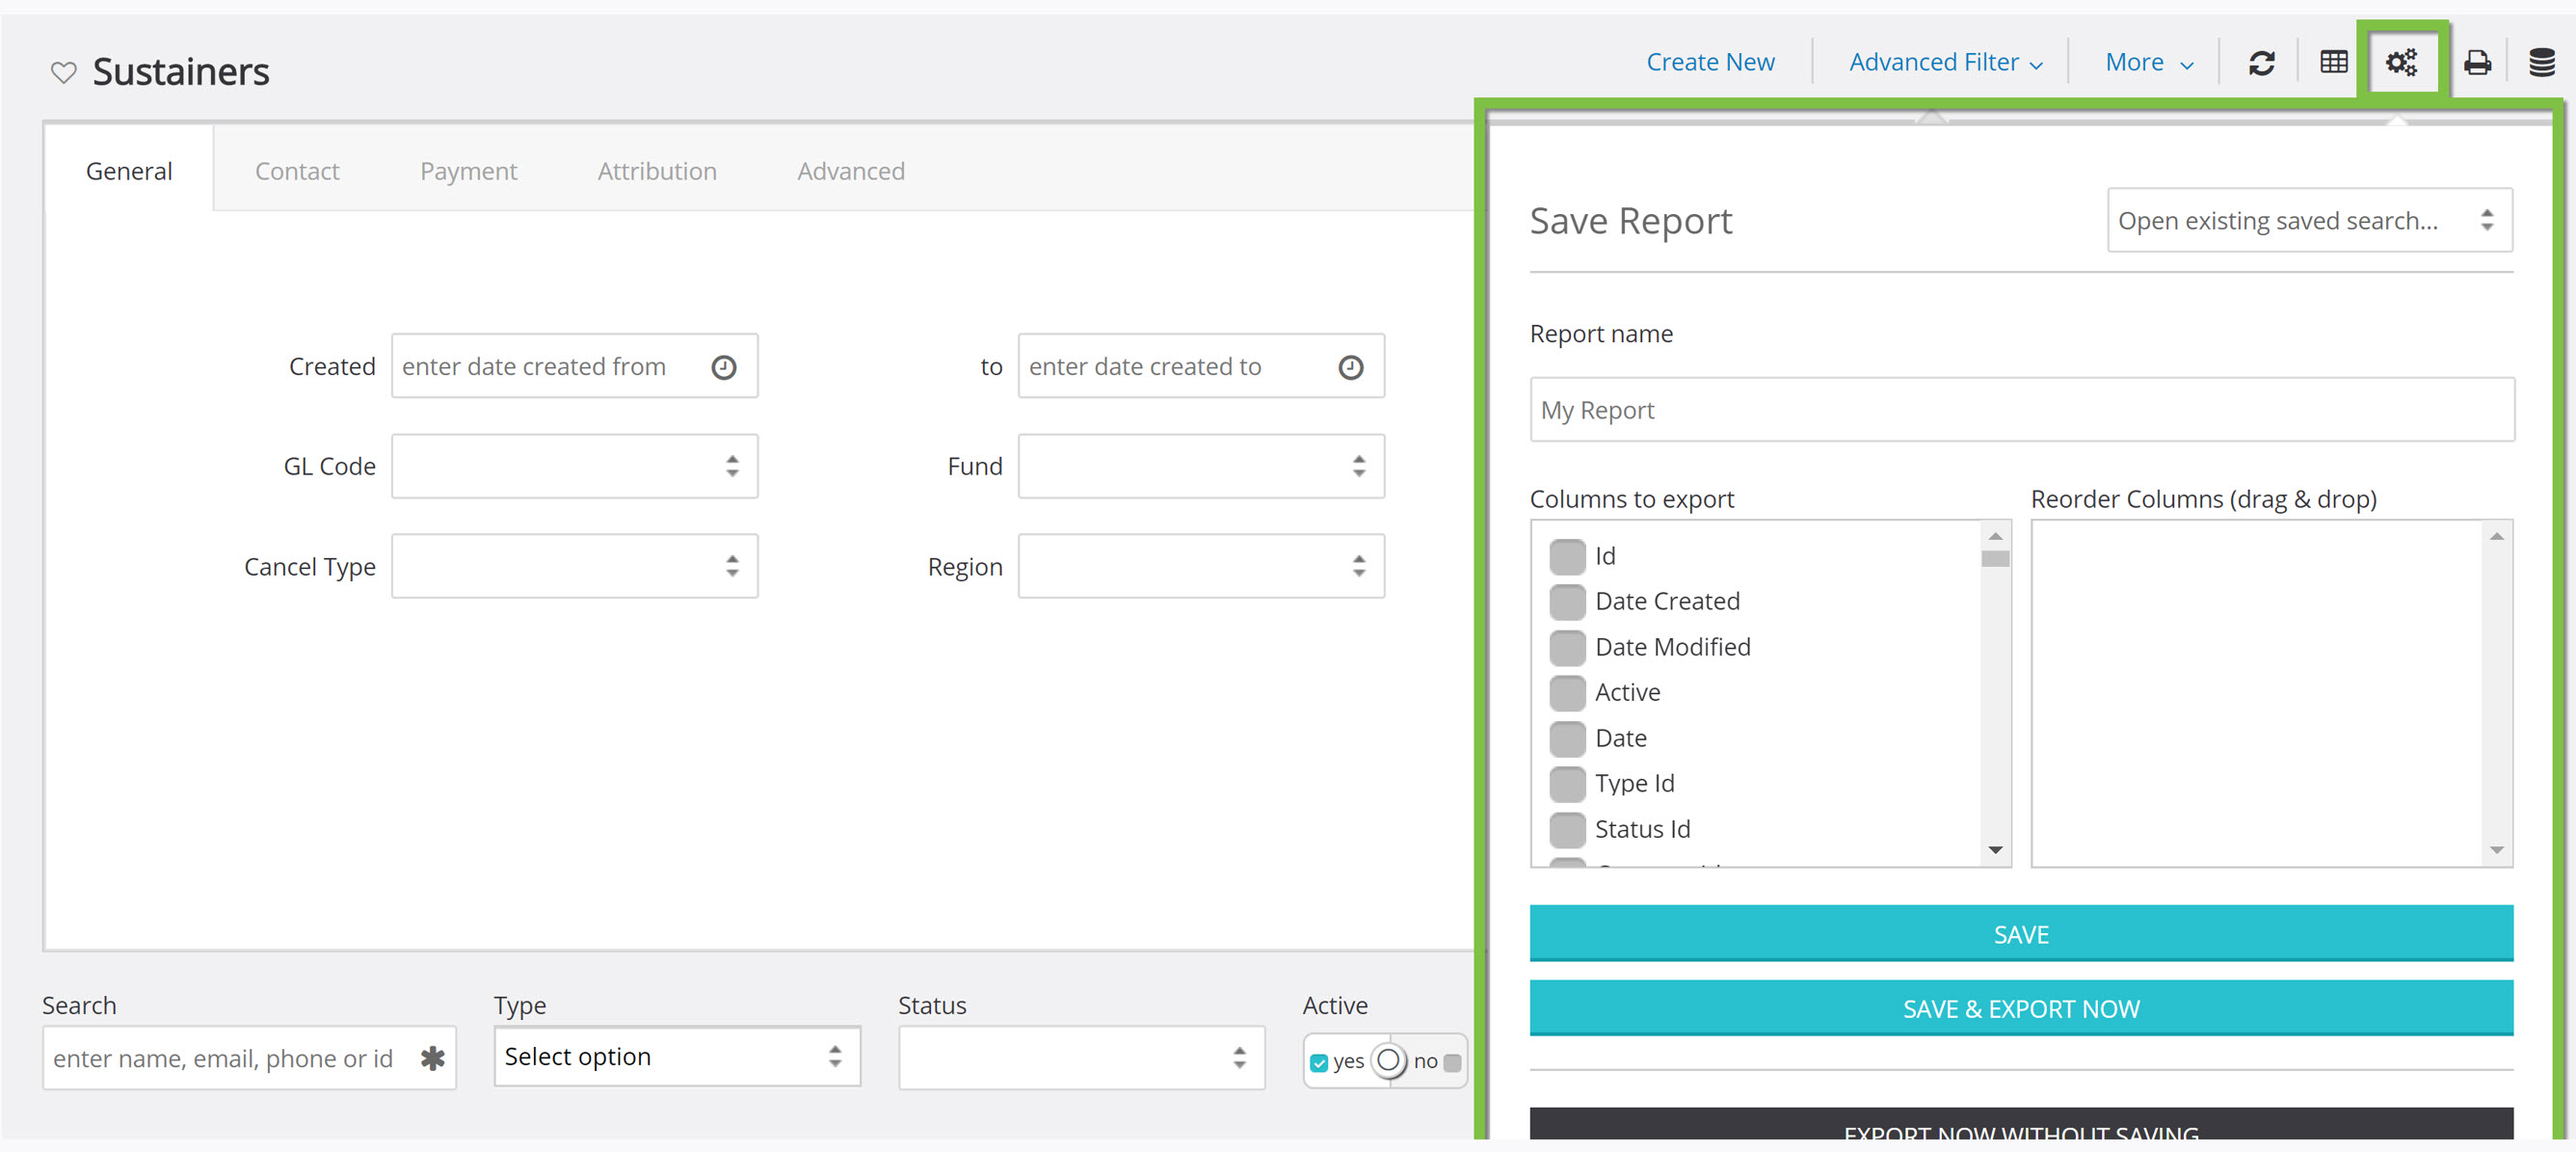
Once Advanced Filters are set, they can be saved for future use in the Report Builder (gear icon labeled below). You can also use Report Builder to make a custom exported report that includes only the fields you want to report on. After saving your report, you can schedule it to be emailed out on an organized basis.
Reporting & Monitoring Tools
There are several tools for monitoring your sustainers. Read more below.
Monitoring invoices/installments
When sustainer accounts have a payment due, an invoice/installment will be created. Monitoring of the invoices/installments is available through the sustainer functionality and can be leveraged for various filter efforts.
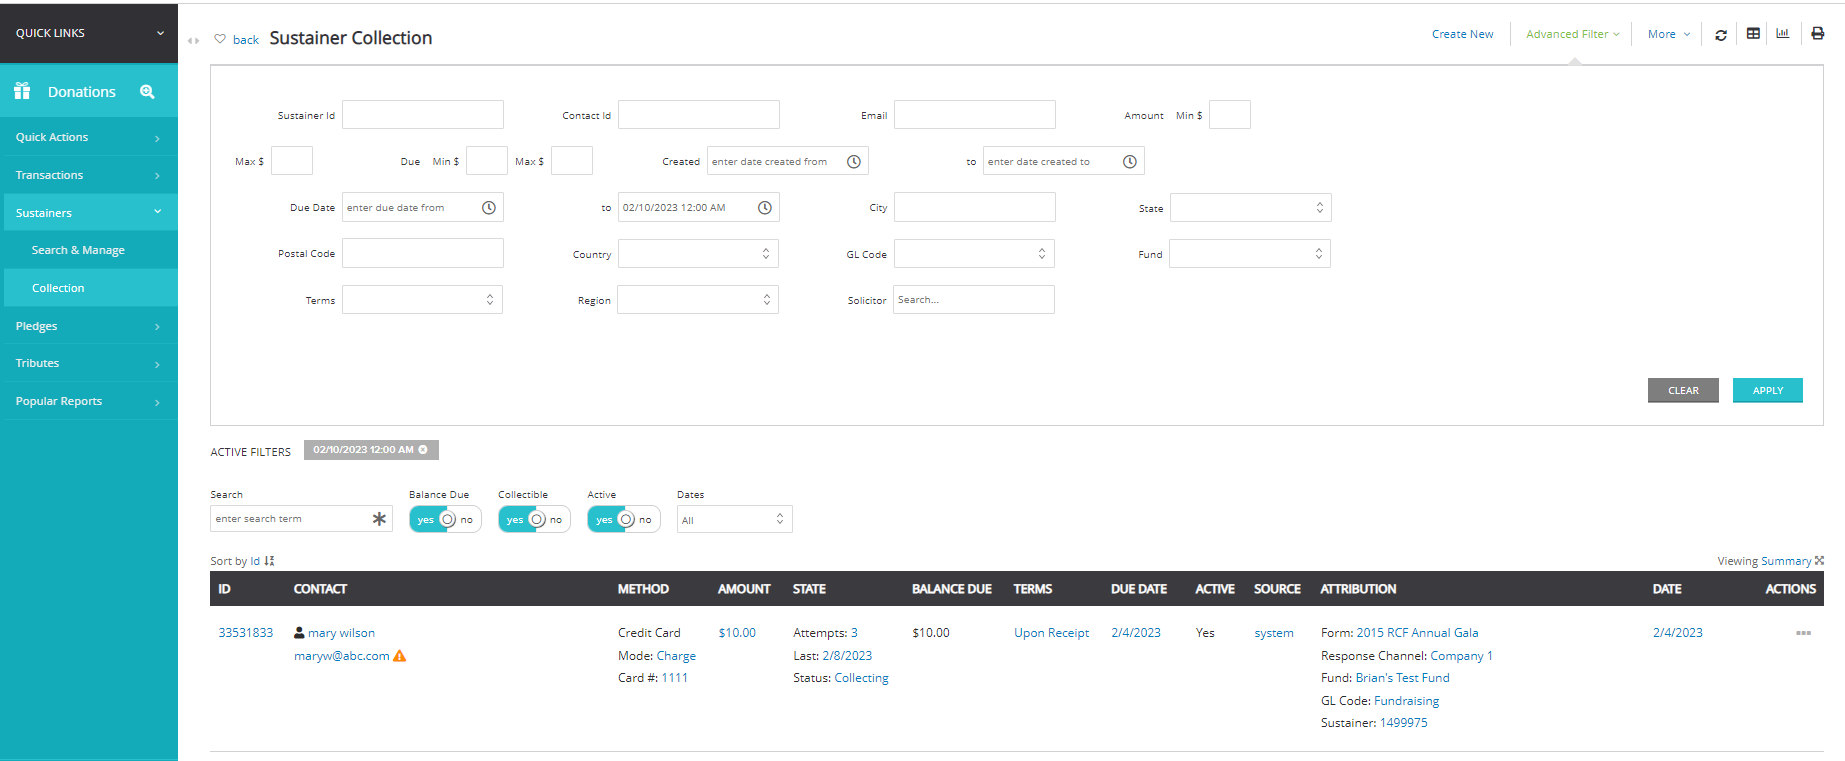
Step 1: Navigate to the Donations App > Sustainers > Collection
From here leverage the:
- Quick Filters:
- Balance Due: Yes, for existing balance or No, invoice/installment paid in full
- Collectable: Yes, open for collection or No, collected
- Active: invoice/installment active and open or No, no longer open
- Advanced Filters - navigate to the top right hand corner for additional filter options
Out-of-Box Reporting: Reports & Analytics - Sustainers
CharityEngine's out-of-box reporting supports a variety of sustainer based reports.
Step 1: Navigate to the Reports & Analytics Apps > Sustainers
Step 2: From here, navigate to a series of available reporting include:
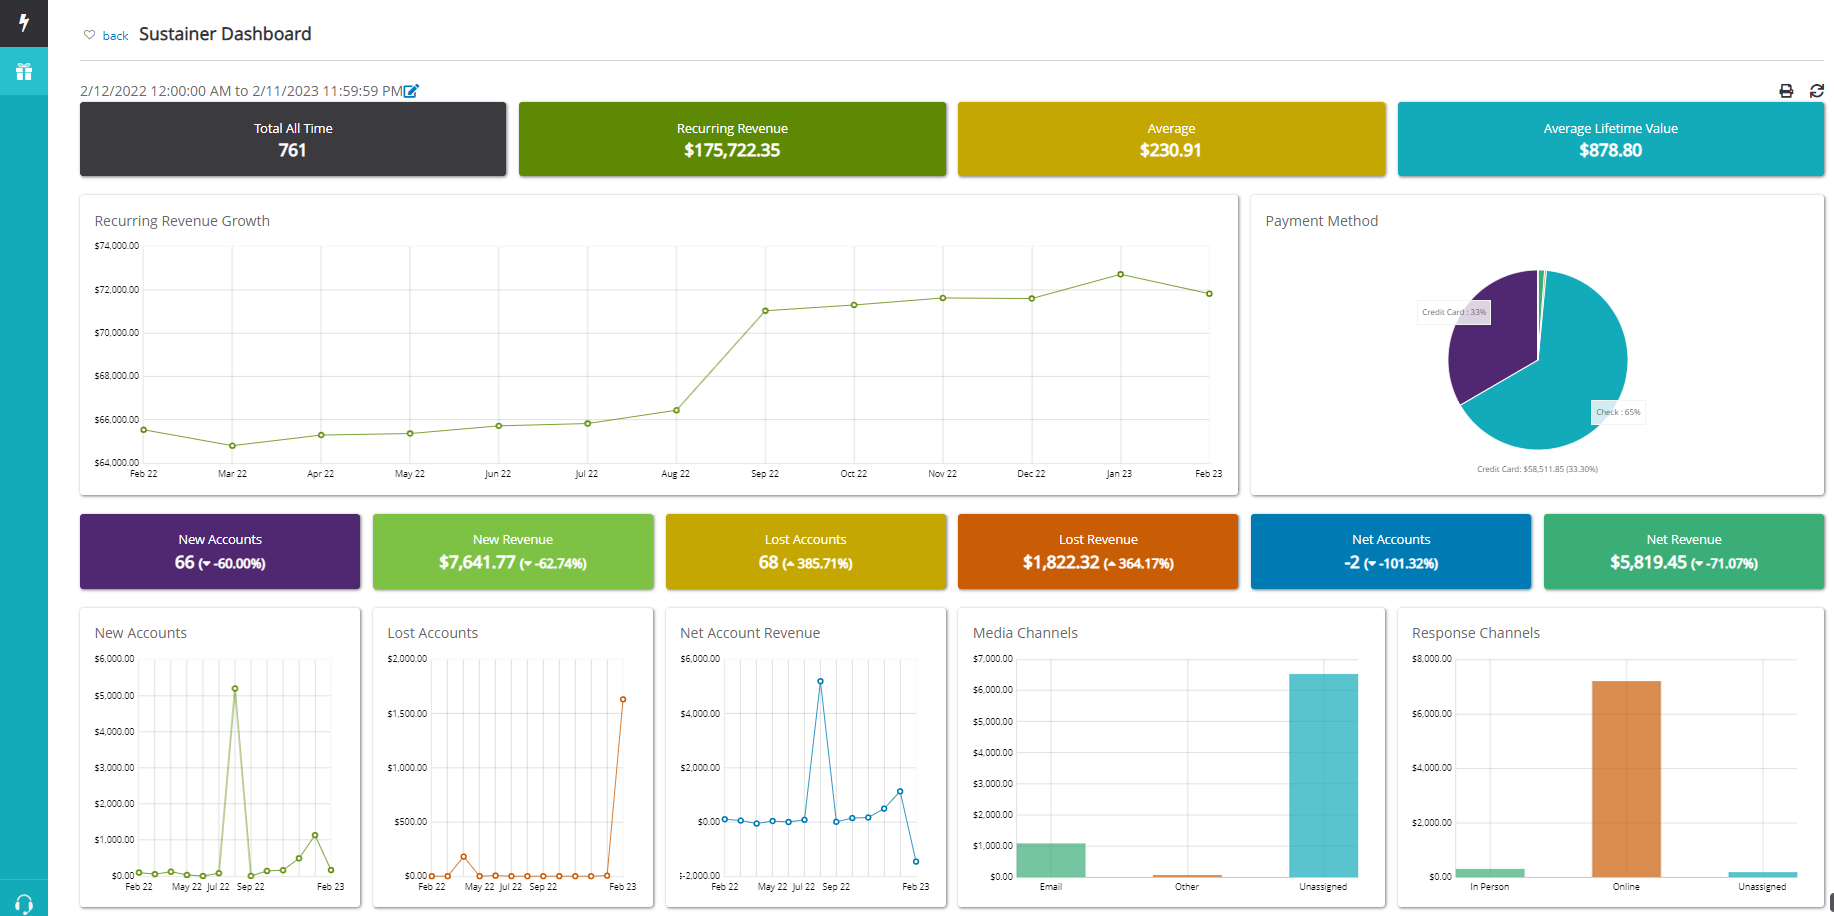
- Sustainer Dashboard - executive summary of sustainer performance over time
- Multiple Accounts - ideal for monitoring of duplicate sustainer accounts and data governance practices
Communication Series
Interested in monitoring the communication series for declined payments and/or deactivation emails?
Step 1: To evaluate email initiative statistics, navigate to the Campaigns App > Create & Publish > Initiatives > Advanced Filter > Creative > locate the creative for the declined payment or the deactivated sustainer
FAQs & Additional Reading
Q. I am using an email creative and am using the Special Link feature. Which option do I select to allow the donor to make a payment or update their payment details?
A. Using the appropriate special link requires alignment with your audience source (query or report). Please follow these guidelines when using payment special links:
| Special Link | When to Use | Audience Source |
| "Sustainer Payment Link" | Donor updating sustainer account payment details | Automation & Workflow > General > Queries > Create New > Filter: Donation > Select: Sustainers Ensure "Sustainer ID" is within query for reference in communication series |
| "Membership Payment Link" | Donor updating membership account payment details | Automation & Workflow > General > Queries > Create New > Filter: Donation > Select: Memberships Ensure "Membership ID" is within query for reference in communication series |
| "Pledge Payment Link" | Donor updating pledge account payment details | Automation & Workflow > General > Queries > Create New > Filter: Donation > Select: Pledges Ensure "Pledge ID" is within query for reference in communication series |
| "Invoice Payment Link" | Donor updating an invoice/installment for sustainer, pledge. Donor has option to update payment for one invoice with an option to apply payment details to all future invoices. |
Automation & Workflow > General > Queries > Create New > Filter: Donation > Select: Invoices Ensure "Invoice ID" is within query for reference in communication series |
Q. Can a user overcharge a donor when adding a new invoice?
A. No. There are fail-safes in place to ensure that a donor is not charged for more than that total value of their pledge commitment.

